Choosing the Best Photos for Your 3D Custom Pet Sculpture
The iPhone slipped from my hand onto the carpet, screen still glowing with the last photo I took of Buster. It wasn’t the perfect portrait I had envisioned for the mantelpiece—his ears were back, his eyes were half-closed, and there was a blurry squeaky toy exiting the frame to the left. But it was him. That chaotic energy, the slight underbite that only showed when he was truly excited, the specific way his fur tufted around his collar. Most people think 3D modeling relies on technical perfection—a perfectly lit, studio-quality stack of images. But after spending over a decade in additive manufacturing and digital sculpting, I can tell you that the "perfect" photo often makes for a lifeless statue. We aren't just printing plastic; we are trying to capture a soul in resin.
Quick Takeaways:
- Volume beats perfection: We need 360-degree coverage more than we need one high-resolution glamour shot.
- The "T-Pose" myth: Don't force your pet into unnatural poses; natural posture creates better structural integrity in the print.
- Lighting is geometry: Shadows hide details. Overcast daylight reveals the true texture of fur for sculpting.
- Eye level is critical: Photos taken from standing height distort proportions (making heads huge and paws tiny). Get on the floor.
The Engineering Behind the Art: Why Photos Matter More Than You Think
Most customers assume we feed photos into a magical machine that spits out a statue. If only it were that simple. What actually happens is a translation process where a human digital sculptor interprets 2D pixels into 3D geometry.
When you send us a photo, you see a cute dog. We see topography.
In the world of SLA (Stereolithography) or MSLA (Masked Stereolithography), which are the resin printing technologies we use for high-fidelity figures, every micron matters. We are dealing with layer heights often between 0.03mm and 0.05mm. That’s thinner than a human hair. If your photo is blurry around the snout, the sculptor has to guess the depth of the nose bridge. If they guess wrong, the light hits the final painted model differently than it hit your real dog, and suddenly, the statue looks like "a dog," but not your dog.
We need to see the "landmarks" of the face—the specific ridges above the eyes, the width of the stop (where the muzzle meets the forehead), and the exact set of the ears. A single photo taken with a wide-angle lens (like a standard phone camera up close) distorts these landmarks, creating a "fish-eye" effect that ruins the likeness.
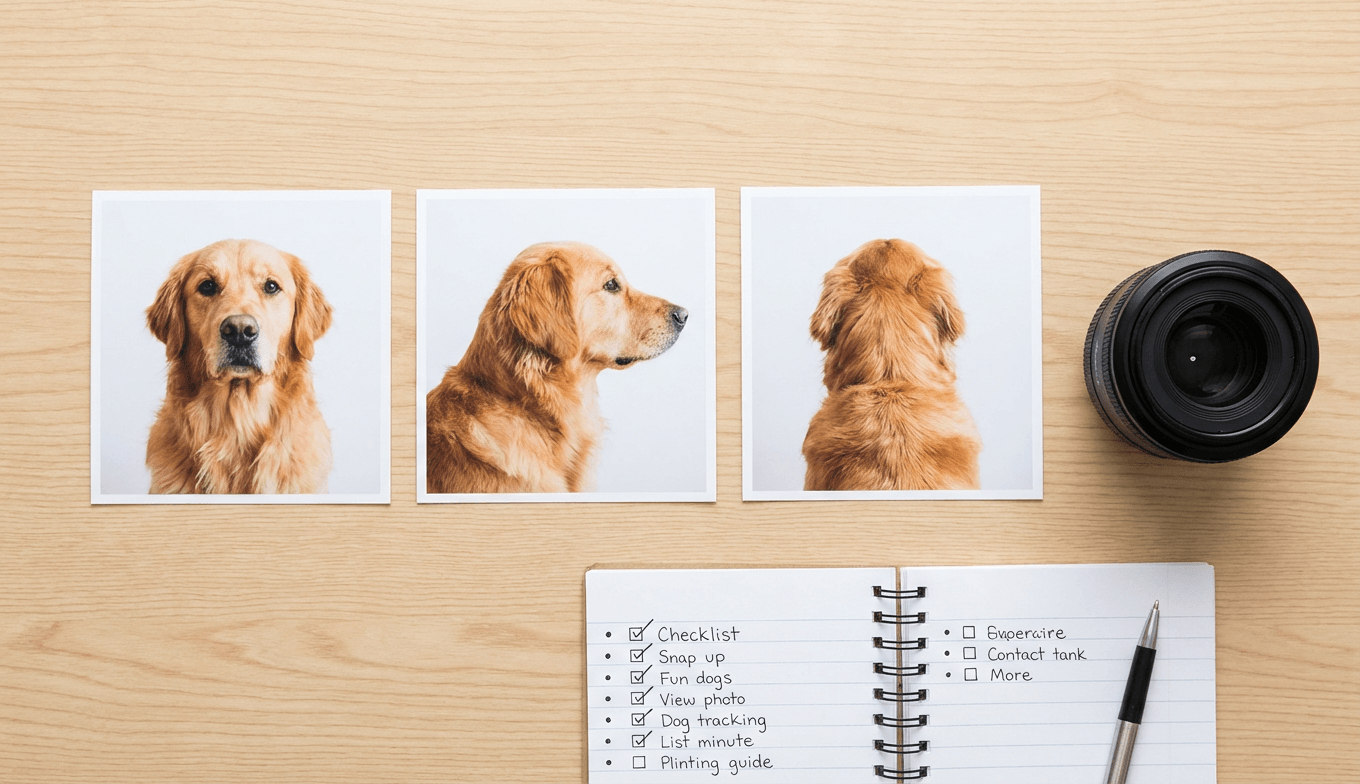
The "Hero Shot" vs. The Reference Deck
- The pet sleeping (cute, but useless for anatomy).
- The pet begging for food (looking up, which distorts the neck).
- A blurry action shot at the park.
While these are emotionally valuable, they are structurally insufficient. To build a digital armature—the virtual skeleton inside the model—we need a "Reference Deck."
Think of your pet as a complex landscape. We need to map it.
The Eye-Level Rule
Get on the floor. Seriously. Lie on your stomach if you have to. When you shoot from above, the head looks massive and the legs look like tiny toothpicks. This foreshortening is a nightmare for sculptors. We need photos taken at the pet's eye level to understand the true length of the legs and the depth of the chest. A clear profile shot (side view) taken at eye level is the single most valuable asset you can give us. It defines the silhouette.
The Lighting Trap
Harsh sunlight creates hard shadows. If one side of your cat’s face is pitch black in shadow, we can’t see the texture of the fur or the shape of the cheekbone. The best photos are taken on an overcast day or in a bright room with indirect light. This "flat" lighting might look boring on Instagram, but it’s gold for 3D modeling because it reveals surface detail without hiding geometry in the dark.
Understanding Fur Texture and "Noise"
One of the hardest things to translate from a photo to a 3D print is fur. In a photo, fur is color and light. On a statue, fur is physical texture—peaks and valleys.
If you have a black dog or a white cat, you probably know the struggle of photography. Exposure blows out white fur into a glowing blob, or crushes black fur into a void. For these pets, we need photos where the light catches the "sheen" of the coat. This helps us understand the "grain" or direction of the fur growth.
When we print, we have to consider "island detection." In resin printing, every new layer must attach to the previous one. If we sculpt a tiny, flying wisp of fur that isn't connected to the main body, it will fail during the print process, sticking to the FEP film (the bottom of the resin vat) rather than the model. We have to stylize the fur slightly to ensure it’s printable. We group fur into "clumps" or masses rather than individual strands. Your photos need to show us how your pet’s fur naturally clumps together—around the neck ruff, behind the ears, or on the tail.
Posture and the "Suction Cup" Effect
This is where the engineer in me overrides the artist. You might want a sculpture of your dog mid-jump, catching a frisbee. It’s a dynamic, beautiful idea. It’s also a structural risk.
In resin printing, we battle gravity and suction forces. As the build plate lifts out of the resin vat, the new layer fights the suction of the film below it. A model with a huge, heavy upper body supported by one thin leg (like a jumping dog) is prone to warping or snapping during the print process.
We can mitigate this with support structures—those scaffolding-like pillars you see on raw 3D prints—but supports leave tiny marks that have to be sanded and filled. The more complex the gravity-defying pose, the more supports we need, and the more post-processing is required. This increases the chance of surface imperfections.
The "Tripod" Principle
The most durable and timeless poses are grounded. Sitting, lying down, or a "stack" (standing on all four legs). These poses allow us to hollow the model effectively. Hollowing is crucial—a solid block of resin is heavy, expensive, and prone to cracking over time as uncured resin trapped inside creates gas pressure. We need to hollow the model and place "drain holes" (usually hidden under the paws or belly) to let the liquid resin escape. A grounded pose gives us plenty of hidden spots for these necessary engineering features.
A customer once insisted on a sculpture of her Greyhound in a full sprint, only one paw touching the ground. We did it, but it required a steel rod insert for stability and extensive internal support trusses. It was a marvel of engineering, but for most custom figurines, a seated pose captures the dignity of the animal and ensures the statue will last for decades without warping.
Capturing the "Micro-Expressions"
Here is the "aha" moment for getting a likeness that makes you cry (in a good way): It’s not about the shape of the head; it’s about the tension in the mouth.
Dogs and cats carry so much emotion in the corners of their mouths and the position of their ears. A "relaxed" ear is different from a "listening" ear. A mouth that is slightly open when panting changes the shape of the cheeks.
When you are gathering photos, look for the "in-between" moments. Not the wide-mouthed pant, and not the closed-mouth sleep. Look for the alert, closed-mouth expression where the lips are slightly relaxed. This gives the sculptor the best baseline for the face. If we sculpt the mouth open, we have to model the teeth and tongue. While we can do this, painting the inside of a 1:6 scale mouth is incredibly difficult, and teeth often look uncanny on a small scale. A closed or slightly parted mouth usually yields a sweeter, more soulful result.
Why "Old" Photos Are Sometimes the Best
We work with many families who have already lost their pets. They panic because they can't go out and take new "reference deck" photos. They send us a shoebox of grainy 4x6 prints from 2008.
Here is the truth: A grainy photo that captures the spirit is better than a 4K photo that feels generic.
We had a project recently for a Boxer named Duke. The owner only had blurry phone photos from ten years ago. But in one photo, Duke was sitting on the porch, leaning heavily against the owner's leg. That "lean" was Duke's signature. We didn't focus on the pixel-perfect texture of his fur; we focused on the weight distribution—the way his shoulder jammed into the human leg, the way his hip kicked out.
If you are working with old photos, don't worry about resolution. Worry about character. Describe the personality to us. Tell us, "He always held his left ear slightly lower than the right," or "She had a cowlick on her chest that stuck straight out." We can sculpt those details even if the photo is blurry, as long as we know they are supposed to be there.
The Color Palette: It’s Not Just "Brown"
When the physical model comes off the printer, it goes through a rigorous washing and curing process. It’s blasted with UV light to harden the resin. At this stage, it’s usually a flat grey or beige. The painting stage is where the magic happens, and this is where your photos need to be color-accurate.
Indoor lighting is yellow (warm). Shade is blue (cool). If all your photos are taken in your living room at night, your pet looks orange. If we paint the statue orange, it will look wrong in natural light.
Try to find at least one photo taken outdoors on a cloudy day. This gives us the "true color" of the coat. If your pet has complex markings—like a Brindle, a Tortoiseshell, or a Merle—we need a "map." Take a top-down photo of their back. We literally project this texture onto the 3D model to guide the painting process. Without a clear view of the back markings, the artist has to guess the pattern, and patterns are like fingerprints—unique identifiers.
Frequently Asked Questions
Can you work with just one photo?
Technically, yes, but it requires significant artistic interpretation. With only one angle, we have to "invent" the other side of the animal. This usually results in a generic body with a specific face. For the best accuracy, we recommend at least 3-5 photos showing different angles (front, side, back, and face close-up). If you only have one photo, be prepared for a longer feedback loop where we ask you to verify the digital sculpt before printing.My pet has passed away and I don't have perfect photos. Is that okay?
Absolutely. This is the most common scenario we handle. In these cases, we ask for a description of their personality and physical quirks. We can also use "breed standard" references to fill in the anatomical gaps, then customize the face and markings based on the photos you do have. The emotional connection is what matters most.How long does the process take from photo upload to delivery?
Quality takes time. A custom sculpt isn't an automated process; an artist spends hours shaping the digital clay. Then, the printing, cleaning, support removal, sanding, priming, and hand-painting can take several days. Typically, the entire cycle runs 4-8 weeks. We prioritize curing and sealing (clear coating) to ensure the paint doesn't fade or chip, which adds time but guarantees longevity.Why do some 3D printed figures look smooth while others look like they have lines?
Those lines are "layer lines," a byproduct of the printing process. In cheaper FDM (filament) printing, these lines are very visible. At PawSculpt, we use high-resolution resin printing (SLA/DLP) with layer heights so small they are nearly invisible to the naked eye. Furthermore, we hand-sand and prime every figure to create a perfectly smooth surface before painting. If you see lines, the post-processing wasn't done right.Can you fix a chipped ear or tail in the photo?
Yes! That is the beauty of digital sculpting. If your reference photo shows your rescue dog with a torn ear, but you want the sculpture to show them "whole," we can reconstruct the ear digitally. Conversely, if that torn ear is a badge of honor you want to keep, we can sculpt it exactly as it is. Just let us know in the notes.The Final Polish
There is a moment in the workshop that never gets old. It’s right after the final matte clear coat has dried. The smell of the solvents fades, and the figure is sitting on the workbench. I look at the reference photo on the monitor—that imperfect, blurry, beautiful photo of a dog that was loved fiercely—and then I look at the figure.
It’s not a clone. It’s an interpretation of a memory.
Choosing the right photos isn’t about hiring a professional photographer. It’s about curating the evidence of a life. It’s about finding the images that make you say, "Yes, that is exactly how she looked at me when I opened the cheese drawer."
When you upload your photos for a custom piece, don't stress about the lighting being studio-perfect or the background being messy. Give us the messy reality. Give us the muddy paws and the crooked smiles. Because when you hold that figurine in your hand years from now, you won't want a generic show dog. You’ll want the dog that stole your spot on the couch. That’s the one we want to build for you.
Ready to Get Started?
Now that you know what goes into creating the perfect pet figurine, it's time to bring your vision to life. Our master sculptors are ready to capture every detail that makes your pet unique.
Free instant AI preview • 3D artist preview within 7 days • 5 free revisions
