Hand-Painted Details: Replicating the Unique Spots of Your Bengal Cat
The late afternoon sun hit the Japanese maple in the corner of the garden, casting a fractured, dappled shadow across my workbench. I was midway through a caliper check on a 1:6 scale prototype, measuring the distance between the scapula blades, when a real Bengal—my own, actually—jumped onto the table. As he stretched, the light caught his flank. I watched the shadows from the leaves interact with the rosettes on his coat. The spots weren't just flat shapes; they shifted. The gold center of the rosette seemed to glow from underneath the black rim, a phenomenon caused by the translucent structure of the guard hairs. I set the calipers down. It struck me then that replicating a Bengal isn't about painting circles on a cat-shaped object. It’s about engineering depth on a surface that is only microns thick.
Quick Takeaways:
- The "Donut" Effect: Bengal rosettes aren't solid dots; they require a three-stage painting process (base, rim, and "glow" center) to look real.
- Resolution Matters: We print at 25–50 microns specifically to capture the "fur flow" texture, which guides the paintbrush.
- Lighting is Key: When submitting photos, avoid direct flash; it flattens the coat's contrast, making 3D modeling difficult.
- Material Science: We use specialized engineering resins to prevent the "yellowing" that destroys custom paint jobs over time.
- Best For: Owners who want a museum-grade replica, not a caricature.
The Engineering of the Canvas: Why Resolution Dictates Reality
Most people think the painting is the hard part. It's not. The hard part is printing a canvas that allows the paint to tell the truth. In the additive manufacturing world, we deal with a constant war between resolution and durability.
If you look at a standard 3D print under a magnifying glass, you see "layer lines"—tiny ridges that look like the grooves on a vinyl record. On a smooth surface like a robot or a car, we can sand these away. But on a pet figurine, those ridges destroy the illusion of fur. If we sand them, we sand away the hair texture. If we leave them, the paint "wicks" into the grooves, creating unnatural stripes that clash with the organic Bengal markings.
The 35-Micron Sweet Spot
We don't use standard hobbyist settings. Through years of trial and error at PawSculpt, we’ve found that the ideal layer height for short-haired breeds like Bengals is typically in the 25–50 micron range.Here is the trade-off:
- Too Thick (100+ microns): The figurine looks like a topographic map. The paint bleeds into the layers, ruining the crisp edges of the rosettes.
- Too Thin (10 microns): The print takes four times longer, increasing the risk of "bloom" (where the resin over-cures and blurs details) or suction failure, where the print rips itself apart due to hydraulic pressure in the vat.
We aim for that 35-micron sweet spot using 8K monochromatic LCD screens. This allows us to print "fur flow"—actual physical texture that mimics the direction of the hair growth. This physical texture acts as a guide for our brushes later. When the brush moves with the grain, the paint settles naturally. If the underlying sculpt is smooth, the spots look like decals.
The "Chaos Theory" of Bengal Markings
A customer once sent us a photo of a figurine they bought elsewhere. "It looks like a leopard," they said, disappointed. "But my cat isn't a leopard."
The mistake that artist made was assuming symmetry. In nature, biology is rarely perfectly symmetrical. Leopard spots are genetically distinct from Bengal rosettes. A Bengal's markings are governed by reaction-diffusion systems—biological chaos. They flow, they break, they merge.
Mapping the Terrain
When our sculptors analyze your photos, they aren't just looking at color. They are looking at "topology."- The Spine Line: Bengals often have a distinct clustering of spots along the spine that break into chaos as they move down the ribs.
- The Shoulder Swirl: There is almost always a disruption in the pattern where the shoulder blade moves.
- The Flank Flow: The rosettes tend to elongate horizontally as the skin stretches during movement.
We have to sculpt the body in a pose that respects these markings. If we sculpt a cat in a curled sleeping position, we have to mentally "stretch" the skin in the 3D software to ensure the spots don't look warped, then compress them back down. It’s a process called UV mapping in the digital stage, but it requires an artistic eye to verify.
Counterintuitive Insight: The most important photo you can send us isn't the face. It's the top-down view of the back. That is the map. Without it, we are guessing at the geography of your pet.
The Chemistry of Color: Replicating the "Glitter"
Bengals have a unique trait often called "glitter"—a hollow air shaft in the hair that refracts light, giving the coat a shimmering, metallic gold appearance. You cannot achieve this with standard flat acrylics.
We treat the painting process less like art and more like automotive finishing. It requires chemistry.
1. The Surface Tension Problem
Resin is naturally hydrophobic (it repels water). Even after we wash the print in isopropyl alcohol and cure it under UV light, the surface can be "slick." If we apply paint directly, it beads up.We use an etching primer—usually a high-fill automotive grade—that bites into the resin. For Bengals, we avoid black or grey primer. We use a warm ochre or white. Why? Because we need the "inner light" to bounce back through the subsequent layers of paint. If the base is dark, the gold looks muddy.
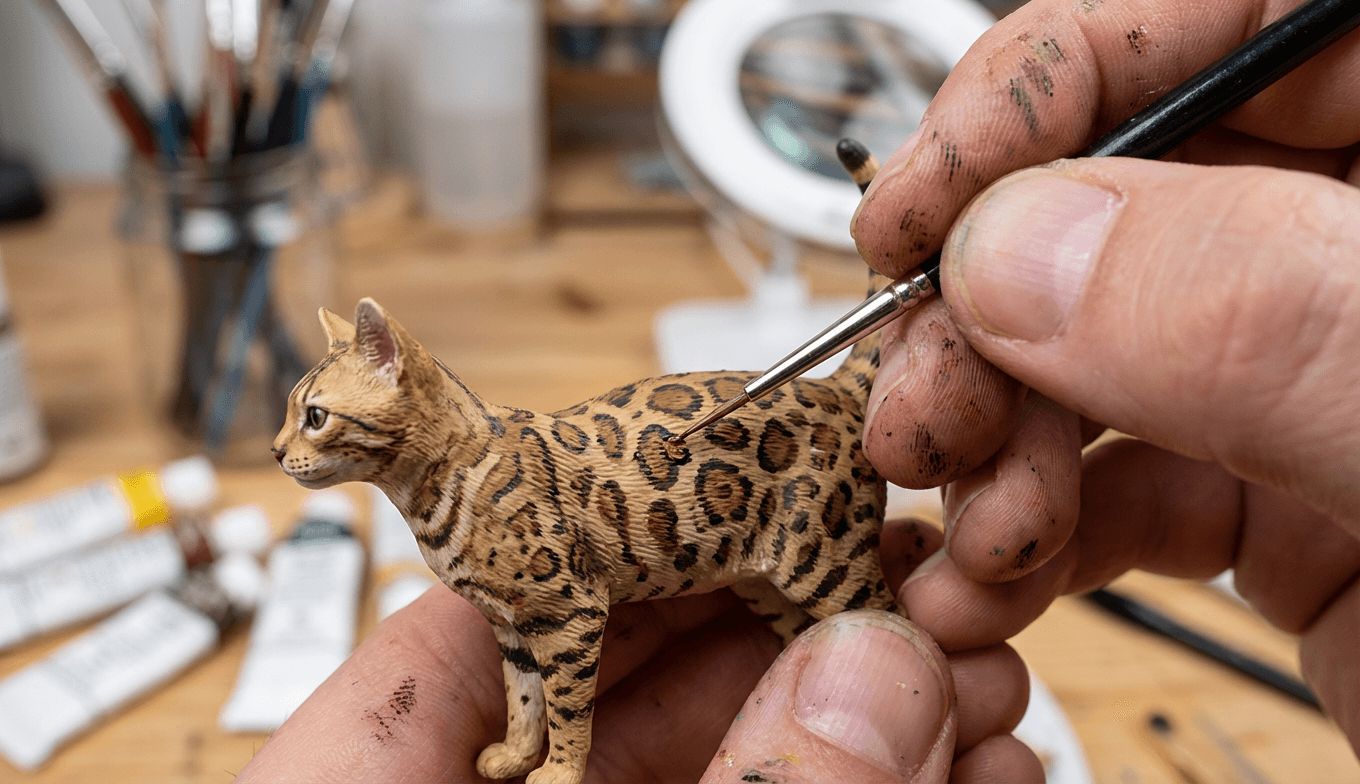
2. The Tri-Layer Rosette Technique
This is where the patience comes in. A single rosette on a PawSculpt figurine is never just one stroke of paint. It is three:- The Ghost (Base): We airbrush a warm, russet-orange gradient where the spots will be. This mimics the subsurface scattering of light through the skin.
- The Rim (Definition): Using a 000-size sable brush, we hand-paint the dark cocoa/black outline. This line is never a perfect circle. It must be broken and organic.
The Glaze (The Glow): This is the secret sauce. We use a glazing medium (a transparent fluid that extends the drying time of acrylics) mixed with a metallic gold pigment. We float this inside* the dark rim. Because it's transparent, the orange "Ghost" layer shows through, but the metallic pigment catches the light.
This creates physical depth. When you turn the figurine in your hand, the spot shifts, just like the real cat in the garden.
Structural Integrity: Why We Hollow the Print
You might pick up a cheap 3D printed figure and notice it feels heavy, almost like a stone. That’s usually a bad sign. Solid resin prints are ticking time bombs.
Resin shrinks as it cures. If a model is solid, the outside cures faster than the inside. Over months or years, the uncured liquid resin trapped in the center releases gas. This builds pressure until—crack—the figurine splits open. We call this "resin rot," and it breaks hearts.
The Drain Hole Strategy
To ensure your Bengal figurine lasts decades, we hollow the model to a uniform wall thickness of about 2–3 millimeters. This requires engineering foresight:- We have to place "drain holes" in inconspicuous spots (usually under the paws or belly) to let the liquid resin escape during printing.
- We use internal latticework supports. Think of the beams inside an airplane wing. These internal struts support the hollow shell so it doesn't crush when you handle it, but they don't trap resin.
We verify this with a scale. If a print comes off the plate weighing 15% more than the software predicted, we know resin is trapped inside. We scrap it and start over. We don't ship potential cracks.
Reference Photos: How to Help Us Help You
We can only sculpt and paint what we can see. The biggest hurdle in our workflow isn't the printing; it's the interpretation of blurry photos.
When you are gathering images for a custom project, keep the "Lighting Paradox" in mind.
- Sunlight is the Enemy: Bright, direct sunlight creates high-contrast shadows. In a photo, a shadow under a muscle looks exactly like a black marking. We might paint a spot where there is actually just a shadow.
- Flash is the Enemy: Camera flash flattens the image, washing out the gold tones and making the rosettes look like black blobs.
The Solution: Take photos on an overcast day or in a room with bright, indirect window light. We need to see the transition between the gold and the cream belly fur. That gradient is where the realism lives.
Also, get close. We need to see the "mascara lines" around the eyes and the specific "M" shape on the forehead. Every Bengal's "M" is different—some are jagged, some are sweeping. That forehead marking is often the anchor for the pet's expression.
The Final Coat: Archival Stability
Once the painting is done—a process that can take 10 to 15 hours for a complex Bengal coat—we have to lock it in.
Resin is UV-sensitive. Even fully cured resin can yellow if left in direct sunlight for years. To combat this, we use a UV-resistant clear coat. But here is the artistic choice: Gloss vs. Matte.
A real cat isn't shiny like a wet car, nor is it dead-flat like chalkboard paint. Fur has a satin sheen.
- Nose and Eyes: High Gloss. These need to look wet and alive.
- The Coat: Satin Varnish. This mimics the natural oils of the fur.
We mask off the eyes with liquid latex before spraying the satin coat on the body. Then we peel the latex and hand-apply gloss to the eyes. It’s a small detail, but when you look the figurine in the face, that "wet" reflection in the eye is what creates the emotional connection.
Closing Thoughts
I went back to that prototype in the garden as the sun dipped below the fence line. My Bengal had moved on to chase a moth, but the impression of his coat remained in my mind.
There is a profound responsibility in what we do. We aren't just manufacturing plastic. We are using industrial-grade technology to capture a biological signature. Whether it’s a memorial piece for a friend who has passed or a celebration of a companion still prowling the living room, the goal is the same: to make something that feels true.
When you hold a custom figurine and run your thumb over the flank, you should feel the texture we engineered. You should see the light catch the gold glaze we layered. It should remind you, vividly and specifically, of the sun hitting those spots on a quiet afternoon.
Frequently Asked Questions
Why do you need photos of my Bengal's back?
Most pet owners focus on the face, but for a Bengal, their identity is largely in their coat pattern. The rosettes on the left side rarely match the right side. To create a genuine replica, we need a "top-down" view of the back to map the flow of spots along the spine, and side views to see how the rosettes stretch across the flanks. Without these, we have to guess the pattern, which makes the figurine look generic.Will the paint fade or the resin crack over time?
This is a common issue with hobbyist prints, but we mitigate it through engineering. We hollow our models to a specific wall thickness to prevent internal gas buildup (which causes cracking). For the finish, we use museum-grade, UV-resistant varnishes. While we recommend keeping any art object out of direct, harsh sunlight, our figurines are built to last for generations without yellowing or peeling.Can you replicate the "glitter" in my Bengal's fur?
Yes, but not with standard paint. The "glitter" effect in Bengals comes from hollow hair shafts refracting light. To mimic this, we use a technique called "glazing," where we suspend metallic pigments in a clear medium and apply it over the base color. This allows the light to bounce off the metallic particles, creating that signature shimmering gold effect that changes depending on your viewing angle.How long does the process take?
Quality takes time. Because we are dealing with chemical curing times for the resin and drying times for multiple layers of oil and acrylic washes, you can typically expect a 3–6 week turnaround. We don't rush the drying phases; trapping moisture under the clear coat can ruin the piece later, so we prioritize stability over speed.Ready to Get Started?
Now that you know what goes into creating the perfect pet figurine, it's time to bring your vision to life. Our master sculptors are ready to capture every detail that makes your pet unique.
Free preview within 48 hours • Unlimited revisions • Lifetime guarantee
