Photographing Your Hyper Husky: Tips for the Perfect 3D Figurine Shot
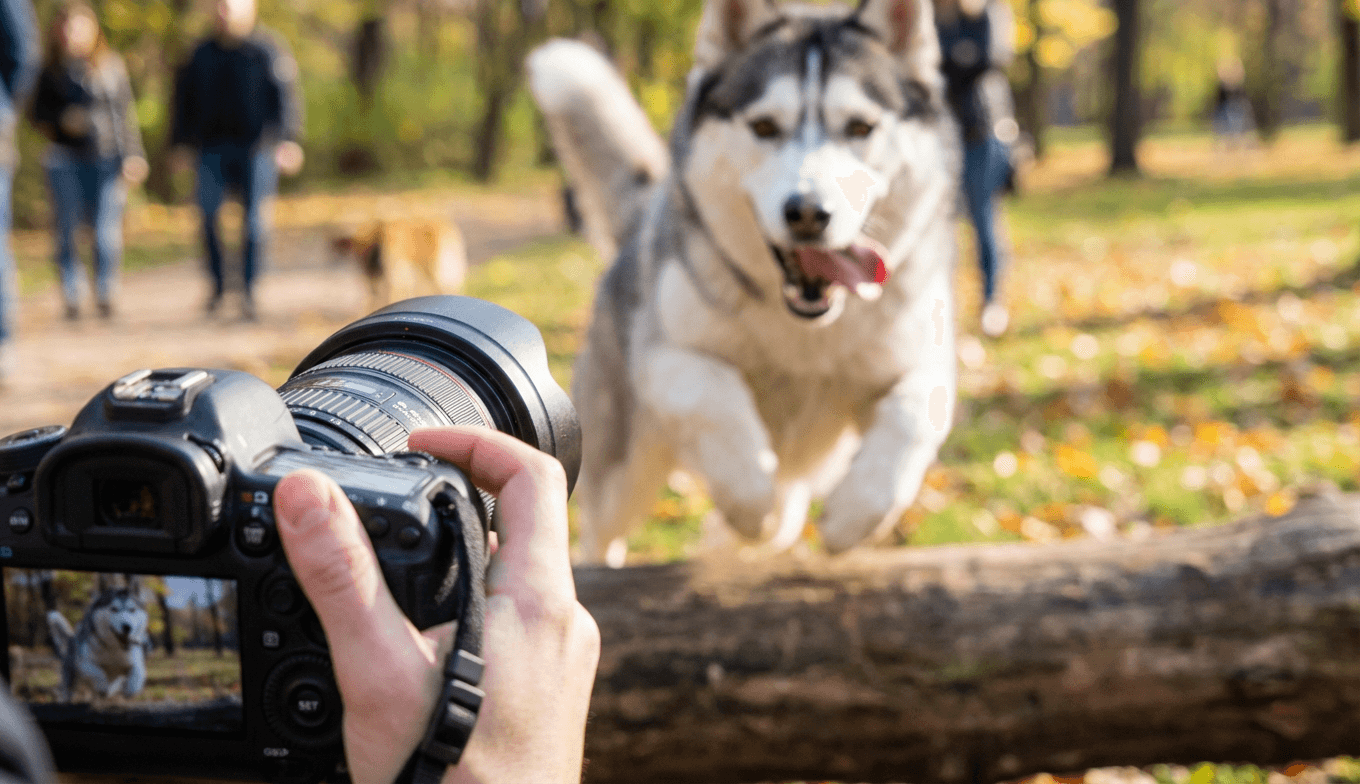
The screen door didn't just open; it exploded outward, vibrating against the siding as Koda, seventy pounds of pure kinetic energy and silver fur, launched himself onto the front porch. Before the wood planks even stopped shaking, he was already halfway down the stairs, barking at a squirrel, spinning in a circle, and looking back at you with that classic, wide-eyed Husky grin that says, “What’s next? Let’s go! Now!” You’re standing there with your phone in hand, thumb hovering over the shutter button, realizing for the tenth time this week that capturing a clear, static image of this dog is like trying to photograph a lightning bolt while riding a roller coaster.
You snap a picture. Blurry. You try again. He turns his head. You try "sit," and he offers you a play-bow and a howl instead. It’s charming in real life, but when you’re trying to commission a high-end collectible, that blur is a problem.
Quick Takeaways:
- Video > Photos: Don't rely on burst mode. Take a high-resolution 4K video while walking 360 degrees around your dog, then pull screen grabs.
- Eye-Level is Critical: Photos taken from standing height create "foreshortening," causing 3D modeling errors that make legs look stubby.
- Lighting for Texture: Flat lighting hides fur depth. You need directional light (morning or evening sun) to help sculptors see the "topography" of the coat.
- The "Tail Curl" Factor: For Huskies, the specific arc of the tail over the back dictates print orientation and support placement—get a side profile of this specifically.
The Engineering Behind the Image
Look, I’ve spent over a decade on the shop floor in additive manufacturing. I’ve run SLA, DLP, and MSLA machines, printing everything from aerospace prototypes to the custom pet figurines we make here at PawSculpt. When I look at a photo of a dog, I’m not just seeing a cute face. I’m seeing geometry. I’m seeing overhangs. I’m seeing shear forces and suction cups.Most people think a 3D sculptor just "draws" the dog. In reality, we are translating 2D data into a 3D mesh that has to obey the laws of physics when we pull it out of a vat of liquid resin.
When you send us a photo taken from five feet up looking down at your Husky, you’re introducing severe perspective distortion. In the 3D printing world, we call this a "Z-axis bias." If we sculpt based on that angle, the resulting model will have a massive head and tiny, tapered legs. It looks fine from one specific angle, but the moment you rotate the physical figurine in your hand, it looks like a caricature.
To get a figurine that feels like your dog—heavy, proportional, and grounded—we need "orthographic" data. That means straight-on views: front, side, and back, taken at the dog's hip height.
The Husky Challenge: Fur Flow and "Bloaming"
Huskies present a specific engineering challenge that, say, a Boxer or a Greyhound doesn't: the double coat.In resin printing, we deal with a phenomenon called "light bleed" or "bloom." When we cure a layer of resin—often at a thickness of just 35 to 50 microns (thinner than a human hair)—the UV light can scatter slightly. If we try to print every single individual hair on a Husky, the resin tends to merge together, creating a surface that looks like melted wax rather than fur.
To counter this, our sculptors exaggerate the "clumping" of the fur—the way the coat breaks naturally over the shoulder blades or gathers at the ruff. This ensures that when the piece is washed and cured, the shadows hold up.
Here is the counterintuitive insight: We don't need to see every hair. We need to see the clumps.
When photographing your Husky, avoid high-noon sunlight. It creates harsh contrast that blows out the white parts of the mask and buries the dark parts in shadow. Instead, aim for "raking light"—light coming from the side. This casts tiny shadows behind every tuft of fur, giving us a roadmap of the coat's direction. If the lighting is too flat (like on a cloudy day), the dog looks like a smooth grey blob, and we have to guess where the muscle ends and the fluff begins.
The "Video Sweep" Technique
If your Husky is anything like the ones I’ve met, "stay" is a suggestion, not a command. Trying to get a perfect front, side, and back photo is an exercise in futility.Forget the camera mode. Switch to video.
Here is the workflow I recommend to every client who tells me their dog is "high energy":
- The Bribe: Get a high-value treat (cheese, hot dog, freeze-dried liver).
- The Anchor: Have a friend hold the treat right at the dog's nose level, but don't give it to them yet. This locks the head in place.
- The Orbit: While the dog is fixated on the treat, you move. Film in 4K or the highest resolution your phone allows. Walk a slow, steady circle around the dog. Keep the phone at the dog's eye level (yes, you will need to squat or crawl).
- The Extraction: Later, sit down at your computer and scrub through the video frame by frame. You will find perfect, non-blurry moments of the side profile, the tail set, and the chest markings that you never could have timed with a shutter button.
This method gives us a continuous "mesh" of information. We can pause the video to see exactly how the white marking on the shoulder connects to the underbelly—a detail often lost in still photos.
The Tail Paradox: Orientation and Supports
Let’s talk about print orientation. When we prepare a digital sculpt for printing, we have to decide how to angle it on the build plate. We need to add "supports"—scaffolding that holds the object while it prints.Supports leave tiny marks. We sand and polish them away during post-processing (a mix of wet sanding and mineral oil checks), but we always try to place supports in hidden areas, like the belly or the bottom of the paws.
For a Husky, the tail is a massive overhang. It usually curls up and over the back. If we don't have a clear photo of how the tail rests on the back, we risk creating a "trap."
If the tail touches the back in the sculpt, we can merge the geometry, making the figure incredibly strong. If there is a tiny gap between the tail and the back, we have to place supports in that gap. Removing supports from a 2mm gap between a tail and a spine without snapping the resin is a nightmare scenario for any finishing technician.
The Fix: Get a close-up photo of where the tail meets the back. Does it rest on the fur? Is there a gap? This "contact point" is crucial for the structural integrity of your custom figurine.
Color Mapping: The Mask and the Eyes
Huskies are famous for their "masks"—the specific white and color patterns on the face. But here’s the thing about 3D printing and subsequent painting: we are painting on a 3D surface, not a flat canvas.A common mistake owners make is sending photos where the dog is panting heavily with eyes squinted. While this is a happy expression, it distorts the mask. The cheeks bunch up, moving the markings. The eyes narrow, hiding the heterochromia (if they have different colored eyes).
We need at least one "neutral" face photo. You can achieve this by making a weird noise (the "squeaky toy" apps on phones work wonders) to get that split-second alert look. Mouth closed, ears up, eyes wide.
This allows our artists to map the mask accurately onto the underlying bone structure. Once we have the geometry right, we can sculpt the "happy panting" expression you love, but we need the "neutral map" to ensure the markings don't slide around during the expression change.
Imperfection is Authentic
We often receive requests to "fix" things in the sculpt. "Can you make his ear stand up? It’s usually floppy." "Can you tuck his tummy a bit?"Technically? Yes. We can do anything in ZBrush. But my advice, from years of seeing people open these boxes? Don't fix the quirks.
If your Husky has one ear that flops when he’s tired, or a scar on his nose from that time he tried to befriend a cat, keep it. In the world of mass-produced collectibles, perfection is the standard. But in the world of custom pet portraits and figurines, specificity is the soul.
I remember a customer who wanted us to remove a small lump on her senior dog's leg. We did. She called us when she received the figurine, crying—not because she was happy, but because it didn't look like him anymore. We reprinted it with the lump. That was the version that ended up on her mantle.
Why This Matters
You might think, "It's just a toy, why does the geometry of the tail matter?"Because resin is a material that feels permanent. When you hold a solid print, it has heft. It has thermal mass. It feels distinct from a hollow plastic toy.
When we create a memorial piece or a celebration of a living pet, we are trying to capture a spirit in a static object. The way a Husky leans back before a run, the specific geometry of their hocks, the density of that neck ruff—these are physical manifestations of their personality.
Getting the reference photos right means the difference between a figurine that looks like a Husky, and a figurine that looks like Koda.
So, grab the cheese. Get down on the floor. Ignore the neighbors staring at you while you crawl in circles around your dog. The chaos on the porch is temporary, but the resulting sculpture is something you’ll have forever.
Frequently Asked Questions
Can I use photos from my phone for a custom figurine?
Absolutely. You don't need a DSLR. Modern smartphones (iPhone, Pixel, Samsung) have incredible cameras. The trick is lighting, not the camera itself. Avoid using the digital zoom, as it destroys texture detail. Instead, physically move closer to your pet. As mentioned in the article, taking a 4K video and pulling frames is often superior to trying to time a shutter snap.What if my dog has passed away and I don't have perfect photos?
This is a very common situation, and we handle it with great care. We don't expect you to have orthographic engineering diagrams of a pet that has passed. In these cases, our artists use "composite sculpting." We start with the accurate anatomical base of the breed (e.g., a standard Husky build) and then meticulously adjust the proportions and markings based on the photos you do have. We can also look at photos of similar dogs if you can point out features that match ("he had a tail like this, but ears like that").How many photos do I need to send?
Quality beats quantity, but coverage is key. Ideally, we look for 5 to 10 photos. The "Holy Grail" set includes: 1. Direct Front Face (at eye level) 2. Full Body Side Profile (Left) 3. Full Body Side Profile (Right) 4. Rear View (to see tail set and hip width) 5. Top-down view (helps with back markings) 6. Close-ups of unique features (scars, specific paw colors, collar tags)Does the background of the photo matter?
It matters more than you’d think. If you photograph a black and white Husky against a black leather couch, we lose the "edge definition." We can't see where the fur ends and the couch begins. High contrast is your friend. Photograph dark dogs against light backgrounds (like a beige wall) and light dogs against darker backgrounds (like green grass). This helps us cut a clean silhouette for the 3D mesh.Ready to Get Started?
Now that you know what goes into creating the perfect pet figurine, it's time to bring your vision to life. Our master sculptors are ready to capture every detail that makes your pet unique.
Free instant AI preview • 3D artist preview within 7 days • 5 free revisions
