Built to Last: The Science & Craft Behind Our Resin Sculptures
The sunlight hit the shelf at exactly 4:00 PM, illuminating a small, brindle-colored form sitting next to a dusty urn. It wasn't just a generic statue; it was him. The slight tilt of the head, the way the left ear flopped just a little lower than the right—details that photos flatten but a three-dimensional object preserves. When you hold a figurine like this, you aren't just holding plastic or resin. You’re holding a tangible anchor to a memory that feels like it’s slipping away a little more each day. But that anchor needs to hold. It can’t yellow in that sunlight, crack when the seasons change, or shatter if a curious cat nudges it off the mantle. That durability isn't accidental; it's engineered.
Quick Takeaways:
- Material Matters: We use specialized photopolymer resins, not standard brittle plastics, balancing rigidity with just enough flex to survive minor impacts.
- The "Hollow" Truth: Solid prints often crack due to trapped uncured resin; proper hollowing and drainage are critical engineering steps, not cost-cutting measures.
- UV is the Enemy: Unprotected resin yellows over time. We apply museum-grade, UV-resistant clear coats to seal the paint and the material itself.
- The Orientation Game: How a digital model is angled for printing determines its strength. We prioritize structural integrity over saving print time.
- Care is Simple: Keep it out of direct, baking sunlight and dust it with a soft brush. No harsh chemicals needed.
The Chemistry of "Forever": Understanding SLA Resin
Most people hear "3D printed" and imagine those spool-fed machines (FDM printers) that lay down lines of melted plastic, leaving visible ridges like the grooves on a vinyl record. That’s fine for a pencil holder, but it’s terrible for capturing the texture of a Golden Retriever’s feathering.
For high-end collectibles, we use Stereolithography (SLA) or Masked Stereolithography (MSLA). Instead of melting plastic, we start with a vat of liquid photopolymer resin. This goo is reactive to specific wavelengths of light (usually UV). A screen or laser draws a single layer of your pet into the resin, curing it instantly into a solid. The build plate lifts up by a fraction of a hair’s width—often 0.05mm or less—and does it again. Thousands of times.
Here’s the engineering reality few talk about: Resin is inherently stressed.
When liquid turns to solid, it shrinks. We’re talking about a volume shrinkage of 1-3% depending on the blend. If you don't account for that shrinkage in the chemistry and the print settings, you get a sculpture that looks fine on day one but literally pulls itself apart on day thirty. We use a custom blend of engineering-grade resins. We mix a "tough" resin (high impact resistance, slightly flexible) with a "standard" resin (high detail, rigid). Pure standard resin is like glass—it holds detail but shatters if you look at it wrong. Pure tough resin can be too soft to hold sharp fur details. Finding that sweet spot took us years of failed prints and drop tests.
Orientation: The Invisible Skeleton
Imagine you’re building a house of cards. You don’t start by balancing a card on its thin edge; you build a base. The same logic applies to printing a dog or cat, but in reverse, because we usually print upside down against gravity.
When we load your pet’s digital sculpt into our slicing software (the program that translates the 3D model into printer instructions), we don’t just hit "auto-orient." That’s a rookie move. We have to manually rotate the model to minimize "suction forces."
Think of it like pulling a boot out of deep mud. If you pull straight up, the suction is immense. If you tilt your foot and pull the heel out first, it releases easily. When the printer pulls a fresh layer off the bottom film of the vat, it creates suction. If the cross-section is too large—say, a flat slice through a bulldog’s broad chest—that suction can rip the layer apart or warp the print.
We orient the model at specific angles (often 30-45 degrees) to keep the cross-sectional area small at any given moment. This reduces stress on the fresh resin. It means the print takes longer—sometimes twice as long—because the model is taller in the Z-axis. But it ensures that the internal structure isn't micro-fractured before it even leaves the machine.
The Support Strategy: Why We Don't Trust Algorithms
If you look at a raw print before cleanup, it looks like your pet is growing out of a forest of scaffolding. These are supports. They hold the model against gravity and peeling forces.
Most consumer software generates these supports automatically. We delete about half of them and place our own. Why? Because an algorithm doesn't know that the tiny tip of a cat’s ear is the focal point of the sculpture. If a support snaps onto the tip of the ear, sanding it away later will ruin the shape.
We place "heavy" supports on the unseen areas—the bottom of the paws, the underside of the belly. These act as the structural anchors. Then, we use "light" supports (with contact points as small as 0.3mm) for stabilizing the chin or tail. This mimics the strategy of a suspension bridge: massive pylons doing the heavy lifting, with thin cables maintaining the shape.
The Tradeoff:
- Heavy Supports: Great stability, but leave pockmarks that require heavy sanding and putty work.
- Light Supports: Leave almost no mark, but risk the print failing or wobbling during production.
We lean toward manual placement because it allows us to control the post-processing. We’d rather spend 20 minutes hand-sanding the bottom of a paw than risk a failed print or a scarred face.
To Hollow or Not to Hollow?
There is a misconception that a "solid" statue is higher quality. In the world of resin, a solid block is actually a ticking time bomb.
As mentioned earlier, resin shrinks when it cures. If you have a solid block of resin 3 inches thick, the outside cures hard while the inside might remain slightly semi-cured or cure at a different rate. This differential stress causes cracks. Massive, ugly fissures that can appear weeks later.
We hollow our models, leaving a wall thickness of about 2-3mm. This provides the heft and cold-touch feeling of stone without the thermal mass issues.
The Critical Step: Drainage
When you hollow a model, you create a cavity. If you don't punch holes in that cavity, liquid resin gets trapped inside. Over time, that trapped resin releases gas. The pressure builds up until—pop—the model cracks open and leaks sticky, toxic goo all over your shelf. It’s a nightmare scenario.
We strategically place two drain holes (usually under the paws or base). One for air to enter, one for resin to escape. This eliminates the "suction cup" effect during printing and allows us to wash the inside of the model thoroughly. If you pick up a cheap 3D printed figure and it feels unusually heavy or sloshes, put it down. It’s a chemical hazard waiting to happen.
The Wash and Cure: Where Material Properties are Locked In
The print finishes. It’s dripping with uncured resin. It looks glossy and undefined. This is the messy part.
Stage 1: The Solvent Bath
We don't just dunk it in water. We use high-concentration Isopropyl Alcohol (IPA) or specialized resin detergents. We use a two-stage wash. Bath A is the "dirty" wash that removes the bulk of the slime. Bath B is the "clean" wash that gets into the crevices of the fur texture. If you don't wash perfectly, the leftover resin cures as shiny, white blobs in the crevices, ruining the fur detail.
Stage 2: Evaporation
Here’s a step amateurs skip: drying. If you cure a model while it’s still soaked in alcohol, the rapid evaporation cracks the surface. We let the models air dry for hours, or use compressed air to gently clear the nooks.
Stage 3: UV Curing
The model is solid, but chemically, it’s only about 80% reacted. It’s "green." To reach its final hardness and stability, it needs a blast of specific UV light (usually 405nm) and heat. We use a curing chamber that rotates the model while heating it to 60°C. This annealing process aligns the polymer chains.
If you under-cure, the resin remains soft and toxic. If you over-cure, it becomes brittle and yellows instantly. We dial this in based on the specific geometry of the pet. A delicate Greyhound needs a different cure profile than a stocky Bulldog.
Surface Prep: The Invisible Art
Once cured, the supports are clipped off. But the model isn't ready for paint. It looks like a topographic map—covered in layer lines. Even at 0.05mm, these lines are visible to the naked eye, especially on smooth areas like a nose or a short-haired coat.
We don't just paint over them. Paint doesn't hide texture; it highlights it.
We use a technique called "wet sanding" with high-grit sandpaper (400 to 1000 grit). The water keeps the resin dust down (which you do not want to inhale) and prevents the friction from melting the plastic. For fur textures where sanding would destroy the detail, we use a high-fill sandable primer. This primer settles into the microscopic valleys of the layer lines, smoothing them out without obscuring the peaks of the fur.
This is the difference between a hobbyist project and a professional custom figurine. You shouldn't see how it was made. You should just see the dog.
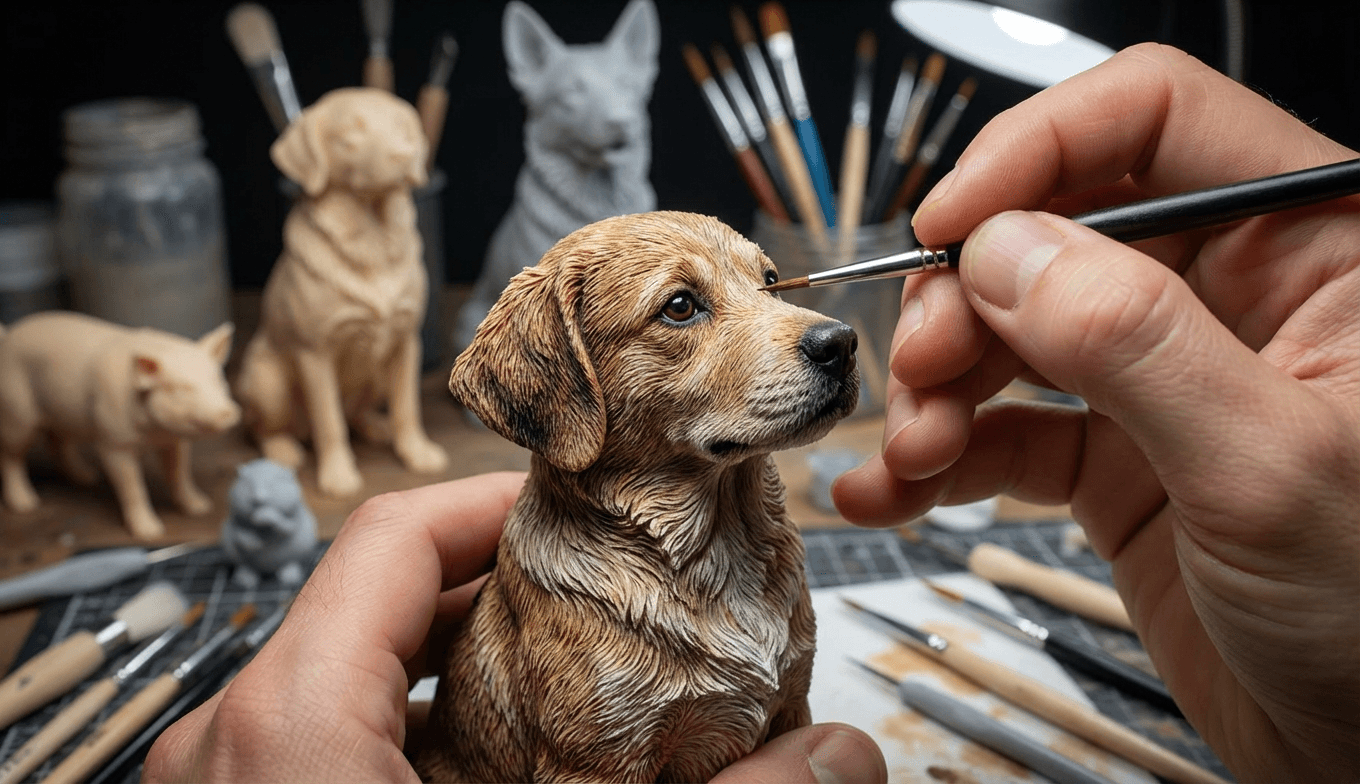
The Painting Process: Adhesion is Everything
Resin is essentially plastic. Paint hates sticking to plastic. If you’ve ever had paint flake off a toy, you know this pain.
We never paint directly on the resin. We use an etching primer. This primer chemically bites into the surface of the resin, creating a substrate that acrylics can grab onto.
Our artists use high-viscosity acrylics for the base coats and thin, glazing mediums for the top coats. This allows us to build depth. A black dog isn't just black. It’s deep blue, warm brown, and cool grey. By layering translucent washes, we mimic the way light scatters through real fur.
But the real engineering challenge is the eyes. The eyes are the first thing to chip because they are usually glossy and smooth. We use a specific gloss varnish for the eyes that cures hard as nails. It gives that "wet" look of a living animal but also acts as a shield for the most delicate paint work on the piece.
The Final Shield: Clear Coat Chemistry
The biggest enemy of any painted figure is UV light. Even if you keep the statue indoors, ambient UV from windows will eventually attack both the paint pigments and the resin underneath.
Resin naturally wants to turn yellow. It’s a photochemical reaction in the polymer backbone. Paint pigments fade. Red tones disappear first, leaving your chocolate lab looking green.
We finish every single piece with a two-step sealing process:
- Isolation Coat: A non-yellowing acrylic layer that protects the paint from the final varnish (sometimes solvents in heavy varnishes can smear delicate detail work).
- UV-Resistant Topcoat: This is similar to what is used in automotive finishing, but scaled down for matte finishes. It contains UV absorbers (UVA) and Hindered Amine Light Stabilizers (HALS). Think of it as SPF 500 for your statue. It absorbs the UV energy and dissipates it as low-level heat before it can break the chemical bonds of the paint or resin.
This coating also changes the tactile feel. Raw painted resin feels tacky or chalky. A proper topcoat feels satin-smooth and resists oils from your fingers.
Durability Reality Check: What to Expect
Let’s be honest about what these are—and what they aren't.
These are not action figures.
They are not made of ABS (Lego plastic) or PVC (flexible toy plastic). They are cured resin. While our "tough" blend adds resilience, if you drop a resin statue onto a tile floor from four feet up, an ear or a tail will likely snap. It’s physics. The material is rigid to hold the detail; rigidity implies brittleness under high shock.
Temperature Sensitivity
Resin is a thermoplastic. It softens with heat. If you leave your figurine in a car on a hot July day, it might warp. If you put it on a mantle directly above a roaring fireplace, it could deform over years.
The "Creep" Factor
"Creep" is the tendency of a solid material to move slowly or deform permanently under the influence of mechanical stresses. If a statue is balanced on one thin leg (like a running pose), gravity will eventually pull that leg out of shape over 5-10 years. We engineer around this by adding hidden stainless steel rods inside thin legs during the assembly process, or by designing the base to support the belly invisibly.
Caring for Your Memorial
We build them to last, but they are heirlooms, not rocks. Here is the practical care guide we give to every client:
- Dusting: Use a soft makeup brush or a high-quality model paintbrush. Do not use a rag; rags snag on tiny resin fur tips and can snap them.
- Cleaning: If it gets grimy, use a damp microfiber cloth with water only. No Windex, no bleach, no alcohol. Alcohol will eat right through the clear coat and dissolve the paint.
- Placement: Avoid direct sunlight beams. Even with our UV blockers, 10 years of direct noon sun will win eventually. Indirect light is perfect.
- Handling: Pick it up by the base or the main body (torso). Never pick it up by the head, tail, or delicate limbs. The oils from your hands are generally fine due to the topcoat, but limiting skin contact keeps the matte finish looking pristine.
Why We Go to These Lengths
I remember a client named Sarah. She sent us photos of a Boxer named Duke who had an underbite that made him look perpetually grumpy, though she assured us he was a sweetheart. When we printed Duke, the first attempt failed—the support on that unique jawline left a mark that changed his expression. We scrapped it. We re-oriented the model, moved the supports to the back of the neck, and printed again.
We sanded that jawline with 800 grit paper wrapped around a toothpick to get the curve right.
When Sarah got the box, she emailed us. She didn't say "nice statue." She said, "I walked into the room, saw it on the table, and for a split second, my heart jumped because I thought he was sitting there."
That is why we obsess over suction forces, layer heights, and UV blockers. We aren't just manufacturing plastic shapes. We are trying to capture a soul in a bottle. Or, in this case, a soul in photopolymer resin. It’s a blend of hard science and soft hearts.
The technology of 3D printing moves fast. New resins hit the market every month. We test them all. If there is a way to make these memories last longer, be sharper, or feel more real, we will find it. Because when you love a pet, "forever" is the only timeline that matters.
Frequently Asked Questions
Is 3D printed resin toxic to my other pets?
Once fully cured and coated, the resin is inert and safe to touch. However, it is not food safe and should not be chewed on. If your living dog is a chewer, keep the figurine on a high shelf. If ingested, the cured resin isn't chemically toxic like liquid resin, but the shards are sharp and can cause internal blockages or lacerations.Can I put the sculpture outdoors on a grave?
We generally advise against it. While we use UV-resistant coatings, the combination of constant UV exposure, rain, freezing and thawing cycles, and temperature fluctuations will eventually degrade the resin and paint. Resin absorbs moisture microscopically, which expands when frozen, causing cracks. For outdoor memorials, we recommend bronze or granite. Our sculptures are designed for indoor preservation.How long does the process take?
Quality takes time. A typical turnaround is 4-6 weeks. This includes digital sculpting (1-2 weeks), printing and cleaning (3 days), curing and prep (2 days), painting (1-2 weeks depending on complexity and drying times), and final sealing/QC. Rushing the curing or drying stages leads to warping later, so we never speed this up.What if my figurine breaks?
Because we use standard cyanoacrylate-compatible resins, clean breaks are actually very easy to repair. A tiny dot of "Super Glue" (cyanoacrylate gel is best) usually bonds the resin instantly and permanently. For complex breaks, we offer a repair service or can reprint the piece at a discounted rate for previous customers.Why does my figurine look slightly different than the 3D render?
The 3D render on a screen is made of light; the figurine is made of pigment. Subsurface scattering (how light enters skin/fur and bounces back) is hard to replicate perfectly in paint. However, the physical object often has a "presence" that the digital file lacks. We also sometimes have to thicken tiny details (like whiskers or thin tails) slightly to ensure they don't snap during shipping, which can create subtle differences from the digital file.The science of memory is complex, but the science of preserving it shouldn't be a mystery. At PawSculpt, we believe transparency is part of the craft. If you’re ready to turn your photos into a permanent tribute, explore our custom figurine options today.
