Lighting Hacks: Capturing Your Black Poodle's Curls for Statues
Ten years ago, I stared at a 3D print of a black Standard Poodle that looked more like a melted chess piece than a beloved pet. Yesterday, I pulled a print off the build plate where I could count the individual ringlets on the ears, catching the light exactly how the real dog's coat did. The difference wasn't the printer technology—it was the reference photo the owner sent us.
In this guide, we'll cover the specific lighting techniques needed to reveal the geometry of black curls so we can sculpt them into a perfect likeness.
The "Black Hole" Effect in Photogrammetry and Sculpting
Here is the brutal truth from the shop floor: Cameras see color, but sculptors need geometry.
When you take a photo of a black Poodle, the camera sensor struggles. Black fur absorbs light. To a camera (and subsequently to our digital sculptors), a black dog often looks like a flat, featureless silhouette. We call this the "Black Hole Effect."
If we can't see the "topography" of the curls—the peaks and valleys of the hair—we have to guess. And when sculptors guess, the figurine ends up looking generic.
The goal of photographing black dogs for 3D modeling isn't a pretty portrait. It's data capture. We need to see where one curl ends and the next begins so that our high-resolution resin printers (often working at 35-50 micron layer heights) have actual details to reproduce.
"A camera captures light, but a sculptor captures shadow. Without light, there is no shadow to sculpt."
The Rim Light Hack: Separating Dog from Background
The biggest mistake Poodle owners make is relying on direct flash. Flash flattens the image, turning those luscious curls into a singular shiny blob.
To get the depth we need for a custom figurine, you need to separate the dog from the background using Rim Lighting.
How to execute the Rim Light:
1. Position the light source behind the dog, slightly off to one side. 2. This creates a "halo" effect around the silhouette. 3. Suddenly, the edges of the ears, the topknot, and the tail pom-poms become crisp lines rather than blurry transitions.The Counterintuitive Insight: You actually want the background to be brighter than the dog in one of your reference photos. This backlighting forces the texture of the curls to pop out in silhouette, giving our sculptors the exact outer boundary of the coat.
Texture Definition: The "Raking Light" Technique
In the additive manufacturing world, we inspect finished parts using "raking light"—a light held at a sharp angle to the surface to reveal imperfections. You need to do the same thing when photographing your Poodle.
If the sun is directly overhead (noon), it casts harsh shadows downward. If the sun is directly behind you (front lighting), it fills in the shadows we need to see the curl definition.
The Golden Hour Rule:
Take your photos during the "Golden Hour" (sunrise or sunset) but position your dog so the light hits them from the side.
- Side lighting creates contrast across the curls.
- One side of the curl is highlighted; the other is in shadow.
- This creates a 3D map that our digital sculpting software (like ZBrush) can interpret.
Micro-Story: We once had a client, Sarah, whose black Toy Poodle, Barnaby, had a very specific "corded" coat texture. Her indoor photos were useless. We asked her to take him out to the driveway at 6 PM and shine her car headlights on him from a low side angle. The resulting photo looked gritty and weird for Instagram, but for us? It was gold. We could see the individual cords, and the final print captured that texture perfectly.
Exposure Strategy: Why "Overexposed" is Good
This is where photography tutorials and 3D modeling requirements diverge. A photographer will tell you never to overexpose (blow out) the highlights.
We disagree.
For a black Poodle, an overexposed photo is often clearer for a sculptor.
- Bump up the exposure on your phone camera until the black fur looks dark grey.
- Yes, the background might look white and washed out. That's fine.
- We need to see into the shadows of the coat.
If the fur is "true black" in the photo, the pixel data is effectively zero (0,0,0 RGB). There is no information there. If the fur is grey, we can see the direction the hair grows, which is critical for how we orient the model on the printer to avoid "support scarring" on the visible areas.
Lighting Setup Comparison for 3D Modeling
Here is a breakdown of how different lighting scenarios impact our ability to sculpt your pet accurately.
| Lighting Setup | Visual Result | Sculpting Utility | The Fix |
|---|---|---|---|
| Direct Flash | Flat, shiny, "oil slick" look. | Poor. Removes depth cues. | Turn off flash. Use a lamp to the side. |
| Mid-day Sun | Harsh contrast, eyes hidden in shadow. | Low. Top-down shadows hide facial expression. | Move to open shade (under a tree/porch). |
| Indoor Bulb | Grainy, orange tint, soft focus. | Medium. Okay for shape, bad for texture. | Move near a window. |
| Overcast Day | Soft, even light. No harsh shadows. | High. Excellent for general proportions. | This is the safest bet for body shape. |
| Raking Light | Light hitting from sharp side angle. | Excellent. Defines curl volume perfectly. | Use sunrise/sunset or a low lamp. |
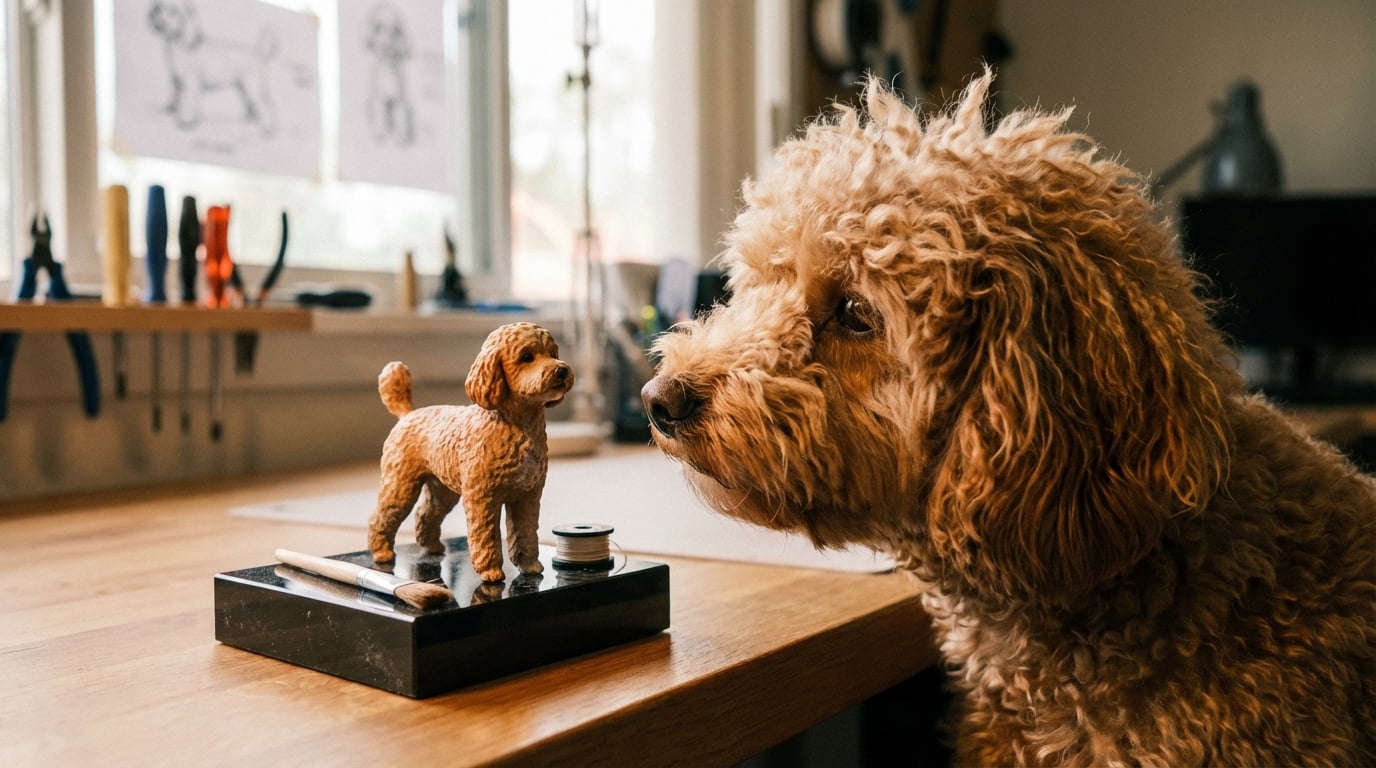
The Poodle Anatomy Checklist
When we are setting up a print file, we have to worry about "islands"—parts of the model that start printing in mid-air. Poodles are full of these complex geometries.
To ensure your figurine is structurally sound and accurate, we need specific shots of these areas:
1. The Topknot Connection
We need to see where the skull ends and the hair begins. If this is just a black mass, the head shape will look wrong. Use a backlight to show how much of that height is just hair.2. The Ear Leather vs. Ear Hair
On a black dog, it's hard to tell where the ear leather stops. If we sculpt the leather too long, the ears look heavy. If we sculpt it too short, they look unnatural. Gently hold the ear hair back in one photo so we can see the actual ear size.3. The Tail Pom
This is a high-risk area for breakage in resin printing if the connection point is too thin. We need to see the base of the tail clearly."Don't photograph the dog; photograph the space between the curls. That negative space defines the sculpture."
Why This Matters for the Final Print
You might wonder why we are so obsessive about these lighting details. It comes down to the physics of the resin.
We use professional-grade photopolymer resins that cure under UV light. The material is incredibly precise, capable of rendering details smaller than a human hair. However, once the model is cured, primed, and painted (especially if painted black), surface details can get lost if they aren't exaggerated slightly in the sculpt.
If we sculpt a "soft" curl based on a blurry photo, the painting process might smooth it out completely. If we sculpt a "deep" curl based on a high-contrast photo, the final statue will hold that texture even after the clear coat is applied.
A Note from the Shop Floor
We love seeing the energy in these photos. The best reference shots aren't the posed studio portraits—they are the ones where the dog is looking at a treat, ears perked, with the sunlight hitting that specific cowlick on their chest.
When you take the time to get that lighting right, you aren't just sending us a file. You're giving us the map to bring your friend back into the physical world.
"The difference between a generic dog statue and a true likeness is often just a shadow in the right place."
— The PawSculpt Team
Frequently Asked Questions
Can I use iPhone photos for my custom figurine?
Absolutely. Modern smartphone cameras are incredibly capable. The trick is to tap on the darkest part of your dog on your screen before taking the picture. This tells the phone, "Make this black area visible," even if it blows out the background.Should I wet my Poodle's fur for the photos?
Please don't. While wet fur shows the body shape underneath, it completely changes the volume and texture of the coat. Unless your dog is always wet, we want to sculpt them dry and fluffy to capture their everyday look.Does the background color matter?
Yes. Avoid photographing a black dog against a black couch or in a dark room. We lose the "edge data." A light background—a white wall, a concrete driveway, or green grass—provides the contrast we need to trace the silhouette accurately.How many photos do you need?
Quality beats quantity, but we generally look for 5-8 distinct angles: front face (eye level), left profile, right profile, rear view (for tail set), and a top-down view to check body width.Ready to Celebrate Your Pet?
Every pet has a story worth preserving, and for Poodle owners, that story is often written in the unique texture of their coat. Whether you're honoring a beloved companion who's crossed the rainbow bridge or celebrating your furry friend's unique personality, a custom PawSculpt figurine captures those details that make your pet one-of-a-kind.
Free instant AI preview • 3D artist preview within 7 days • 5 free revisions
