Photographing Your Maine Coon's Ear Tufts for the Perfect 3D Model
Does the late afternoon light in your garden ever catch the tips of your Maine Coon’s ears, turning those signature tufts into glowing halos? It’s a specific kind of magic, isn't it? You’re watching them stalk a beetle near the hydrangeas, and for a split second, the geometry of their face is perfect. The "lynx tips" stand tall, defining that wild, regal silhouette that makes the breed so captivating. But when you pull out your phone to capture it, the result is often... disappointing. That halo disappears into a blurry fuzz, or worse, disappears against the background entirely.
When you’re trying to immortalize that moment in a physical object—specifically a high-fidelity 3D printed figurine—that blurriness becomes an engineering hurdle. As someone who has spent over a decade on the production floor of additive manufacturing shops, looking at slicing software and vat polymerization processes, I can tell you that "fluff" is the hardest thing to translate into "solid." We aren't just taking a picture; we are fighting physics to turn wispy keratin into durable, cured resin.
Quick Takeaways:
- Backlighting is Non-Negotiable: To model hair, we need to see the "negative space" between the strands.
- The "Insertion Point" Matters: Don't just photograph the tip; photograph where the hair leaves the skin.
- Macro Mode is Your Friend: Use your phone’s macro setting to capture the texture density, not just the shape.
- Profile Views are Critical: We need to see how the tuft curves relative to the skull, not just how it looks from the front.
- Resin has Limits: Understand that super-fine hairs must be slightly stylized (thickened) to survive the printing process.
The Engineering of Fluff: Why Standard Photos Fail
Most pet owners think of a photograph as a memory. In our workshop, we think of a photograph as a data set. When we look at a reference photo of a Maine Coon, we are mentally converting that 2D image into voxels (volumetric pixels).Here is the counterintuitive insight that most photography guides won't tell you: We don't need to see the color of the hair as much as we need to see the volume of the hair.
In 3D printing, specifically with SLA (Stereolithography) or MSLA (Masked Stereolithography) printers which we use for high-end collectibles, we are curing liquid resin layer by layer. These layers are often in the 25–50 micron range. That is incredibly thin—thinner than a human hair. However, just because we can print that thin doesn't mean we should.
If you send us a photo where the ear tuft is a solid black mass because of poor lighting, the sculptor has to guess the density. If they guess wrong and sculpt individual hairs that are 0.1mm thick, those hairs will likely fail during the print process. They might suffer from "bloom" (where light bleeds and over-cures the resin, turning detail into a blob) or they might be ripped apart by the suction forces as the build plate lifts out of the vat.
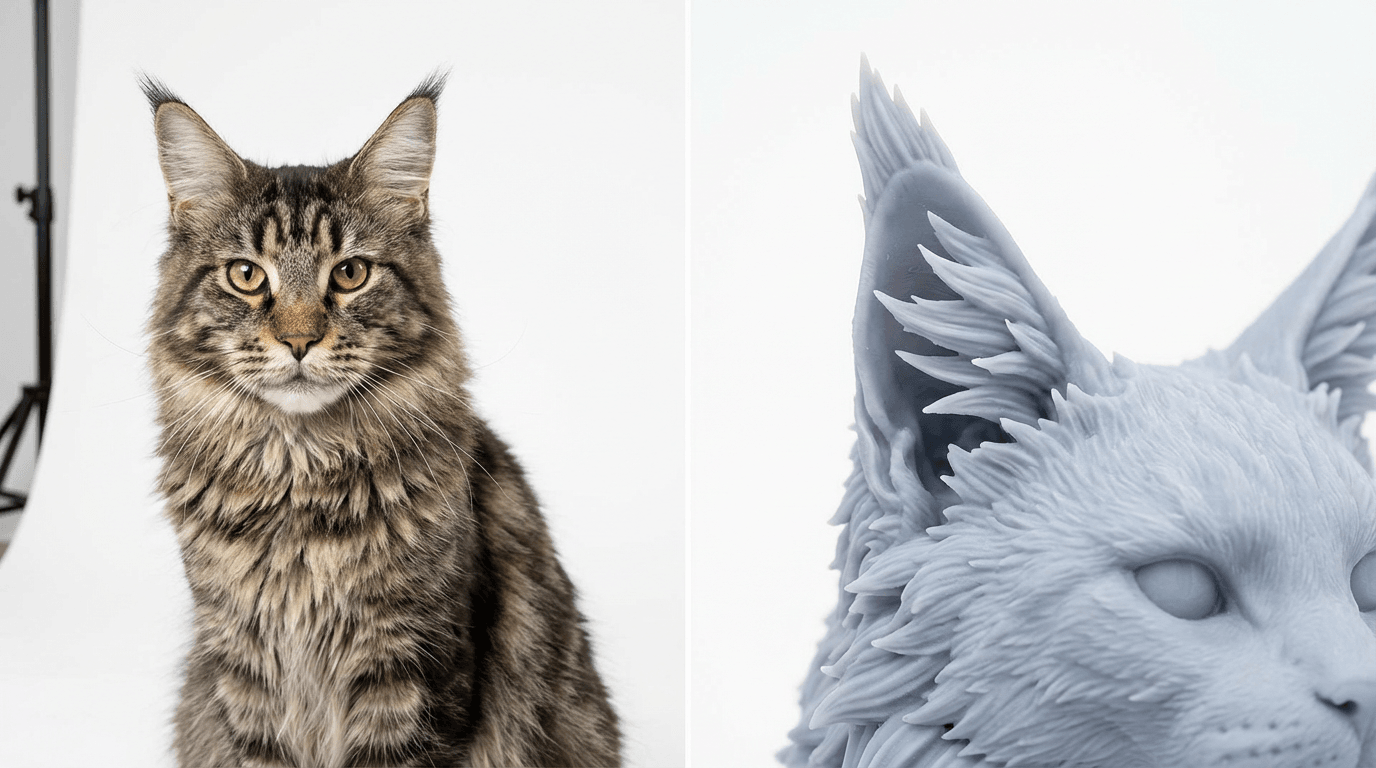
We need photos that show us the structure of the tuft so we can sculpt it as a coherent mass with surface texture, rather than a thousand impossible needles.
The "Over-Cure" Heuristic
In the shop, we have a rule of thumb: details need to be at least 0.3mm to survive post-processing. When you wash a print in isopropyl alcohol and then cure it under UV light, thin parts warp. If your photos don't show us the thick "base" of the ear tuft, we risk creating a model that is structurally unsound. We need to see the anchor point.Lighting Strategies: The Silhouette Technique
The biggest mistake we see with Maine Coon photos is direct flash. Flash flattens the subject. It illuminates the front of the ear and the background equally, erasing the depth cues we need to build a 3D model.To get the perfect reference for a sculptor, you need to think like a cinematographer. You want Rim Lighting.
The Golden Hour Setup
Go back to that garden scene. The reason the tufts looked so good was likely because the sun was behind or to the side of the cat. This creates a rim of light around the ears.- The Setup: Position your cat so the sun is hitting the back of their head at a 45-degree angle.
- The Result: The ear becomes dark, but the tufts glow white.
- Why We Need This: This clearly defines the boundary between "ear leather" and "hair." It tells the digital sculptor exactly where the solid geometry of the ear ends and the delicate geometry of the hair begins.
The "Raking Light" Texture Check
To capture the texture of the fur on the ear itself (the furnishings inside the ear), use side lighting. This is called "raking light." When light hits a surface from the side, it creates micro-shadows behind every tuft of hair.- The Science: In 3D modeling, we look for these shadows to determine "surface noise." If the light is head-on, the surface looks smooth. If the light is raking, we can see the flow direction of the coat.
- Action: Take a photo of your cat's profile near a window, where the window is to their side, not behind you.
Anatomy of a Tuft: What the Sculptor is Hunting For
When the team at PawSculpt sits down to analyze your photos, they are looking for specific anatomical landmarks that define the Maine Coon breed standard. It’s not just "hairy ears."1. The Lynx Tip Base
We need to see the insertion point. Does the tuft grow strictly from the very apex of the pinna (the ear flap), or does it start slightly down the back side? This determines the "flow" of the digital sculpture. If we get this wrong, the cat looks like it's wearing a hat rather than growing hair.2. The Inner Furnishings
These are the hairs growing inside the ear. On Maine Coons, these are massive. They often curl outward. A common failure mode in amateur sculpting is making these too straight. We need photos looking down into the ear slightly to see the curl pattern. Does it sweep left? Does it corkscrew?3. The Weight and Drape
Hair has weight. Even fine cat hair. In a static figurine, we have to sculpt "implied motion." If the tuft is long, gravity should pull it down slightly unless the cat is alert. We need photos of your cat in a relaxed state versus an alert state. This helps us average out the pose to create something that feels alive, not stiff.The 3D Printing Reality: Trade-offs in Resin
I want to be transparent about the manufacturing process because it helps you understand why we ask for specific angles.Orientation and Support Scars
In SLA printing, we have to support the model with scaffolding. We never want to put support struts on the focal points—the face and the ear tips.- The Challenge: If the ear tufts are the highest point of the model, they are the last thing to print. They are fragile.
- The Solution: We often orient the model so the head is tilted back. This moves the support structures to the back of the head or under the chin.
Your Role: This is why we need clear photos of the back* of the ears. We need to know what the fur texture looks like there, because that’s often where we hide the supports. If we have to guess, we might place a smooth patch where there should be fluff.
Brittleness vs. Detail
Standard resins are brittle. Drop a standard resin print, and the ear tips shatter. At PawSculpt, we use engineering-grade resins mixed with flex modifiers to add toughness. However, tough resins can sometimes be less precise with microscopic details than brittle standard resins. It’s a balancing act. We aim for a layer height of 35 microns—the sweet spot between speed and detail. To make this work, the "hairs" in the model are often sculpted as "clumps" or stylized volumes rather than individual strands. Your photos help us decide how to group those clumps so they look natural, not like spaghetti.The Shot List: Your Action Plan
You don't need a $3,000 camera. A modern smartphone is sufficient if you use it right. Here is the exact shot list a production engineer wants to see:1. The Profile Silhouette (Against a plain wall)
- Goal: To establish the curve of the ear and the length of the tuft.
- Technique: Get on the cat's eye level. Do not shoot from above. Shoot against a white or light gray wall.
2. The "Top-Down" Triangle
- Goal: To see the width of the ear base and the volume of the inner furnishings.
Technique: Stand over the cat while they look up at a treat. Focus on the space between* the ears.
3. The Macro "Insertion" Shot
- Goal: To see exactly where the tuft hair meets the skin.
- Technique: Use your phone's macro mode. Get within 3-4 inches of the ear tip. We need to see the skin texture.
4. The Back-of-Head Shot
- Goal: To determine the transition from neck ruff to ear back.
- Technique: Wait for the cat to look away (usually easy!). This is crucial for hiding support artifacts during manufacturing.
Post-Processing: Where the Magic Happens
Once the print comes off the plate, the work isn't done. This is another area where your reference photos are vital, specifically for the painting team.The Translucency Illusion
Resin is opaque (usually grey or white) after priming. Real hair is translucent. To replicate a Maine Coon's ear tuft, our painters use a technique called "glazing." They lay down opaque base colors and then layer transparent inks over the top.- Why this matters for photos: If you only send photos taken with a flash, the hair looks one solid color. We need those backlit photos to see the color variation. Is the tip of the tuft lighter than the base? Is there a reddish hue when the sun hits it?
- The "Dry Brush" Effect: We physically highlight the raised texture of the print using a dry brush technique. This catches the high points, just like the sun does. If your photos show us the "clumping" of the fur, we can sculpt the ridges that catch the paint brush.
When Things Go Wrong: Common Failure Modes
We’ve seen thousands of reference photos, and there are patterns to the ones that result in difficult builds.The "Portrait Mode" Trap
Modern phones use AI to blur the background (bokeh). Unfortunately, the AI often thinks the fine ear tufts are part of the background and blurs them out!
The Fix: Turn off* Portrait/Cinematic mode when photographing ear tips. Use standard photo mode to ensure the tips remain sharp.
The "Dark Cat in a Dark Room"
If you have a black smoke or dark tabby Maine Coon, low light is your enemy. The sensor creates "noise" (grain). In 3D modeling, we can't tell if that grain is fur texture or digital artifacting.
- The Fix: Go outside. Overcast days are actually better than bright sun for dark cats because the clouds act as a giant softbox, reducing contrast and highlighting texture.
Why This Level of Detail Matters
You might be wondering if this is overkill. It’s just a figurine, right?But we know it isn't. We know that for many of our clients, this figurine is a celebration of a best friend, or sometimes, a memorial for one that has passed. The grief of losing a pet is often triggered by the smallest things—the silence in the hallway, or the way the light hits a spot on the rug where they used to sleep.
When you hold a custom figurine in your hand, your thumb naturally gravitates to the ears. It’s a tactile memory. If that ear feels smooth when it should be tufted, or if the shape is just slightly "off," the illusion breaks. The brain rejects it.
But when the geometry is right—when the light catches the painted resin and mimics that translucent glow of the lynx tip—it triggers a spark of recognition. It feels true.
Capturing the Spirit
So, go back to the garden. Watch the light. Wait for that moment when the geometry aligns. Don't just snap a picture; capture the data. Capture the volume, the flow, and the transparency.The difference between a generic cat statue and a true portrait lies in the microns. It lies in the understanding that an ear tuft isn't just hair; it's a structure that defies gravity, catches light, and defines a personality. By giving us the right visual information, you allow us to bridge the gap between a digital file and a physical object that feels like home.
Frequently Asked Questions
Can you make a 3D model from just one photo?
Technically yes, but we strongly advise against it. A single photo flattens the subject, forcing the sculptor to guess about the depth of the snout and the width of the head. For a breed like a Maine Coon with complex geometry, we typically need at least 3 angles (front, side, back) to accurately calculate the depth and the flow of the ear tufts.Will the ear tufts break off my figurine?
They shouldn't! We use specialized engineering resins mixed with flex additives to reduce brittleness, making them much tougher than standard hobbyist prints. However, ear tips are the most delicate part of any model due to their thinness. We recommend displaying the figurine in a safe spot, like a curio cabinet or deep shelf, away from edges where it could be knocked over.My cat has passed away and I don't have perfect photos. Can you still help?
Absolutely. This is a very common situation, and we approach it with great care. Our sculptors are experts in breed anatomy. If you provide the photos you have, even if they are blurry or dark, we can fill in the gaps using our deep knowledge of Maine Coon physiology to recreate what's missing. We will work with you during the revision process to ensure it "feels" like your cat.Why do the ear tufts look thicker on the model than in real life?
This is a limitation of physics and additive manufacturing. Real hair is microns thick. If we printed it that thin, it would snap under its own weight or dissolve during the washing process. To print it in resin so it survives, we have to stylize it slightly, grouping hairs into "clumps" or volumes that are structurally sound (usually a minimum of 0.3mm thick).How long does the custom sculpting process take?
Quality takes time. Typically, the initial digital sculpt takes 2-3 weeks. We then send you a digital preview for approval. This is your chance to say, "The left ear tuft should be longer!" Once you approve the geometry, the physical printing, hand-painting, and curing process takes another 2-3 weeks.Ready to Get Started?
Now that you know what goes into creating the perfect pet figurine, it's time to bring your vision to life. Our master sculptors are ready to capture every detail that makes your pet unique.
Free instant AI preview • 3D artist preview within 7 days • 5 free revisions
