The Texture Map: How to Photograph Your Turtle's Shell for Maximum Realism
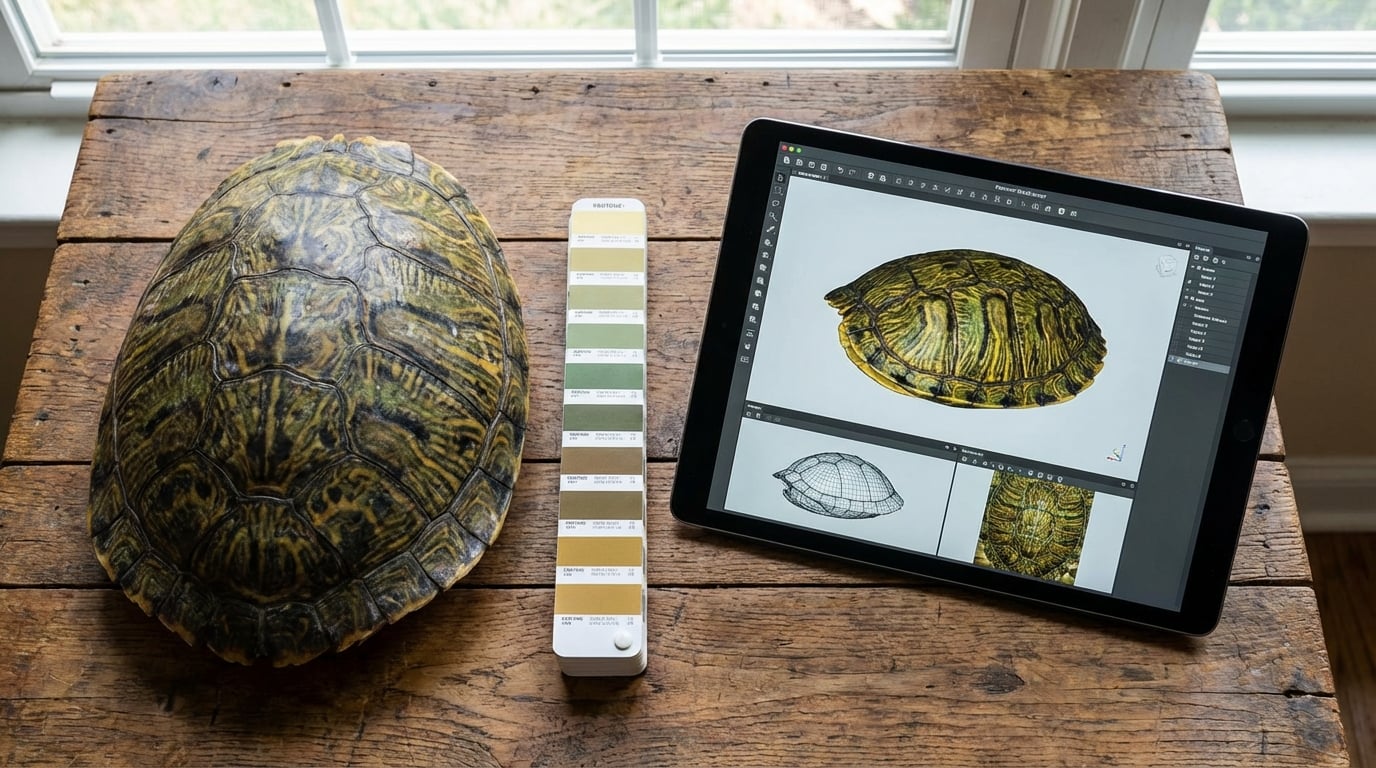
Have you ever stood at the water's edge, watching the sunlight hit a carapace and realizing just how complex that living geometry actually is? Capturing high-quality turtle shell photos isn't just about preserving a memory; it is about documenting a biological map of your pet's life history.
Quick Takeaways
- Avoid direct flash — it creates "specular hotspots" that destroy surface texture data.
- Capture the "Bridge" — the area connecting the top and bottom shells is often missed but crucial for 3D modeling.
- Shoot dry, not wet — while water enhances color, it hides the micro-texture of the scutes needed for digital sculpting.
- Secure a physical legacy — use these photos to create a custom figurine that replicates your turtle's unique growth patterns.
The Science of Scutes: Why Standard Photos Fail
Most pet owners approach photography from an aesthetic standpoint: "Does this look cute?" But when your goal is to provide reference material for a 3D artist or to capture the true essence of the animal, you need to approach it from a morphological standpoint.
A turtle's shell is not a single object. It is a complex bio-structure composed of bony plates covered by keratinous scales called scutes.
From a cognitive science perspective, our brains are wired to perceive depth through "texture gradients." When you take a blurry photo or one washed out by flash, you flatten these gradients. You lose the annuli—the growth rings that serve as the tree rings of your turtle's life. To a digital sculptor, a photo without texture definition is like a map without elevation lines. We can see the outline, but we can't navigate the terrain.
The Lighting Paradox: Diffuse is King
The biggest enemy of a realistic turtle shell photo is the "specular highlight." Because keratin is naturally somewhat glossy, direct light (like a camera flash or high noon sun) bounces off the surface, creating a pure white spot where no color or texture data exists.
In photography and 3D scanning, we call this "data loss."
To combat this, you need diffuse lighting. This type of light wraps around the curve of the shell rather than bouncing directly back at the lens.
The Ideal Lighting Setup
- The Overcast Day: Cloud cover acts as a giant softbox, scattering photons evenly across the shell.
- The Shade Technique: If it's sunny, place your turtle in the shade of a tree or building, but keep the background relatively bright.
- Indoor Diffusion: If shooting inside, bounce your light off a white ceiling or hang a thin white sheet over a window.
"A shell isn't just armor; it's a topographical map of survival. Every scratch and ridge tells a story."
The Wet vs. Dry Debate: A Biological Trade-off
This is where many pet owners get confused. You might think, "My turtle looks most vibrant when wet." Biologically, this is true. Water fills the microscopic imperfections in the keratin, reducing light scattering and making the colors appear deeper and more saturated.
However, for the purpose of creating a PawSculpt custom figurine or a detailed 3D model, dry photos are often superior.
Why? Because the water layer acts as a lens that smooths over the fine topographic details. The "grain" of the shell—the subtle ridges, the flaking, the pyramiding—is obscured by the surface tension of the water.
- Take the "Geometry Set" (Dry): Photograph the turtle completely dry to capture the physical shape and texture.
- Take the "Color Set" (Damp): Lightly mist the shell (don't soak it) to reveal the true coloration patterns for the texture map.
The Orthographic Requirement
In 3D modeling, we often work with "orthographic" views—images taken at a perfect 90-degree angle to the subject. This eliminates perspective distortion.
When you take a photo of your turtle from above, but at a slight angle, the scutes closest to the camera look huge, and the ones furthest away look compressed. This is "foreshortening." It tricks the brain and confuses the digital sculptor trying to recreate the proportions.
How to Shoot for Accuracy:
1. The Top-Down (Dorsal): Hold the camera directly parallel to the ground, centered exactly over the middle of the shell. 2. The Belly (Plastron): Carefully hold your turtle (safety first!) or place them on a clear glass table and shoot from underneath. 3. The Profile (Lateral): Get down on the ground. The lens should be level with the turtle's eye line, not looking down at them.Visual Guide: The Essential Shot List
To ensure you capture every millimeter of data required for a high-fidelity reproduction, follow this matrix.
| Shot Type | Camera Angle | Purpose for 3D Artist | Common Mistake |
|---|---|---|---|
| Dorsal | 90° Top-Down | Maps the primary scute pattern and overall width. | Shooting at a slight angle (perspective distortion). |
| Lateral | Eye-Level Side | Determines the height of the dome and slope of the back. | Ignoring the "bridge" (where top meets bottom). |
| Anterior | Eye-Level Front | Captures the head shape and opening of the shell. | Focusing only on the face, blurring the shell rim. |
| Posterior | Eye-Level Back | Shows the tail tuck and rear marginal scutes. | Forgetting this angle entirely. |
| Macro | Close-up (<6 inches) | Captures the specific texture of the keratin layers. | Camera shake causing blur on fine details. |
Capturing the "Bridge" and Marginal Scutes
The "bridge" is the bony structure that connects the carapace (top) to the plastron (bottom). In many species, like Box Turtles or Red-Eared Sliders, this area has intricate color patterns that wrap around the body.
Cognitively, we tend to ignore the bridge because we focus on the "face" or the "back." But a 3D model that lacks detail on the sides looks like a toy, not a living animal.
"The difference between a generic turtle and your turtle usually hides in the margins—the chipped scute on the left, the unique color bleed on the bridge. That's what we hunt for in the photos."
— The PawSculpt Team
The Biology of Color: It's Not Just Green
When photographing for a full-color 3D print, you must understand that "green" is rarely just green. A turtle's shell is a mix of melanin (blacks/browns), xanthophores (yellows), and blood flow beneath the bone.
Camera sensors often struggle with these organic earth tones, pushing them toward grey or oversaturated neon green.
The White Balance Hack:
Place a standard white piece of paper next to your turtle for one photo. This gives the digital artist a "reference white." They can use software to calibrate the colors in the photo based on that white paper, ensuring the olive tones of the shell are chemically accurate to real life.
Handling the Subject: Stress and Cortisol
We cannot ignore the psychological state of the animal. A stressed turtle will retract fully into its shell. While this is great for photographing the shell itself, a figurine usually looks best with the head and legs slightly extended—a sign of a relaxed, confident animal.
- Set up your lighting and camera first.
- Place the turtle in the zone.
- Wait.
- Do not poke or prod. Let curiosity take over.
When the turtle extends its neck to investigate, snap the shutter. This captures the "alert posture," which translates into a much more lifelike and engaging sculpture.
Frequently Asked Questions
Can I use photos from my phone for a 3D turtle figurine?
Absolutely. Modern smartphone cameras have incredible resolution. The key is to avoid digital zoom (which degrades quality) and ensure you have massive amounts of natural light. Tap the screen to focus specifically on the shell texture before snapping.How do I photograph a turtle that won't come out of its shell?
Biological imperatives drive behavior. If the turtle feels threatened, it hides. Place them in a warm, secure area with your camera ready on a tripod or stable surface. Sit quietly. It may take 10-15 minutes for their cortisol levels to drop enough for them to investigate.Should I clean my turtle's shell before photographing?
Yes, but be gentle. Use a soft toothbrush and tepid water to remove dried mud or heavy algae. A 3D artist might interpret a clump of mud as a physical bump on the shell. However, do not use oils or "shell shine" products, as these create artificial reflections that confuse the geometry.What if my turtle has shell damage or pyramiding?
Document it honestly. Pyramiding (raised scutes) or old injuries are part of your pet's history. Our process at PawSculpt captures these details faithfully because they are what make your turtle yours. If you prefer a "corrected" version, you can request that, but the most emotional impact usually comes from realism.Ready to Celebrate Your Pet?
Every pet has a story worth preserving. Whether you're honoring a beloved companion who's crossed the rainbow bridge or celebrating your shelled friend's unique personality, a custom PawSculpt figurine captures those details that make your pet one-of-a-kind.
Free instant AI preview • 3D artist preview within 7 days • 5 free revisions
