The Velvet Nose: Macro Photography Tips for Your Horse's Digital Twin
"God forbid that I should go to any heaven in which there are no horses," wrote R.B. Cunninghame Graham. Standing in the backyard paddock as the morning fog lifts, you don't just see a large animal; you see the map of a life etched into a velvet nose and a scarred shoulder. This guide isn't about capturing the perfect jump—it’s about mastering horse photography to preserve the tiny, intimate details that make your equine partner truly yours.
Quick Takeaways
- Macro tells the story — Close-ups of whorls, scars, and eye colors capture personality better than full-body shots.
- Lighting is texture's best friend — Soft, overcast light reveals coat patterns better than harsh noon sun.
- Distortion kills accuracy — Step back and zoom in rather than getting the phone camera too close to the muzzle.
- Reference is everything — PawSculpt's digital artists rely on high-resolution close-ups to recreate specific markings.
- The "Unseen" angles matter — Don't forget the view from above (the topline) and underneath (the belly markings).
The Micro-Geography of the Horse
Most equine photography guides focus on the "hero shot"—ears pricked, neck arched, looking majestic against a sunset. While we love those images, they often fail to capture the tactile reality of the horse. When you miss your horse, you don't usually miss their silhouette. You miss the specific way their forelock splits, the texture of their chestnuts, or the unique dusting of white hairs on their muzzle.
We call this the "Micro-Geography" of the horse. It is the landscape of their body that you know by heart but rarely see in photos.
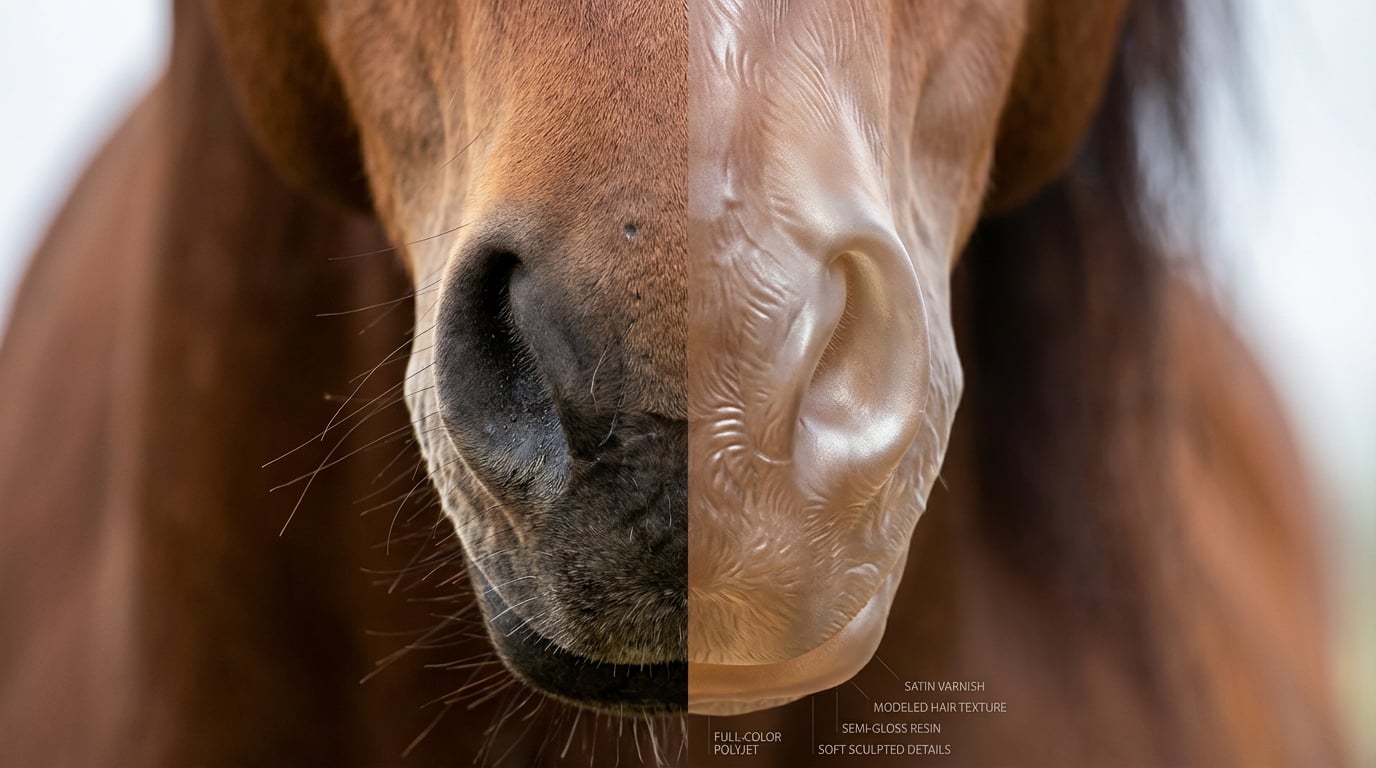
For the team here at PawSculpt, these details are the difference between a generic horse statue and a true digital twin. Because our process uses full-color 3D printing technology, we aren't limited by a painter's brush. If your horse has a dappled coat where the grey fades into flea-bitten specs, our printers can replicate that voxel by voxel (think of a voxel as a 3D pixel). But we can only model what we can see.
"The difference between a horse and your horse is often measured in millimeters and markings."
Why "Pretty" Photos Make Bad References
A common mistake pet parents make is sending us their favorite professional portrait where the background is blurred (bokeh) and the lighting is dramatic. While beautiful, these photos often obscure the transition points of markings.The Counterintuitive Insight: The best reference photo for a custom figurine is often the "ugliest" one. It’s the flatly lit, boring side profile where the horse looks a bit sleepy, but every inch of color and conformation is clearly visible without artistic shadows.
Gear Guide: You Don't Need a $5,000 Lens
Let's bust a myth right now: You do not need a DSLR with a telephoto lens to capture the details needed for a custom pet figurine. In fact, for the specific purpose of texture reference, your smartphone might actually be better—if you use it correctly.
Modern smartphones (iPhone 13/14/15 Pro, Samsung S23/24, etc.) have incredible computational photography capabilities. They process color and sharpen textures automatically. However, they have one major weakness: Lens Distortion.
The "Big Nose" Problem
Have you ever taken a photo of your horse's face from a foot away, and their nose looked like a giant balloon while their ears looked tiny? That's wide-angle distortion.If you send that photo to a 3D sculptor, they have to guess: Does this horse actually have a massive Roman nose, or is it just the camera?
- Back Up: Stand at least 6-8 feet away from your horse.
- Zoom In: Use the 2x or 3x telephoto option on your phone screen.
- Level Out: Hold the camera at the horse's barrel height, not your eye level.
Lighting the Landscape: The Texture Trap
Texture is created by the interplay of light and shadow. If the light is too direct (noon sun), the shadows are pitch black, hiding details. If the light is too dim (evening), the camera applies "noise reduction," smoothing out the fur texture until it looks like plastic.
We recommend the "Open Barn Door" technique.
Position your horse just inside the barn aisle, with the big doors open. You stand outside or in the doorway. The natural light flooding in is soft, directional, and wraps around the horse's muscles without creating harsh highlights. This is the "studio lighting" of the equestrian world, and it costs nothing.
Lighting Scenarios for Texture
| Lighting Condition | Effect on Coat Texture | Suitability for Reference Photos |
|---|---|---|
| High Noon (Direct Sun) | High contrast, deep shadows, "blown out" whites. | Poor. Hides markings in shadow. |
| Overcast / Cloudy | Soft, even light. No harsh shadows. | Excellent. True color representation. |
| Golden Hour | Beautiful warm tones, but alters coat color. | Fair. Good for art, bad for color matching. |
| Open Shade (Barn Aisle) | Directional soft light. Highlights muscle definition. | Best. ideal for 3D modeling reference. |
The Shot List: Mapping Your Horse
To create a true 3D replica, whether for a digital asset or a physical keepsake, you need to photograph your horse in zones. Think of it as scanning them.
Zone 1: The Head (The Soul)
This is where the personality lives.- The Whorls: Photograph the forehead straight on. The placement of hair whorls (cowlicks) is as unique as a fingerprint.
- The Eyes: Get close. Capture the color variation in the iris. Does your horse have a "human eye" (white sclera showing)?
- The Muzzle: This is critical. Many horses have "mealy" muzzles (lighter coloration) or pink snip markings that get lost in wider shots.
"A generic horse figurine is a decoration. A replica with your horse’s specific whorl pattern is a time machine."
— The PawSculpt Team
Zone 2: The Body (The Conformation)
- The Profile: Take a photo directly from the side. Ensure all four hooves are visible.
- The Topline: Get on a mounting block or ladder. Look down at the horse's back. This shows the sculptor the width of the barrel and the shape of the neck crest.
- The Chest: Stand directly in front. We need to see how wide the chest is and how the front legs track.
Zone 3: The Legs and Hooves (The Foundation)
This is the most overlooked area.- Ermine Spots: These are the black spots on white markings just above the hoof. They are notoriously difficult to invent if we can't see them.
- Hoof Color: Is the hoof striped? Solid black? Shell colored?
- Chestnuts/Ergots: While we don't sculpt every flake of a chestnut, their size and placement affect the silhouette of the leg.
Handling the "Chrome": Photographing White Markings
White markings (chrome) are tricky. Cameras try to "save" the highlights by darkening the image, or they overexpose the white until it's a glowing blob.
Pro Tip: Tap your phone screen on the edge of the white marking (where white meets color). This tells the camera to balance the exposure for both. If you have a paint horse or an Appaloosa, this is vital. The jagged edges of a pinto's markings are incredibly specific. Our full-color 3D printing process injects color directly into the resin, meaning we can replicate those "roaning" edges where white hairs mix with dark ones—but only if the photo isn't blown out.
The Challenge of the "Black Hole" Horse
Owners of black or very dark bay horses know the struggle. In photos, they often look like a horse-shaped void. You lose the shoulder definition and the stifles.
- Overexpose slightly: If using a phone, drag the little sun icon up just a hair.
- Use Reflective Light: Stand your horse on concrete or light gravel rather than dark dirt. The light will bounce up from the ground and illuminate the belly and legs.
- Wait for overcast days: Never photograph a black horse in direct sun for reference; the blue sky reflection will make their coat look blue-tinted.
From Pixel to Polymer: How We Use These Photos
When you commission a piece from us, we don't feed photos into an automated machine. A master 3D artist looks at your photos on one screen while sculpting on another.
They are looking for:
- Asymmetry: Is the left hip slightly lower? Is the right hoof slightly more upright? Real horses aren't symmetrical.
- Muscle Condition: Is your horse a fit eventer with a "hay belly," or a retired senior with a swayed back? We honor the horse as they are (or were).
- Coat Patterns: This is where PawSculpt shines. We use texture mapping to wrap your photos around the 3D model. The clearer your macro shots of the coat pattern, the more realistic the final custom figurine will be.
We've seen families heal by holding something tangible that feels accurate. It's not just about having a statue; it's about running your thumb over a figurine and seeing the same star-strip-snip combination that you kissed for twenty years.
Creating the Mood: It’s Not Just Anatomy
While anatomy is crucial for the sculpt, the mood is crucial for the pose.
Does your horse rest a hind leg constantly? Do they have a "mare stare"? Do they carry their head high and alert, or low and relaxed?
Include a video in your reference package. A 10-second clip of your horse walking and turning out in the paddock tells us volumes about their biomechanics and attitude. We can pause that video to catch a candid posture that feels more "them" than a forced halter pose.
"Grief isn't a problem to be solved. It's a love story that continues after the last chapter."
Dealing with the "Rainbow Bridge" Dilemma
We know that many of you reading this may have already said goodbye to your companion. You might not be able to go out to the barn and take new photos.
Don't panic.
- Crowdsource: Ask barn friends if they have photos of your horse in the background of their shots.
- Describe the "Unseen": Write to us. Tell us, "His left ear always flopped a bit," or "He had a small scar on his right stifle." Our artists can sculpt based on detailed descriptions combined with imperfect photos.
- Find a "Body Double": If your horse was a standard bay Quarter Horse, find a photo of a horse with a similar build online to help us get the muscle structure right, then we use your photos for the markings.
The Emotional Weight of Accuracy
There is a distinct feeling when you unbox a memorial item. If it looks 90% like your horse, it's a nice gesture. If it looks 100% like your horse—down to the way the mane falls to the left—it's an emotional anchor.
That accuracy requires a partnership. It requires you to look at your horse (or your photos) with a critical, loving eye. It asks you to notice the things you took for granted. The grey hairs around the eyes. The wind knots in the tail.
By taking the time to document these details, you aren't just taking pictures. You are curating a legacy. You are ensuring that the specific, unique beauty of your horse can be translated into a form that lasts forever.
Frequently Asked Questions
Can I use smartphone photos for a custom horse figurine?
Yes, absolutely. Modern smartphones are excellent for reference photos. The key is to avoid distortion. Instead of standing close to your horse's face, step back about 6-8 feet and use the telephoto (zoom) lens setting. This compresses the image and provides a true-to-life representation of your horse's proportions.How do I photograph a black horse so the details show up?
Black horses are notoriously difficult to photograph because cameras struggle to find contrast. The best approach is to photograph them on a cloudy day or in "open shade" (like a barn doorway). Avoid direct sunlight, which creates harsh shadows. If possible, stand the horse on a light-colored surface like concrete or gravel, which reflects light upward onto their belly and legs.What if my horse has passed away and I don't have perfect photos?
We specialize in memorial pieces and understand that perfect reference photos aren't always available. We can work with grainy photos, old prints, or videos. In these cases, detailed written descriptions help immensely. Tell us about their quirks—did they rest a leg? Did they carry their tail high? We can also use "body double" photos of horses with similar builds to supplement your images.Do I need to clean my horse before taking reference photos?
Ideally, yes. While we love a muddy pony, mud obscures the white markings and muscle definition that we need to replicate. A quick grooming session to remove dust and mud allows our artists to see the true coat color and the specific location of whorls and scars.How many photos should I submit for a custom figurine?
For the best results, we recommend the "compass points" approach: Front, Back, Left Side, and Right Side. Additionally, close-up macro shots of the face (front and profile) and any unique markings (stockings, blazes, scars) are incredibly helpful. The more visual data you provide, the more precise the final 3D print will be.Ready to Celebrate Your Pet?
Every pet has a story worth preserving. Whether you're honoring a beloved companion who's crossed the rainbow bridge or celebrating your furry friend's unique personality, a custom PawSculpt figurine captures those details that make your pet one-of-a-kind. From the specific whorl on their forehead to the unique socks on their hooves, horse photography helps us create a masterpiece.
Free instant AI preview • 3D artist preview within 7 days • 5 free revisions
