The Lighting Trap: Why Flash Photography Ruins Your Black Cat's Reference Photos
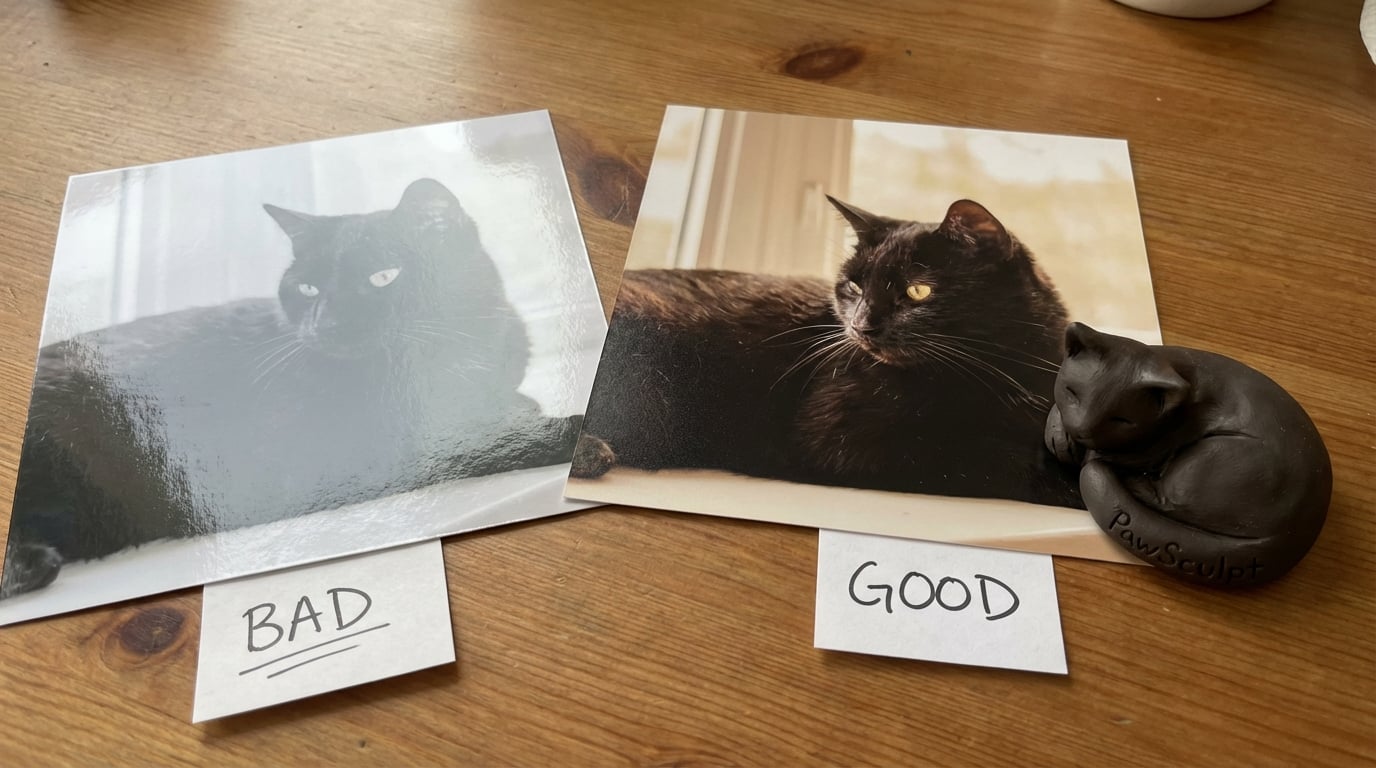
You’re holding your phone steady, waiting for Midnight to look up, but the moment you tap the shutter, the flash fires and turns your sleek panther into a shapeless, glowing-eyed blob. That burst of artificial light didn’t just ruin the shot—it obliterated the very details needed for accurate black cat photography.
Quick Takeaways
- Flash flattens dimension — it erases the subtle shadows that define your cat's muscle structure.
- Natural light is non-negotiable — diffuse window light creates the necessary contrast for black fur.
- Exposure compensation is key — manually underexposing slightly prevents black fur from looking grey or washed out.
- Reference photos need texture — for 3D modeling, we need to see the grain of the fur, which custom figurines rely on for realism.
The Physics of Black Fur (And Why Sensors Hate It)
Here is the brutal truth about photographing black cats: your camera is trying to fix a problem that doesn’t exist. Modern camera sensors are calibrated to 18% grey—essentially, they want the average brightness of a scene to be in the middle. When you point a lens at a black void (your cat), the camera panics. It thinks the scene is too dark and artificially boosts the exposure to make the black fur look grey.
Add a flash to this confusion, and you get disaster.
Black fur is highly reflective. It’s not a matte surface; it’s thousands of tiny, glossy fibers. When a direct flash hits those fibers, the light bounces straight back into the lens. This creates "specular highlights"—those harsh white spots that look like dandruff or dust—and completely crushes the blacks around them.
"To a camera sensor, a black cat isn't a pet; it's a lighting error it's desperately trying to correct."
If you are taking photos for a 3D modeling reference, this is catastrophic. A sculptor cannot model what they cannot see. If the photo shows a flat black silhouette with two laser-beam eyes, there is no data to interpret the shape of the snout, the set of the ears, or the curve of the shoulder.
The Window Strategy: Direction Matters
Most guides tell you to "use natural light." That is too vague to be useful. You need directional natural light.
The goal is to create a gradient on the black fur. You want to see where the light hits (a soft grey-black) and where the shadow falls (a deep true black). This difference is what tells our eyes—and our sculptors—that the object is three-dimensional.
The Setup
1. Find a large window that does not have direct sun streaming in. Direct sun is almost as bad as a flash; it creates contrast that is too harsh. 2. Position your cat at a 45-degree angle to the window. Do not put them with their back to the window (silhouetting them) or facing the window directly (flattening them). 3. Get on their level. Shoot from the floor.Why this works: The light raking across the side of the cat catches the edges of the fur tufts. Suddenly, you aren't photographing a black hole; you're photographing texture. You can see the separation between the chin and the chest. You can see the velvet texture of the nose bridge.
Lighting Scenario Comparison
| Lighting Source | Effect on Black Fur | Suitability for 3D Reference |
|---|---|---|
| Direct Flash | Flattens image, causes "laser eyes," highlights dust | 0/10 (Unusable) |
| Direct Mid-Day Sun | Harsh shadows, high contrast, "oil slick" shine | 4/10 (Poor) |
| Overhead Room Lights | Creates weird color casts (orange/yellow), unnatural top-down shadows | 5/10 (Mediocre) |
| Overcast Window Light | Soft gradients, visible fur texture, accurate color | 10/10 (Perfect) |
The "Negative Fill" Secret
Here is the counterintuitive insight that most pet photography articles miss: sometimes you need less light on one side to make the black fur pop.
In professional photography, this is called "negative fill." If you have white walls in your house, light bounces everywhere, filling in the shadows and making your black cat look grey and hazy.
The Fix:
Grab a piece of black poster board or a dark blanket. Hold it up on the side of the cat opposite the window. This stops light from bouncing back onto the shadowed side of the cat. It deepens the shadows, making the black look truly black, while the window side remains illuminated. This maximizes the 3D look of the image, which is exactly what we need when we’re digitally sculpting the geometry of a pet.
Phone Settings: Stop Letting Auto-Mode Decide
Your smartphone is smarter than you think, but it’s biased against black cats. You have to override its brain.
For iPhone Users:
Tap the screen where your cat’s face is. A yellow box with a sun icon will appear. Drag that sun icon down slightly. You want to underexpose the image just a hair. This protects the highlights on the shiny fur and keeps the black looking rich and deep, rather than washed-out grey.
For Android Users:
Go into "Pro" or "Manual" mode if you have it. Look for "EV" (Exposure Value). Set it to -0.3 or -0.7.
Turn Off HDR:
High Dynamic Range (HDR) tries to balance the lightest and darkest parts of an image. With black cats, HDR often over-processes the fur, making it look crispy or digital. Turn it off to get a smoother, more natural representation of the coat.
"A slightly dark photo with preserved texture is infinitely better than a bright photo that looks like digital noise."
Background Control: Contrast is King
If you photograph a black cat on a dark brown leather couch, you are playing on hard mode. The camera struggles to find the edge where the cat ends and the couch begins.
For the best reference photos, place your cat on a light-colored surface. A grey blanket, a light wood floor, or even a white sheet works wonders. This forces the camera to recognize the contrast edges. It ensures that the outline of your pet is crisp and defined.
The "Eye-Level" Mandate:
We see this constantly in submitted photos—the "human perspective" shot looking down at the cat's back. This distorts the proportions. It makes the head look huge and the legs look tiny. For a figurine that captures your pet's true stance, we need you to lie on your stomach. The lens should be parallel to the cat's eyes or chest.
Action Plan: The 15-Minute Shoot
Stop trying to get the perfect shot during your cat's "zoomies." It won't happen. Motion blur is the enemy of texture.
- Wait for the nap window. Catch them when they are groggy, usually mid-afternoon.
- Clean the lens. The oils from your pocket smear the lens, creating a hazy "bloom" around lights that ruins black contrast. Wipe it on your shirt.
- Use a lure, not a toy. A toy makes them jump. A treat or a small noise makes them freeze and focus. Hold the treat right above the camera lens to get that direct eye contact.
- Take a burst. Don't take one photo. Hold the shutter down. You might take 50 photos to get 3 perfect ones where the eyes are open and the ears are forward.
Why This Matters for Your Figurine
When you send photos to PawSculpt, our artists aren't just looking at a picture; they are deciphering geometry.
We use full-color 3D printing technology to create your figurine. This means the color isn't painted on top; it is built into the resin itself, voxel by voxel. To get that depth of color—the midnight blue sheen on a shoulder, the rusty undertone on the belly—we need reference photos that show those subtleties.
A flash photo destroys that data. A natural light photo preserves it.
"We can sculpt a generic cat from a silhouette, but we need texture and shadow to sculpt your cat."
— The PawSculpt Team
If you provide us with a flat, flash-blasted image, we have to guess the muscle structure. If you give us a window-lit photo with clear shadows, we can replicate the exact way your cat's haunches sit or the specific asymmetry of their whiskers.
Frequently Asked Questions
Can I edit the photos before sending them to you?
Generally, no. We prefer the raw, unedited photos. Filters often crush the black levels or tint the image, giving us false color information. If the photo is too dark, our team can brighten it professionally to see the details we need.What if my cat is "void" black with no visible markings?
Even the darkest cats have structure. Focus on the silhouette. Get photos against a very bright white background (like a wall) so we can see the exact outline of their ears, tail, and paws. The profile view is especially critical for solid black cats.How many photos do you actually need?
Quality beats quantity. We need four key angles: front face (eye level), left profile (full body), right profile (full body), and a back view showing tail markings. A few close-ups of the face in natural light are a bonus.My cat hates the phone. How do I get them to look?
Curiosity is your friend. Crinkle a wrapper or use a squeaker they haven't heard before. You have about 2 seconds of intense focus before they realize it's a trick. Be ready to shoot immediately.Do video clips help?
Yes! A slow pan around your cat while they are eating or sitting still can be incredibly helpful. It allows our sculptors to pause and see the transition of shapes from different angles, which is often missed in still photos.Ready to Celebrate Your Pet?
Every pet has a story worth preserving. Whether you're honoring a beloved companion who's crossed the rainbow bridge or celebrating your furry friend's unique personality, a custom PawSculpt figurine captures those details that make your pet one-of-a-kind.
Free instant AI preview • 3D artist preview within 7 days • 5 free revisions
