Caring for Your Resin Figurine: A 2-Minute Routine to Protect Your Persian Cat Sculpture Forever
When was the last time you held something small enough to fit in one palm—smooth resin, precise weight, the curve of a familiar face pressed against your thumb—and realized you had no idea how to care for a resin figurine so it lasts as long as the memory it holds?
Quick Takeaways
- Resin figurines need UV protection above all else — direct sunlight degrades color and causes yellowing within months
- The 2-minute care routine is real — a soft brush and proper placement protect your figurine for decades
- Never use household cleaners on full-color 3D prints — chemicals strip the protective clear coat and damage embedded pigments
- Understand what your figurine is made of — PawSculpt's full-color resin figurines use embedded color technology that requires different care than traditional painted models
- Display location matters more than cleaning frequency — where you place your figurine determines 80% of its longevity
What Your Persian Cat Figurine Actually Is (And Why That Changes Everything)
Here's the thing most pet figurine care instructions get wrong: they assume your figurine is a solid chunk of resin with paint on top. If your figurine comes from a full-color 3D printing process—like the ones PawSculpt produces—that assumption will lead you to care for it incorrectly.
A full-color resin 3D print is fundamentally different from a traditionally manufactured figurine. The color isn't a coating. It's not a layer of acrylic sitting on a white surface. The pigment is embedded directly into the UV-cured photopolymer resin during printing, voxel by voxel (a voxel is essentially a 3D pixel). Think of it less like paint on a wall and more like dye in fabric—the color is part of the material itself.
This distinction matters enormously for care. When color is embedded in the resin matrix rather than applied on top, you're not worried about paint chipping or flaking. But you are worried about different failure modes: UV degradation of the photopolymer, surface bloom (a whitish haze that can develop on cured resin), and damage to the protective clear coat that seals and enhances the surface.
Your Persian cat figurine—with its digitally sculpted coat texture, those flattened facial features captured in precise 3D geometry, the subtle gradients of cream and silver fur printed directly into the resin—deserves care that matches what it actually is. Not what people assume it is.
The Clear Coat: Your Figurine's First Line of Defense
After a full-color resin figurine is printed, cleaned, and cured, the final production step is applying a clear coat (sometimes called a varnish or sealant). This is the only post-printing manual step in the process. No color is added at this stage. The clear coat serves three critical functions:
- UV filtering — slows photopolymer degradation from ambient light
- Surface sealing — prevents moisture absorption into micro-pores in the resin
- Optical enhancement — adds sheen and deepens the vibrancy of the embedded colors
When people damage their resin figurines through improper cleaning, they're almost always damaging the clear coat first. Once that barrier is compromised, the resin underneath becomes vulnerable. Every care step I'll outline below is designed to protect this layer.
"The clear coat isn't cosmetic. It's structural armor. Treat it that way, and your figurine will outlast your bookshelf."
The 2-Minute Routine That Actually Works for Resin Figurine Care
Most cleaning guides overcomplicate this. You don't need a dedicated workstation. You don't need specialty products (yet). You need consistency and the right touch.
Here's the weekly routine, broken down honestly:
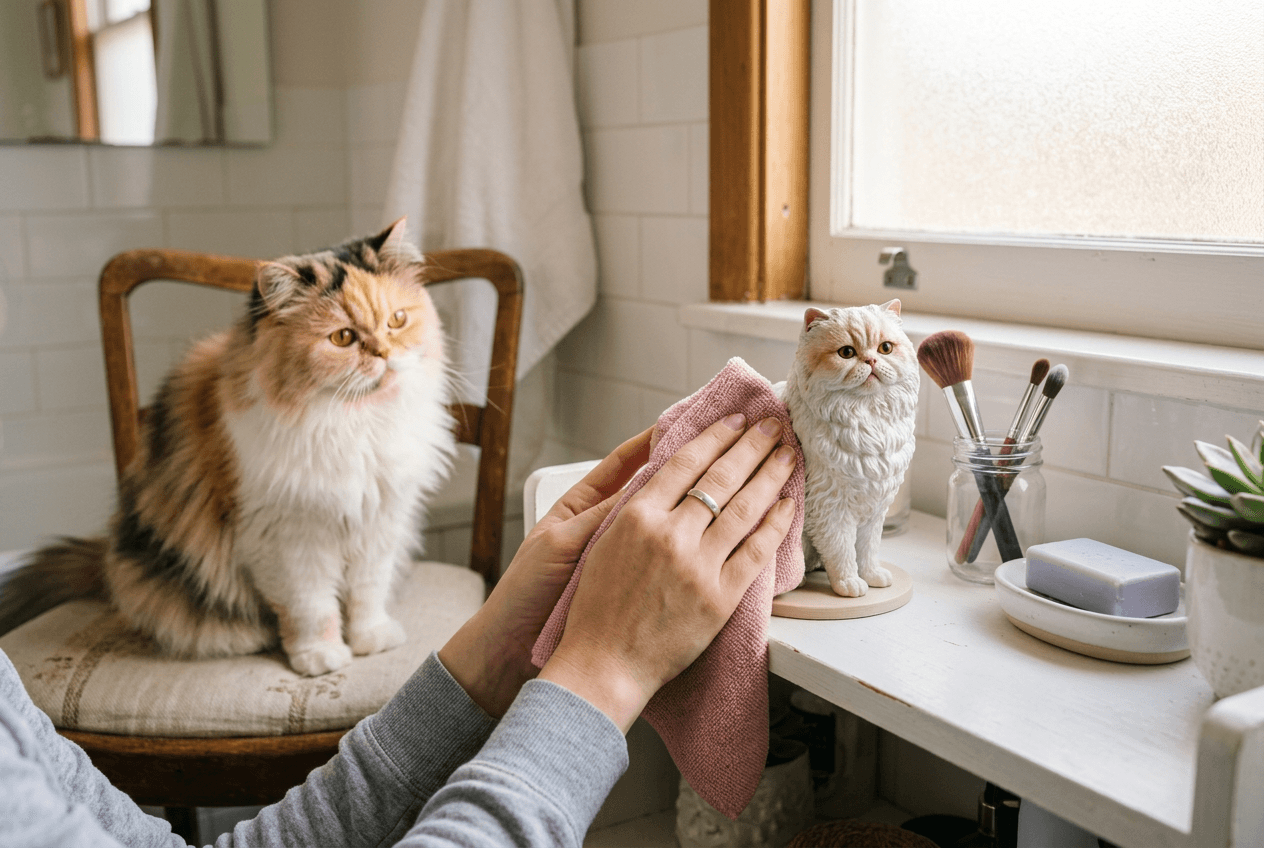
Step 1: The Soft-Brush Pass (30 seconds)
Use a clean, dry, soft-bristle brush—a makeup brush works perfectly, or a dedicated figurine dusting brush with natural fibers. Synthetic brushes with stiff tips can micro-scratch clear coat over time.
Start at the top of the figurine and work down. For a Persian cat sculpture, pay special attention to the digitally sculpted fur texture. Those tiny ridges and valleys that mimic coat flow? Dust settles into them. A gentle, directional brushstroke—following the grain of the sculpted fur—lifts particles without grinding them against the surface.
The mistake most people make: using compressed air. It seems logical, but canned air propellants can leave a chemical residue on resin surfaces. And if you're too close, the force can snap delicate features. Persian cat figurines with their longer sculpted fur textures are especially prone to trapping propellant moisture in textural crevices.
Step 2: The Visual Check (30 seconds)
Hold the figurine at eye level under a light source. Tilt it slowly. You're looking for three things:
- Bloom — a milky, whitish haze on the surface (early sign of UV exposure or moisture issue)
- Micro-cracks — hairline fractures in the clear coat, often visible only at an angle
- Discoloration shifts — any area where embedded color appears to be fading unevenly
This is the same principle used in quality control during figurine production: raking light inspection. By holding the piece at an angle to a light source, surface defects cast tiny shadows that make them visible. It takes practice, but after a few weeks you'll spot changes immediately.
Step 3: Occasional Damp Wipe (60 seconds, monthly)
Once a month—or when you notice a smudge from handling—dampen a microfiber cloth with distilled water (not tap water; mineral deposits can leave spots on clear coat). Wring it nearly dry. Gently wipe the figurine's surface, again following the direction of sculpted texture.
Never use:
- Window cleaner (ammonia strips clear coat)
- Rubbing alcohol above 50% concentration (can cloud photopolymer)
- Paper towels (wood fibers scratch at the micro level)
- Any product with acetone, even trace amounts
That's it. Three steps. Two minutes at most. The discipline isn't in the complexity—it's in the consistency.
A Morning With the Routine
Picture this: Sunday morning. Coffee's on the counter. You walk past the shelf in the hallway where your Persian cat figurine sits—the one that captures the way Mochi used to tuck her paws beneath her chest, that specific pose. You pick it up, feel the cool, smooth weight of cured resin in your hand. A quick pass with the brush you keep in the drawer below. A tilt under the hallway light. Back on the shelf. Fifteen seconds, and you've just added years to its life.
The Real Enemies of Resin Figurines (Ranked by Actual Damage)
Not all threats are equal. Here's what genuinely damages full-color resin figurines, ranked by how often we've seen it cause problems—not by how dramatic it sounds.
| Threat | Severity | How Fast It Acts | Reversible? | Prevention Difficulty |
|---|---|---|---|---|
| Direct sunlight (UV) | Critical | Weeks to months | No — color loss is permanent | Easy — just relocate |
| Heat above 40°C / 104°F | High | Hours to days (warping) | Sometimes — minor warps only | Moderate |
| Chemical cleaners | High | Immediate to days | Rarely — clear coat damage compounds | Easy — use water only |
| Repeated handling without washing hands | Moderate | Months | Partial — oils can be cleaned early | Easy |
| Humidity extremes | Moderate | Months to years | Sometimes | Depends on climate |
| Impact / drops | Variable | Instant | Depends on break location | Easy — secure placement |
UV Exposure: The Silent Destroyer
This is the counterintuitive insight that surprises most people: your figurine's biggest enemy isn't a fall—it's a sunny windowsill.
UV radiation breaks down the molecular bonds in photopolymer resin. The same UV wavelengths that initially cured the resin during manufacturing continue to act on it after production. Over-curing causes brittleness, yellowing, and gradual color shift. The embedded pigments—which gave your Persian cat's coat that precise champagne-to-silver gradient—lose their vibrancy unevenly. Warm tones fade first. Blues and greens hold longest.
The clear coat includes UV inhibitors, but they're not infinite. Think of them like sunscreen: they delay damage, they don't prevent it forever.
Practical rule: if sunlight touches the spot where your figurine sits for more than 30 minutes per day, move it. A shelf 3 feet from a window versus directly on the windowsill can mean the difference between decades of color fidelity and visible fading within a single summer.
Heat and the Warping Problem
Full-color resin has a heat deflection temperature (the point where it starts to soften under load) that typically falls somewhere in the 40–60°C range, depending on the specific photopolymer formulation. You'll never hit that in a normal living room. But a figurine on a shelf above a radiator? In a south-facing window during July? In a car during transport?
Those scenarios reach dangerous temperatures fast. And here's what makes it worse for detailed figurines: warping doesn't happen uniformly. Thin features distort first. A Persian cat's sculpted ears, the delicate curl of its tail, the fine texture of its chest fur—these warp before the base does. By the time the base shows distortion, the details are already compromised.
"A figurine doesn't break all at once. It changes in the places you love most first—the ears, the curve of the tail, the expression."
The Oil from Your Hands
This one gets overlooked constantly. The natural oils on your skin—especially after applying lotion, handling food, or sweating—leave a residue on resin surfaces. Over months of regular handling, this residue builds up, attracting dust that bonds to the oily surface and gradually dulling the clear coat.
The fix is simple: wash and dry your hands before handling your figurine. Or pick it up by the base only. Some collectors keep cotton gloves near their display shelf, which might seem excessive until you realize a $2 pair of gloves protects an irreplaceable keepsake.
How to Clean a 3D Printed Figurine When Something Goes Wrong
The weekly routine handles normal dust and light fingerprints. But life happens. Someone knocks your figurine into a coffee mug. The cat (the living one) bats it off the shelf into a houseplant. A child explores it with sticky fingers.
Here's the escalation protocol, from gentlest to most aggressive. Always start at Level 1 and only move up if needed.
Level 1: Distilled Water + Microfiber
Dampen a high-quality microfiber cloth with distilled water. Gently wipe. Allow to air dry completely before returning to display. This handles 90% of incidents.
Level 2: Mild Soap Solution
Mix one drop—literally one drop—of pH-neutral dish soap (no fragrances, no antibacterial additives) into a cup of distilled water. Dampen a microfiber cloth in the solution, wipe the affected area, then follow immediately with a second cloth dampened with plain distilled water to remove soap residue. Air dry.
Why pH-neutral matters: the clear coat on resin figurines is chemically stable within a narrow pH range. Strongly alkaline cleaners (most kitchen degreasers) or strongly acidic solutions (vinegar, citrus cleaners) can chemically react with the coating, causing hazing or softening.
Level 3: Isopropyl Alcohol (Targeted, Careful)
For stubborn marks—dried food, adhesive residue, ink—a cotton swab lightly dampened with 70% isopropyl alcohol can be used on the specific spot only. Don't soak the area. Don't rub aggressively. Dab, lift, check. Dab, lift, check.
Critical warning: alcohol above 90% concentration can cloud or whiten certain photopolymer resins. It strips the clear coat faster. Stick to 70% and use it sparingly. This is a last resort, not a routine tool.
Level 4: Professional Restoration
If your figurine has sustained significant damage—a deep scratch through the clear coat into the pigmented resin, a broken feature, or widespread yellowing from UV exposure—the best course of action is to contact the manufacturer. For custom 3D-printed pet figurines, a new clear coat application or even a reprint may be possible. This isn't a failure. It's the advantage of digital fabrication: the original 3D file still exists.
| Cleaning Level | When to Use | What You Need | Risk to Figurine | Success Rate |
|---|---|---|---|---|
| Level 1: Distilled water | Weekly maintenance, light dust, fingerprints | Microfiber cloth, distilled water | Virtually none | 95%+ |
| Level 2: Mild soap | Smudges, light grime, food residue | pH-neutral soap, two microfiber cloths | Very low | 90% |
| Level 3: IPA spot treatment | Adhesive, ink, stubborn stains | 70% isopropyl alcohol, cotton swabs | Moderate if overused | 75% |
| Level 4: Professional help | Cracks, breaks, severe yellowing, deep scratches | Contact manufacturer | N/A — expert handles it | Varies |
Where to Display Your Persian Cat Figurine (The Placement Strategy Nobody Talks About)
Most guides say "keep it out of sunlight" and stop there. That's incomplete. Display placement is about managing a matrix of environmental factors simultaneously. Let me walk through what actually matters.
The Ideal Display Conditions
- Temperature: 18–24°C (65–75°F) — normal room temperature
- Humidity: 40–60% relative humidity — avoid both bone-dry and tropical
- Light: Indirect ambient light only; LED lighting preferred over halogen or incandescent (LEDs emit minimal UV)
- Air circulation: Moderate; avoid direct HVAC vents (temperature cycling stresses resin)
- Vibration: Minimal; not on a speaker, not near a frequently-slammed door
Here's the insight that changes how you think about display: the worst spot in most homes isn't the sunniest. It's the one with the most temperature variation. A shelf near an exterior wall in a climate with cold winters experiences daily thermal cycling—warming during the day, cooling at night. Over months, this cycling creates micro-stresses in the resin that can lead to surface cracking, even without any UV exposure at all.
The best spot? An interior wall, away from windows and exterior walls, at mid-height (not near the ceiling where heat accumulates, not near the floor where cold air pools). A bookshelf in a hallway often hits every criterion perfectly.
Display Cases: Worth It or Overkill?
A glass or acrylic display case adds meaningful protection—but not for the reasons most people think. The primary benefit isn't UV filtering (most glass blocks only some UV wavelengths, and acrylic varies widely). The primary benefit is dust reduction. A sealed case reduces dust accumulation by roughly 80–90%, which means your biweekly brush routine becomes a monthly one, and you're physically handling the figurine less often.
If you invest in a case, choose one with:
- UV-filtering acrylic (specifically marketed as UV-protective, not standard acrylic)
- No interior lighting, or cool-running LED strips only (halogen spotlights inside a sealed case create a tiny greenhouse)
- Enough clearance that the figurine doesn't touch the walls or top
"We've seen figurines arrive back for repair after five years on a mantel versus fifteen years in a case. The case always wins. Always."
— The PawSculpt Team
The Garage Problem
We need to address this directly because it comes up more often than you'd expect. People store boxes of keepsakes in garages, attics, and basements. If you ever need to store a resin figurine temporarily, the garage is among the worst options. Temperature swings in an uninsulated garage can range from below freezing to well above 40°C in a single year. Humidity is uncontrolled. Dust, chemical fumes from vehicles or stored solvents, rodent activity—every environmental threat concentrates in that space.
If temporary storage is unavoidable, wrap the figurine in acid-free tissue paper, place it in a rigid container (not a flexible bag—resin needs protection from compression), and store it in the most climate-stable part of your home. A closet in an interior room beats a garage every single time.
Understanding the Material: A Deeper Look at Full-Color Resin
You don't need a materials science degree to care for your figurine well. But understanding a few basics about what full-color photopolymer resin actually is will make every care decision more intuitive.
How the Color Gets In
During full-color 3D printing, the machine deposits and cures resin layer by layer—typically in the 25–50 micron range per layer (for reference, a human hair is roughly 70 microns thick). At each layer, the printer deposits pigmented resin in precise patterns, embedding color at the voxel level. The result is a solid object where the color extends into the material, not just across its surface.
This is why, if you were to chip a full-color resin figurine (which is difficult to do without deliberate force), the color at the chip site would be consistent with the surface. There's no white substrate underneath. The color goes through.
This embedded-color structure has a specific implication for care: you cannot "touch up" a full-color 3D print the way you'd touch up a traditional figurine. If color is lost due to deep scratching or UV bleaching, you can't simply add color back on top and have it match. The color matching of the original print is calculated at the digital level, with the printer controlling pigment ratios per voxel. Replicating that with a brush and paint pot is effectively impossible.
This is both a strength and a responsibility. The color won't chip, peel, or flake under normal conditions. But it also can't be easily restored if damaged. Prevention—not repair—is the correct strategy.
Resin Brittleness: The Honest Truth
Photopolymer resin, once fully cured, is harder and more rigid than most people expect. It's not rubbery or flexible. It has a feel somewhere between dense ceramic and hard plastic—smooth, cool to the touch, with a satisfying weight that comes from its solid resin density.
But rigid materials have a trade-off: they're brittle under point impact. Drop a resin figurine onto carpet from shelf height? Probably fine. Drop it onto tile from the same height? You might lose an ear or a tail tip. The material doesn't flex to absorb the impact the way softer plastics do.
For a Persian cat figurine specifically, the areas of highest risk are:
- Ears — thin, protruding geometry
- Tail — if sculpted in an extended or curved position
- Any base-to-body junction — where the figurine meets its platform, stress concentrates
This isn't a flaw in the manufacturing—it's a fundamental property of the material class. High detail resolution requires a hard, rigid resin. Softer resins can't hold the fine textures that make a Persian cat's coat look convincingly fluffy in sculpted form. The tradeoff between detail fidelity and impact toughness is real, and every figurine maker navigates it.
Practical takeaway: secure your figurine with museum putty (a removable adhesive putty used in earthquake-prone areas to fix objects to shelves). A small dab under the base prevents the most common cause of breakage—getting knocked off a shelf. It costs a few dollars and adds zero visual impact.
What to Expect: The Journey from Photo to Figurine
Understanding how your figurine was made helps you care for it better. Not because you need to become a 3D printing expert, but because knowing the process reveals why certain care steps matter.
The Photo-to-Sculpt Workflow
When you submit photos to a company like PawSculpt for a custom pet figurine, those images become reference material for a digital sculptor. The sculptor works in 3D software—tools like ZBrush or Blender—to model your pet's likeness from scratch. This isn't a scan or a filter applied to a photo. It's a trained artist interpreting anatomy, proportions, and personality from 2D references and building a 3D model vertex by vertex.
For Persian cats, this process involves specific challenges that the sculptor navigates:
- Brachycephalic facial structure — the flattened face, prominent eyes, and compressed muzzle of a Persian require careful proportional checks. The American Kennel Club's Persian breed profile (and equivalent cat breed standards) provide anatomical baselines, but every individual cat's face is unique.
- Long coat flow — sculpting the direction and layering of fur digitally requires understanding how a Persian's coat falls, parts, and bunches around the chest, haunches, and tail. The sculptor references your photos to match your specific cat's fur patterns and density.
- Color mapping — the digital model receives a detailed color map that tells the printer exactly which pigments to deposit where. Your cat's subtle tabby markings, the slight difference between the fur color on their back versus their belly, the pink of their nose leather—all of this is specified digitally before printing begins.
Print Orientation and Why It Matters for Durability
Before the figurine is printed, a technician decides its orientation on the build plate—essentially, which direction the figurine faces relative to the printer's layer-by-layer construction. This decision affects everything: surface quality, structural strength, and where support structures attach.
Supports are temporary scaffolding structures printed alongside the figurine to hold overhanging features in place during the build. After printing, they're carefully removed. The spots where supports attached—called support witness marks—receive post-processing attention (cleaning, smoothing) but may retain faint texture differences visible under close inspection. This is normal for all resin 3D printing and doesn't indicate a defect.
For a Persian cat figurine, the orientation is typically chosen to minimize support contact on the face and the most visible fur surfaces, placing support structures underneath, on the base, or on less visible areas.
Post-Processing: What Happens After the Printer Stops
Once the full-color print is complete, the figurine goes through several post-processing steps:
- Washing — removal of uncured liquid resin using a solvent bath (often isopropyl alcohol) or specialized cleaning solution
- Post-curing — additional UV exposure in a controlled curing chamber to fully harden the resin and maximize its mechanical properties
- Support removal — careful detachment of support structures, followed by smoothing of witness marks
- Clear coat application — the protective sealant layer that provides UV resistance, surface sealing, and optical enhancement
- Quality inspection — dimensional checks, symmetry verification, surface inspection under raking light, and color accuracy review against the approved digital preview
No color is added during post-processing. The figurine emerges from the printer in full color. Every step after printing is about protection, refinement, and quality assurance—not decoration.
Long-Term Preservation: Thinking in Decades, Not Months
Here's where most figurine care guides stop being useful. They tell you how to dust. They don't tell you how to think about preservation across a timeline that matters—which, for a memorial figurine or a keepsake of a beloved pet, might be twenty, thirty, or fifty years.
The 5-Year Check
At the five-year mark, perform a thorough inspection:
- Hold the figurine under strong, angled light and rotate it slowly. Look for any yellowing, especially on lighter-colored areas (whites and creams show UV damage first—particularly relevant for light-coated Persian cats).
- Run your fingertip gently across the base. Does the clear coat still feel smooth and slightly slick? Or has it developed a matte, slightly tacky texture? Tackiness can indicate early clear coat breakdown.
- Check for bloom — that milky haze mentioned earlier. It typically appears on surfaces that experience regular temperature cycling.
If the clear coat shows wear at the five-year mark, reapplication is possible. A thin layer of UV-resistant clear coat (available from hobby and model-making suppliers) can restore protection. Use a spray formulation, not a brush-on, to avoid stroke marks. Apply in thin coats and allow full curing between layers.
The Generational Question
There's a deeper question underneath all of this practical advice, and it's worth sitting with for a moment.
Why do we preserve these objects so carefully? A figurine is, at the material level, a few ounces of cured photopolymer resin. But you already know it's not just that. It's the specific tilt of Mochi's head. The way your cat's coat caught the afternoon light. The weight of an absence made into something you can hold.
The ancient Egyptians mummified their cats and placed them in decorated coffins. We print ours in full-color resin and set them on bookshelves. The technology changes. The impulse doesn't. We make things solid because memory is not solid. We give form to what we're afraid of forgetting.
Caring for a resin figurine isn't really about resin. It's about maintaining your promise to remember a specific, unrepeatable creature who shared your days.
"We preserve objects because memory has no weight. A figurine gives your love something to rest on."
Common Mistakes to Avoid When Cleaning 3D Printed Figurines
Let's be direct about the errors we've seen most often, because some of them are genuinely counterintuitive.
Mistake 1: Using "Gentle" Household Cleaners
Products marketed as gentle—baby wipes, lens cleaning solutions, "natural" surface sprays—often contain ingredients that interact badly with photopolymer clear coats. Baby wipes frequently contain aloe or lanolin. Lens cleaners often contain surfactants designed to strip oils from glass. "Natural" cleaners may use citric acid or essential oils.
None of these are safe for resin figurines. Stick to distilled water. It's boring advice. It's correct advice.
Mistake 2: Storing Figurines in Bubble Wrap Long-Term
Bubble wrap is excellent for shipping. It's terrible for storage beyond a few weeks. The plasticizers in bubble wrap can off-gas and transfer to the figurine's surface, leaving marks that are extremely difficult to remove. Over months, bubble wrap can chemically bond to clear coat at contact points.
For long-term storage: acid-free tissue paper as a first wrap, then a rigid box. Nothing else touching the figurine's surface directly.
Mistake 3: Placing the Figurine "Just Temporarily" in a Bad Spot
The most common damage scenario isn't dramatic. It's someone setting their figurine on a windowsill "just for the photo" or "just until I find the right shelf." Three months later, it's still there. The UV damage during that period may be imperceptible day-to-day but cumulative and irreversible.
Find your permanent display spot before unboxing. Make the decision once, deliberately, using the criteria outlined above. Then commit to it.
Mistake 4: Over-Cleaning
Counterintuitively, cleaning too often causes more damage than cleaning too rarely. Every physical contact with the surface—even with appropriate materials—creates microscopic wear on the clear coat. A weekly brush pass and monthly damp wipe is sufficient for a figurine displayed in a clean home. If your figurine is in a case, you can reduce frequency even further.
The goal is minimum effective intervention. Enough care to prevent accumulation. Not so much that you wear through the protection you're trying to maintain.
Your Complete Pet Figurine Care Instructions: A Quick-Reference Summary
For those who want the actionable steps without the explanatory context, here's your reference card:
Weekly (2 minutes):
- Soft-bristle brush, top to bottom, following sculpted texture direction
- Visual inspection under angled light
Monthly (5 minutes):
- Damp microfiber cloth with distilled water, gentle wipe
- Check for bloom, yellowing, or tackiness in clear coat
- Inspect base for any shifting or loosening of museum putty
Annually (15 minutes):
- Thorough inspection of all surfaces
- Photograph the figurine under consistent lighting for comparison year over year (this creates a visual baseline for detecting gradual changes)
- Assess display location for any environmental changes (new window, relocated furniture, HVAC modifications)
Every 5 Years:
- Full condition assessment
- Consider clear coat reapplication if wear is detected
- Evaluate whether storage conditions have changed
Never:
- Household cleaners, ammonia, bleach, acetone
- Direct sunlight for more than 30 minutes daily
- Storage in garages, attics, or basements
- Bubble wrap for long-term contact
- Paper towels or rough cloths for cleaning
This isn't complicated. It's just deliberate. The two-minute weekly routine is the foundation. Everything else is periodic maintenance built on top of that habit.
The Weight of Small Things
There's a moment—you might recognize it—when you pick up a figurine of a pet who's no longer with you, and the weight of the object surprises you. Not because it's heavy. Because the gap between what it weighs in your hand and what it weighs in your meaning is enormous. A few ounces of cured resin carrying years of companionship.
Knowing how to care for a resin figurine is, at its core, a practical skill. Distilled water, soft brushes, indoor shelves, museum putty. Nothing exotic. Nothing expensive. But the practice of caring for this small object—picking it up each week, turning it in the light, brushing away what's settled—is also a practice of attention. Of returning, deliberately, to a memory you've chosen to keep in physical form.
The Persian cat who used to press her warm, dense coat against your ankle while you stood at the kitchen counter doesn't need you to maintain a figurine. She needed you to show up. You did. You're still doing it—just in a different form now. With a brush instead of a chin scratch. With distilled water instead of fresh water in her bowl.
That's not sentimental. That's just what love looks like after it changes shape. And if two minutes a week can keep that shape intact for decades, it's the easiest commitment you'll ever make.
Frequently Asked Questions
How do I care for a resin figurine long-term?
The foundation is a weekly 2-minute routine: dust with a soft-bristle brush, perform a visual inspection under angled light, and do a monthly wipe with distilled water on a microfiber cloth. Beyond the routine, display placement matters most—keep the figurine away from direct sunlight, heat sources, and exterior walls with significant temperature variation. Museum putty under the base prevents the most common cause of damage: being knocked off a shelf.
Can I use Windex or household cleaners on a 3D printed figurine?
No—and this is one of the most common mistakes. Glass cleaners contain ammonia, which strips the protective clear coat on full-color resin prints. Even products labeled "gentle" or "natural" often contain surfactants, essential oils, or acids that interact badly with photopolymer surfaces. Distilled water is the safest and most effective cleaning agent for routine maintenance. For stubborn spots, a single drop of pH-neutral dish soap in distilled water is the maximum safe escalation for regular use.
Will my resin figurine yellow over time?
It can, but the primary cause is preventable. UV radiation from sunlight is the main driver of yellowing in cured photopolymer resin. The clear coat applied during manufacturing contains UV inhibitors that slow this process significantly, but they don't last forever under constant exposure. By displaying your figurine away from direct sunlight—on an interior wall, under LED lighting—you can maintain color fidelity for many years. Light-colored figurines (white and cream Persian cats, for example) show yellowing earliest and most visibly.
How should I store a resin figurine if I need to pack it away?
Wrap the figurine in acid-free tissue paper (available from art supply stores) and place it in a rigid container—a cardboard box with padding, or a hard-sided case. Store in a climate-controlled interior room with stable temperature and moderate humidity. Avoid garages, attics, and basements, where temperature swings and moisture levels can damage resin over time. And critically, avoid bubble wrap for long-term storage: its plasticizers can transfer to and bond with the figurine's clear coat surface.
What is the best way to clean a 3D printed figurine?
Start with the gentlest method: a clean, dry, soft-bristle brush (a makeup brush works well) applied weekly, brushing in the direction of any sculpted texture. Monthly, use a barely-damp microfiber cloth with distilled water. For stubborn residue, a cotton swab with 70% isopropyl alcohol can be applied to the specific spot only—never the entire surface. Always air dry completely. The key principle is minimum effective intervention: clean enough to prevent buildup, but not so aggressively or frequently that you wear through the protective clear coat.
Can a damaged resin figurine be repaired?
It depends on the type of damage. Surface-level clear coat wear can often be addressed by applying a thin layer of UV-resistant clear coat spray (available from hobby suppliers). Small chips in non-prominent areas may be acceptable to leave as-is, since the embedded color means there's no white substrate showing through. For structural breaks—a snapped ear, a separated base—cyanoacrylate glue (super glue) can create a strong bond, but the repair line will likely be visible. For significant damage, contact the original manufacturer to discuss options; since the original digital 3D file exists, reprinting may be possible.
Ready to Celebrate Your Persian Cat?
Every Persian cat has a personality that transcends the breed standard—the particular way yours claims the sunniest spot in the house, the imperious gaze, the specific flop onto a favorite blanket. A custom PawSculpt figurine captures those details in full-color resin, built to last for decades with the simple care routine outlined above. Now that you know exactly how to care for a resin figurine, you can focus on what matters: choosing the photos that tell your cat's story best.
Visit pawsculpt.com to learn more about our process and guarantees
