Floppy Ears, Perfect Ears: Why Your Cocker Spaniel's Figurine Might Need a Second Try

The basement light caught the long curve of a cocker spaniel figurine, and something was off before anyone said it—the ears sat too high, too tidy, missing that soft, rain-heavy drape his family knew by heart.
Quick Takeaways
- Floppy ears define expression — prioritize side-profile and three-quarter photos, not face-on shots alone.
- First drafts can miss breed nuance — ask for ear length, set, and feathering revisions early.
- Better reference photos beat more photos — use clear daylight images showing coat flow and skull shape.
- A strong preview process matters — explore how custom pet figurines at PawSculpt handle likeness before production.
Why floppy ears are harder than most pet owners realize
One of our customers—let's call her Mara—brought her mother downstairs to see the figurine they had ordered after losing Oliver, their buff cocker spaniel. The dryer hummed in the corner. A fleece blanket still held that faint warm-dog scent, the sweet, dusty smell of ears that had brushed kitchen floors and porch boards after rain. Her mother smiled first. Then she paused.
“It’s him,” she said, “but the ears aren’t.”
That pause is the whole article.
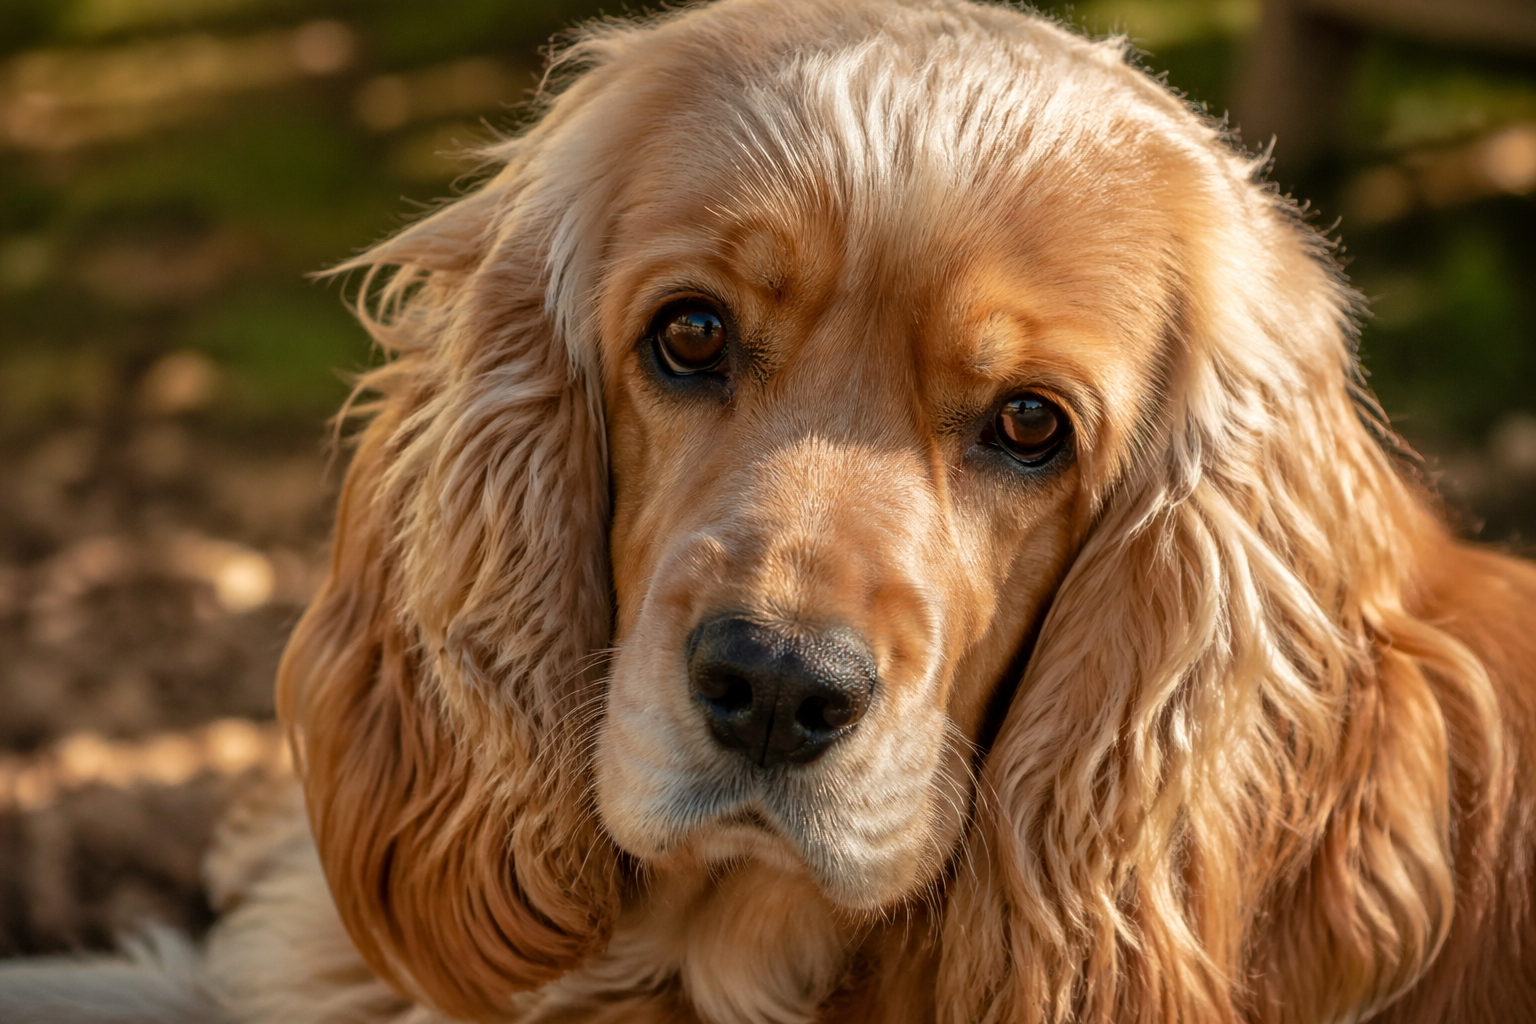
Most people assume a custom pet figurine succeeds or fails on color markings. And yes, color matters. The white blaze, the darker muzzle, the pinkish skin tone around the nose—those cues help your brain say, that’s my dog. But with cocker spaniels, the feature that most often decides whether a figurine feels emotionally accurate is ear architecture.
Not ear length alone. Architecture.
A cocker’s ear isn’t just a hanging shape attached to the side of the head. It begins with ear set (where the ear attaches relative to the skull and eye line), continues into ear leather (the actual ear structure beneath the fur), and finishes with feathering (the longer silky fur that softens the outline). If any one of those is off, the likeness shifts. Suddenly the dog looks younger, heavier, more alert, less gentle, or even like an entirely different spaniel type.
That’s the overlooked part most generic guides miss: breed-specific emotion lives in anatomy, not only markings.
A cocker spaniel’s expression depends on the relationship between four things:
- Skull dome
- Eye size and placement
- Muzzle length
- Ear set and drape
Move one, and the others read differently.
If you lift the ears too high, the dog can look anxious or stylized. If you shorten them, the face loses that soft, downward frame that gives the breed its tender, almost listening expression. If you over-bulk the feathering, the head starts to feel heavy and toy-like. If you make the ear edges too thin for printability, they may look elegant in a digital preview but become fragile in real resin.
And this is where real production experience matters. In our years working with pet families, we’ve learned that cocker ears often need a second look not because the artist is careless, but because floppy structures are one of the hardest things to translate from flat photos into a durable, full-color resin object.
Photos compress depth. Fur hides cartilage. Owners remember movement, not static geometry.
That last point surprises people. You don’t remember your dog’s ears as measurements. You remember them swinging when he trotted, fanning across the blanket, smelling faintly of shampoo and outside air. Memory is kinetic. A figurine is still. Bridging that gap takes more than copying a photo.
The counterintuitive reason revisions are often a good sign
Some buyers worry that requesting a revision means something went wrong. Honestly, not always. Often it means the process is working.
A good 3D printing revision stage gives space for the owner’s memory and the sculptor’s technical eye to meet in the middle. That’s especially important for long-eared breeds because the first pass may capture the dog accurately from one reference image while missing how the ears balanced the face in real life.
The mistake most people make is asking for “more detail” when what they really want is different proportion.
Those aren’t the same thing.
More detail means added fur texture, sharper edges, more visible strands. Different proportion means changing ear attachment, widening the base, extending the drop, softening the taper, or adjusting the amount of feathering around the cheek. If you ask for the wrong fix, you can get a busier figurine that still doesn’t look right.
Here’s a simple way to think about it: with cocker spaniels, the silhouette matters before the surface. If the outline is wrong, no amount of color accuracy will rescue the likeness.
"With floppy-eared breeds, the silhouette carries the memory before the markings do."
What “accurate” actually means in a cocker spaniel figurine
Accuracy in a figurine isn’t a single standard. It’s usually three layers working together:
- Breed accuracy — does it read clearly as a cocker spaniel?
- Individual accuracy — does it look like your cocker spaniel?
- Emotional accuracy — does it trigger recognition, warmth, and that tiny catch in the throat?
A figurine can nail the first and miss the second. It can hit the second and still miss the third if the posture feels wrong.
With cockers, owners often respond most strongly to:
- The weight of the ears near the cheek
- The curve at the ear tip
- The silky transition from skull to feathering
- The way the ears make the eyes look softer
That’s why pet figurine accuracy is never just a matter of tracing photos. It’s interpretation grounded in anatomy and manufacturing reality.
If you’re curious about how breed standards describe the cocker head and ear relationship, the American Kennel Club’s breed guide for Cocker Spaniels is a useful reference. It won’t tell you how your own dog’s ears smelled after a storm or how they spread across the sofa cushion, but it does help explain why ear placement changes the entire face.
The photo problem: why your best memory may not be your best reference
Mara’s first batch of photos of Oliver was full of love and almost useless for sculpting. That sounds harsh. It’s also true. They were the photos most families have on their phones: close-up couch shots, low-light holiday pictures, a few outdoor images where his ears were flying backward because he was mid-run.
Beautiful. Not ideal.
The photo-to-sculpt workflow begins long before any digital modeling software opens. It starts with choosing images that reveal structure rather than just sentiment. Our team can often tell in a minute whether a set of photos will support accurate modeling of floppy ears—or whether the ears will end up guessed, generalized, or revised later.
What artists need to see in cocker ears
For a strong figurine, reference photos should show more than “cute face.” They should reveal:
- Front view with ears in a natural resting position
- Left and right side views at head level
- Three-quarter view showing ear thickness and facial depth
- Full-body view so head-to-body proportion stays believable
- Lighting that separates ear edge from background
That last one is huge. If the ear disappears into a dark couch or blends into shadow, the artist has to infer the outline. Sometimes inference is fine. Sometimes it turns your dog into a generic spaniel.
This table shows which photos help most with floppy ears detail and why:
| Photo Type | What It Reveals | Why It Matters for Ears | Common Mistake |
|---|---|---|---|
| Front, eye-level | Ear set relative to eyes and skull | Prevents ears from being placed too high or wide | Shooting from above |
| Side profile | True ear length and drape | Shows how far ears fall below jawline | Ear tucked behind collar |
| Three-quarter angle | Thickness, feathering, cheek overlap | Helps model volume, not just outline | Heavy shadow on one side |
| Standing full-body | Head-to-body proportion | Keeps the figurine from looking oversized or puppy-like | Cropped too tightly |
| Resting candid | Natural ear behavior | Captures the “default” look owners remember | Mid-run action shot only |
Why overhead phone photos distort cocker spaniels
Here’s the thing almost nobody tells customers: phone photos taken from above make a cocker’s muzzle look shorter and the ears look farther back than they really are. That distortion can be charming in a social post. In sculpting, it’s a trap.
A downward angle compresses the front of the face and exaggerates the roundness of the skull. The result? Artists may build a sweeter, more juvenile head shape with ears that feel decorative instead of weighted.
And weighted is the word.
Cocker ears have visual gravity. Even when trimmed, they should seem to hang from the head, not float beside it.
If you only have older photos, choose the ones with:
- Soft daylight rather than yellow indoor bulbs
- Minimal motion blur
- Ears visible on both sides
- No costumes, bows, or thick bandanas hiding attachment points
The scent-memory trap
This is a strange but real part of the process. Families often choose photos based on the moment they miss most—dog on the porch after rain, dog curled in the laundry basket, dog under the table while dinner cooked. Those memories come loaded with smell: damp grass, warmed fleece, corn-chip paws, detergent, cedar from the deck.
But the image that carries the strongest feeling may not show the dog’s anatomy clearly.
That doesn’t mean you shouldn’t submit it. It means you should pair emotional photos with structural photos. One tells the story. The other lets the artist build the form.
The best sets usually combine both.
A practical reference checklist before you submit
Before sending photos for a cocker spaniel figurine, look through them once for emotion and once for engineering. Yes, engineering.
Ask:
- Can I clearly see where each ear begins on the skull?
- Do at least two photos show the ear in a relaxed, natural drop?
- Is feathering visible without blowing out highlights?
- Can the artist tell whether the ears are fine and silky or fuller and heavier?
- Does one image show the dog standing naturally, not crouching or twisting?
If the answer is no to most of those, expect that a 3D printing revision may become part of the path. That’s normal.
Some families ordering 3D pet sculptures assume more photos automatically mean better results. Not quite. Twenty muddled photos won’t outperform six clean, well-lit ones. Quality beats quantity every time.
Inside the sculpt: how floppy ears get translated into full-color 3D form
Once references are chosen, the work shifts from memory into digital sculpting. This is where a figurine becomes either generic or convincing.
At PawSculpt, the physical object is not carved from a block and it’s not a white model colored later. The process is digitally sculpted, then precision 3D printed in full color. The artist builds your pet in software such as ZBrush or Blender, shaping form in three dimensions first. Then the model is produced through full-color resin 3D printing, where colors are printed directly into the material. After printing, the piece is cleaned, cured, supports are removed, and a clear coat is applied for protection and finish.
No brushwork. No manual color layer. The color is part of the print.
That distinction matters because it affects what details reproduce well.
The hidden challenge of sculpting long, soft things in a hard material
Real cocker ears are supple. Printed resin is not.
Even when using high-end UV-cured photopolymer resin with embedded pigments, you’re translating something flexible and feathery into something that must survive production, cleaning, shipping, and shelf life. So every ear becomes a balancing act between visual delicacy and structural integrity.
If an ear edge is modeled too thin:
- It may flex during support removal
- It may chip in transit
- It may warp slightly during post-cure if unsupported
- It may print with translucency or weak edge definition
If it’s modeled too thick:
- The figurine loses breed elegance
- The ears can look stiff or toy-like
- Feathering may read as a slab instead of layered fur
That’s why experienced sculptors don’t simply trace the visible photo outline. They build an ear with enough minimum section thickness to print reliably while preserving the illusion of softness.
This is also why a second pass is common. Especially for spaniels.
How artists check proportion before printing
In a proper photo-to-sculpt workflow, artists usually move through several checks:
- Block-in of overall anatomy
- Proportional checks
- Breed-specific refinement
- Surface development
For cocker ears, proportional checks are where most likeness decisions happen. A useful internal rule is to assess the ear not alone, but against the negative space beside the cheek and neck. Negative space means the empty shape around the ear. If that space feels too open, the ear may be too narrow or too high. If it feels crowded, the ear may be too broad or low.
This is old sculptor’s logic, and it still works beautifully in digital form.
Coat flow matters more than fur texture
Another counterintuitive point: for spaniels, coat flow usually matters more than micro-texture.
Families often think detailed fur means lots of tiny strands. In actual collectible figure making, over-texturing fur can create visual noise, especially in full-color prints where tone transitions are already doing some of the descriptive work. For cocker ears, what reads best is not “many hair lines,” but a coherent direction of growth—how the feathering falls from the ear base, wraps along the cheek, and gathers toward the lower edge.
Done well, the eye fills in the softness.
Done poorly, the ear looks shredded, stringy, or busy.
"The ears don’t just hang from the head; they frame the dog’s entire emotional expression."
— The PawSculpt Team
A note on trim styles and why they change everything
Cocker spaniels are especially tricky because grooming changes identity more than many owners realize. A sporting trim, a fuller pet trim, a puppy cut, and a longer show-inspired ear all create different silhouettes.
We’ve seen families submit photos from three years apart and not realize the dog appears almost like two different individuals because the ear feathering changed so much.
So if your goal is pet figurine accuracy, decide early what version of your dog you want preserved:
- Most familiar everyday look
- Most elegant groomed look
- Older, softer late-life look
- Puppy or young adult stage
None is more correct. But mixing references from different grooming eras without noting it can confuse the sculpt.
Full-color printing changes how markings are interpreted
Because PawSculpt uses multi-color additive manufacturing, markings are built directly into the print. That’s excellent for cocker spaniels with subtle gradients—buff, red, black, parti-color, roan-adjacent blends, white chest patches, lighter feathering around the ears.
But full-color printing has its own visual logic. The printer handles color voxel by voxel (tiny 3D dots of material information), which means broad transitions usually reproduce more naturally than ultra-sharp painted-style effects. Fine freckles and nuanced tonal shifts can come through well when the digital file is clean, but they still need enough surface area to read at figurine scale.
That means an ear’s printed success depends on both geometry and color map.
A slightly thick ear with excellent tonal transition may feel more lifelike than a razor-thin ear with weak color definition. Again: tradeoffs.
Why a second try is sometimes the professional move, not a disappointment
Mara and her family didn’t reject Oliver’s first preview because it was bad. They rejected it because it was close. Close is the dangerous zone. A poor likeness is easy to identify. A nearly-right likeness can unsettle you in a deeper way because your eye keeps circling the thing it can’t name.
With cocker spaniels, that unnamed discomfort is often the ears.
What revisions usually fix in a cocker spaniel figurine
When families request a revision, the changes usually fall into one of these categories:
- Ear set too high
- Ear drop too short
- Feathering too bulky
- Ear shape too narrow at the bottom
- Cheek overlap missing
- Overall expression too alert or too stern
Notice what isn’t on that list: “add more fur detail.”
Again, the mistake most people make is treating the issue as texture when it’s actually proportion and gesture.
A good revision note might say:
- “Please lower the ear attachment slightly so it begins closer to the eye line.”
- “Can the ear extend a bit farther below the jaw for his usual look?”
- “The feathering was softer and less full near the base.”
- “His ears framed his face more closely, especially on the left side.”
A weak revision note says: “Make it more realistic.”
Realistic how? For whom? Compared to which photo?
Specific feedback saves time and leads to better outcomes.
Why previews and revisions matter in 3D printing, specifically
In standard sculpture discussions online, people often focus on artistic likeness and skip manufacturing. But in 3D printing revision work, the revision stage also protects the production process.
Why? Because changing an ear after printing is not practical in the way some people imagine. With full-color resin printing, color is embedded in the material during fabrication. You don’t simply reshape a cured ear and restore the exact original color by surface touch-up. If the geometry changes meaningfully, the clean solution is usually to revise the digital model and print again.
That’s one reason experienced teams put serious energy into the preview.
What actually happens if the ears are too thin, too long, or too tucked
This is where shop-floor reality enters.
If ears are modeled too long and close to the body, they can create tight support zones and awkward cleaning access. If they cup inward too deeply, they may trap support contact or cleaning residue in hard-to-reach areas. If they’re too thin, they can show edge waviness or become vulnerable during support removal.
And if the ear forms a hollowed, concave shape without proper drainage considerations in some resin workflows, you can get suction-related print stress—what printers call a suction cup effect. In plain English, a shape like a deep spoon can pull against the peel forces of the machine during printing, increasing the chance of defects, layer stress, or failure. Advanced production teams design around this with orientation, wall strategy, and support planning.
That’s not romantic. It is real.
A figurine has to survive the machine before it can sit beautifully on a shelf.
Typical failure modes pet owners never hear about
Most articles stop at “the artist makes a 3D model.” But if you want to understand why a second try may be needed, here are some real-world issues that affect floppy ears and fine appendages:
- Support pitting: tiny marks where supports contact the print
- Warping: slight bending during cure or from uneven section thickness
- Bloom or frosting: hazy surface effect from incomplete cleaning or cure imbalance
- Over-cure brittleness: too much UV exposure can make thin areas more fragile
- Under-cure tack: too little cure leaves surfaces soft or unstable
- Layer witness lines: fine stepping visible under certain light, especially on curves
- Drainage issues: trapped resin in hollow areas if design and prep aren’t right
For pet owners, the useful takeaway is simple: the best figurine is not the thinnest or most extreme version of every detail. It is the version that balances likeness with manufacturability.
That’s why we’re not huge fans of promising “hyper-detailed miniature” expectations for every pet. Full-color resin prints can capture beautiful nuance, but they do so through a process with physical limits. Honest craftsmanship respects those limits and designs within them.
"The right revision doesn’t mean starting over emotionally; it means getting closer to recognition."
How to give revision feedback that helps the artist
If you’re reviewing a proof and something feels wrong, use this sequence:
- Name the feature
- Compare it to a specific photo
- Describe the emotional mismatch
- Limit to the 2-3 biggest fixes
This works because artists need both objective correction and subjective intent. The photo supplies the first. Your language supplies the second.
If you’re unsure whether the ear issue is anatomy or grooming, say so. A good team can parse that.
And if you need direct support, a contact path matters. For process questions, reference concerns, or clarification, it’s better to use a clear communication channel like the one on PawSculpt’s contact page than to keep second-guessing silently.
The manufacturing reality: what happens after the digital sculpt is approved
This is the part people rarely see, and it explains why some shapes are adjusted before print even after the likeness is approved.
Once the sculpt is finalized, the file enters production preparation. In high-end collectible workflows, that means evaluating the model not just as art, but as a printable object.
Orientation logic: why the dog doesn’t print “standing up” the way you imagine
Depending on the exact full-color resin process and machine family, figurines are oriented to optimize a few competing goals:
- Surface quality on the face
- Support placement in less visible areas
- Stability during printing
- Reduced peel stress on delicate features
- Cleaner color presentation on important viewing angles
A newcomer might assume you print the dog exactly upright. Sometimes. Often not.
Long ears are especially sensitive to orientation. If the ear edge is aimed in a way that collects too many support contacts on the visible side, the result can be more cleanup marks. Rotate the model too far the other way, and you may improve one side while worsening under-ear surfaces or introducing other tradeoffs.
This is the kind of decision experienced figure makers make almost instinctively, but it’s built from years of seeing what fails.
Supports: the necessary evil nobody frames nicely
Supports are temporary structures that hold delicate or overhanging parts during printing. They matter because ears, tails, feathering edges, and chin areas often can’t print cleanly in midair.
For cocker ears, support strategy tries to answer three questions:
- Where can contact marks be hidden or minimized?
- How do we prevent droop or print stress on thin edges?
- Can the supports be removed without bruising visible surfaces?
There is no support strategy with zero consequence. That’s another overlooked truth. Every support choice is a tradeoff between printability and finish.
In resin workflows, supports can leave tiny witness marks. Good cleanup reduces them significantly, but under raking light—light coming in from a low angle that exaggerates texture—even excellent prints reveal their process if you know what to look for. That’s normal. In fact, we think there’s something honest about it. A good figurine doesn’t need to pretend it fell from the sky fully formed and frictionless.
Hollowing, wall thickness, and drain holes—explained plainly
Some figurines are printed as solid forms; others may be hollowed in certain workflows to manage material use, curing behavior, or structural balance. Hollowing means the inside is partially empty rather than fully filled. When a model is hollow, it often needs drain holes so uncured material can escape and the interior can be cleaned properly.
Pet owners don’t need to become print engineers, but they should know this: hollowing isn’t “cheapening” the piece. It’s often a technical decision. The key is doing it intelligently so the shell remains durable and the exterior form stays true.
With floppy ears, the ear itself may remain effectively solid or structurally supported while adjacent body areas follow different strategies depending on scale and machine requirements.
Typical layer heights in detailed resin figure work are often in the 25–50 micron range (a micron is one-thousandth of a millimeter), though exact settings vary by machine and color process. Finer layers can improve surface smoothness, but they also affect build time and don’t override poor orientation or weak support logic.
Post-processing: where good prints become display-worthy
After printing, the figurine still isn’t finished.
Post-processing for full-color resin 3D printing usually includes:
- Cleaning
- Support removal
- Secondary surface cleanup
- Curing
- Surface inspection
- Clear coat application
That clear coat is the only manual finishing layer in the color pipeline. It protects and unifies the surface appearance. It does not “add the fur color later.” The color is already in the print.
A practical note: gloss level affects how ears read. A very shiny finish can make silky ears look lively under display light, but too much gloss can exaggerate print texture and support cleanup. A more restrained sheen often preserves the natural softness better. This is one of those subtle collectible-maker judgments that separates a merely successful print from a satisfying one.
Quality control under the kind of light that tells the truth
Quality control is where seasoned production teams earn their keep.
A proper inspection doesn’t just ask, “Does it look like the preview?” It also checks:
- Symmetry in ears, eyes, and stance
- Dimensional consistency with the approved model
- Surface integrity after support removal
- Color continuity across transitions
- Defects visible under raking light
- Stability on a flat surface
Raking light is brutal—and useful. It reveals scratches, subtle support pitting, and shallow surface issues that overhead room light hides. If a figurine passes that inspection, it’s much more likely to look good in the mixed real-world lighting of shelves, mantels, offices, and memorial tables.
This table gives a practical view of where cocker ear issues can appear during production:
| Stage | What Can Go Wrong | How Experienced Teams Reduce Risk | Why You Should Care |
|---|---|---|---|
| Digital sculpt | Ear set or length feels off | Compare multiple angles, check breed proportions | Fixing shape early is cleaner than reprinting later |
| Print preparation | Weak orientation or support plan | Rotate for face quality and ear stability | Better prep means fewer visible marks |
| Printing | Warping, stress, incomplete ear edges | Balanced wall thickness and support strategy | Delicate ears must survive fabrication |
| Post-processing | Support pitting or over-sanding | Gentle removal and controlled cleanup | Aggressive cleanup can flatten soft details |
| Curing/finishing | Brittleness, bloom, uneven sheen | Controlled cure and clear coat application | The figurine should look refined, not chalky |
What to expect from a thoughtful custom process
Mara sent two better photos: one from the side, one from the porch, Oliver looking left with his ears hanging damp and straight after a light shower. You could almost smell the boards—wet wood, cold air, that unmistakable dog smell that lives in feathered ears and old towels.
The revised proof changed only a few things. The ears started lower. The left ear widened near the base. The feathering softened. Suddenly, there he was.
That’s often how it happens. Not with dramatic transformation. With proportion.
The general process, minus the mystery
For readers considering a figurine, here’s the broad what to expect path without pretending every order follows identical timing or rules:
- You submit photos
- A digital artist models the pet in 3D
- You review a preview for likeness
- Revisions are made if needed
- The approved model is printed in full color
- The piece is cleaned, cured, finished, and checked
- Your figurine is packed for display or gifting
That’s the bones of it.
Different companies handle communication, previews, and service details differently, so it’s smart to review current information directly on the PawSculpt service pages or their FAQ. We won’t invent numbers here because those details change. The important thing is understanding what a careful process should include: reference review, digital sculpting, approval, full-color print production, and final quality control.
What a good customer experience feels like
Not flashy. Clear.
A thoughtful figurine process should leave you feeling that:
- Your photos were actually interpreted, not merely uploaded
- Breed-specific traits were noticed
- Revisions were treated as part of craftsmanship, not a nuisance
- Technical limits were respected honestly
- The final object was made to last as a display piece
That honesty matters. We’ll be real—if your only photos are blurry, backlit, and taken from six feet above the dog, no company can conjure perfect likeness from thin air. A trustworthy team will guide you toward what’s possible rather than overpromising.
If your dog’s ears were always in motion
Some cocker spaniels never seemed to wear the same ears twice. After the groomer, they looked neat and narrow. After a nap, one ear flattened outward. After a walk in mist, both ears lengthened visually because damp feathering pulled down. During dinner, they became radar dishes. During thunderstorms, they tucked close.
So which ears should your figurine preserve?
Our advice: choose the version that feels most emotionally native to your dog. Not necessarily the fanciest. Not necessarily the youngest. The one that makes your body recognize them before your brain explains why.
For some families, that’s the polished birthday portrait. For others, it’s the slightly rumpled everyday look with one ear fuller than the other.
That asymmetry, by the way, is often where likeness lives.
Commonly overlooked details beyond the ears
Even in an article devoted to floppy ears detail, a few adjacent features can sabotage or strengthen the result:
- Eye aperture: too open and the dog looks startled
- Muzzle stop: too abrupt and the face feels cartooned
- Neck fur transition: too thick and the ears disappear
- Paw scale: too small and the body loses cocker substance
- Pose choice: seated poses often make ears read differently than standing poses
This is why breed-specific details have to be understood as a system. Ears don’t exist in isolation.
Caring for a full-color figurine once it arrives
A custom figurine is a display object, not a chew-proof family relic. Treat it gently.
Basic care is simple:
- Display out of direct harsh sunlight when possible
- Dust with a soft, dry brush or microfiber cloth
- Avoid soaking or abrasive cleaners
- Handle ears and thin details carefully
- Keep away from rough edges or unstable shelves
If you’re using the piece as a memorial, consider where you place it. We’ve seen beautiful arrangements near framed photos, paw prints, collars, and blankets. But avoid crowded shelves where the figurine gets knocked every time someone reaches for a candle or book.
For grief support, keepsakes help many families, but they’re not a substitute for emotional care. If you’re struggling heavily after a loss, the Association for Pet Loss and Bereavement offers helpful resources that many pet parents find grounding.
The real goal isn’t perfection. It’s recognition.
There’s a difference between a technically impressive object and a figurine that stops you in the doorway. The first earns admiration. The second gives you back a small, steady piece of presence.
For cocker spaniels, that presence often arrives through the ears—their weight, their frame around the face, the way they soften the whole animal into someone you knew by smell as much as sight. The faint sweetness of shampoo trapped in feathering. The wet-leaf scent after a walk. The warm, woolly smell of a blanket where your dog used to sleep. Those things don’t print, of course. But they can be summoned by shape.
That’s why a second try can be worth it.
Not because the first effort failed. Because some breeds ask more of memory, and some details carry more emotional load than they seem to. If your preview feels almost right, don’t ignore that instinct. Name what’s off. Compare photos. Ask for the revision. Especially with ears.
Mara’s family placed Oliver’s revised figurine on a shelf above the basement steps, where everyone passed on the way to the laundry room. Weeks later, they told us the strange part wasn’t that it looked perfect. It was that they kept glancing up expecting movement. That little recognition reflex. That old habit.
And honestly, that’s the standard we trust.
Frequently Asked Questions
Why do cocker spaniel figurines often need ear revisions?
Because floppy ears detail does more than decorate the head—it defines the dog’s expression. A cocker’s ears affect how the eyes read, how soft the face feels, and whether the figurine looks breed-true. If the ears are slightly too high, short, or bulky, the whole likeness can shift.
What photos work best for a cocker spaniel figurine?
Use a mix of front, side, and three-quarter photos in good natural light. The most helpful images show where the ears attach, how far they fall, and how the feathering frames the face. One full-body standing photo is also important so the head doesn’t get modeled out of proportion.
Are PawSculpt figurines hand-painted?
No. PawSculpt figurines are digitally sculpted, then 3D printed in full color using advanced resin-based printing technology. The colors are printed directly into the resin material, and after that the piece is cleaned, cured, and protected with a clear coat.
What should I say if the ears look wrong in the preview?
Be concrete. Say whether the issue is ear set, length, width, drape, or feathering, and point to a specific reference photo if possible. “Please lower the ears slightly and make them frame the cheeks more closely” is much more useful than “make it more realistic.”
How durable are full-color resin pet figurines?
They’re designed as display keepsakes, so they hold up well on a shelf or desk, but thin features like ears should still be handled gently. Avoid rough cleaning, unstable placement, or repeated grabbing by delicate edges. Think collectible, not toy.
Ready to Celebrate Your Pet?
Every pet has a story worth preserving. Whether you're honoring a beloved companion who's crossed the rainbow bridge or celebrating your furry friend's unique personality, a custom PawSculpt figurine captures those details that make your pet one-of-a-kind. And if you're creating a cocker spaniel figurine, getting those ears right can make all the difference between resemblance and recognition.
Visit pawsculpt.com to learn more about our process and guarantees
