How a Digital Sculptor Turns Your French Bulldog's Photo into a Resin Portrait
Five years ago, that hallway shelf held a leash, a half-chewed rope toy, and a vet appointment card for a French Bulldog named Gus. Today it holds a full-color resin figurine—a custom French Bulldog figurine that catches the afternoon light in a way that still makes his owner, one of our longtime customers, pause mid-step every single time.
Quick Takeaways
- Your photos are the blueprint — the right reference shots determine 90% of your figurine's accuracy
- Full-color 3D printing embeds pigment directly into resin — there's no painting step, ever
- Digital sculpting is where the soul gets built — artists spend hours on coat flow and expression alone
- Post-processing is subtle but critical — clear coat application protects color and adds depth for years
- You can explore the full process and start your order at PawSculpt's custom figurine studio
The Photo That Starts Everything (And Why Most People Get It Wrong)
Here's the thing most people don't realize: the single biggest factor in how your finished figurine turns out isn't the printer, the resin, or even the sculptor's skill. It's your photos.
We've seen it hundreds of times. Someone sends in a gorgeous, moody, backlit photo of their Frenchie silhouetted against a sunset. Beautiful image. Terrible reference. The sculptor opens it up and can barely distinguish the brindle pattern from shadow, can't see whether the ears tilt slightly left, can't tell if there's a white patch under the chin or just a reflection.
Then another customer sends in four slightly boring, well-lit phone snapshots taken in the kitchen—overhead fluorescents, linoleum floor, zero aesthetic appeal—and the sculptor has everything they need. Every wrinkle mapped. Every color transition visible. The fawn fading to cream around the muzzle, the exact pink of the inner ears, that one darker freckle on the nose.
The counterintuitive truth: ugly photos make beautiful figurines.
What a digital sculptor actually needs from your reference images:
- Front-facing shot at the dog's eye level — not looking down from above, which distorts proportions
- Both side profiles — Frenchies especially carry asymmetry in their ears and facial wrinkles
- A top-down view of the back and shoulders — this reveals coat color distribution that side shots miss
- At least one photo in neutral, diffused lighting — overcast days or indoor ambient light, no harsh flash
- A sense of scale — your dog next to a known object helps the sculptor nail proportions
What most guides won't tell you: the sculptor isn't just looking at what your dog looks like. They're reading the photos for structural anatomy beneath the surface. Where does the skull ridge sit? How deep are the stop (that indent between forehead and muzzle) wrinkles versus the expression wrinkles? A French Bulldog's face is a landscape of folds, and each one catches light and shadow differently in resin.
| Photo Type | Why It Matters | Common Mistake |
|---|---|---|
| Front-facing, eye level | Captures facial symmetry and ear set | Shooting from above, distorting the skull shape |
| Side profile (both sides) | Reveals body proportions and unique markings | Only sending one side, assuming symmetry |
| Top-down back view | Shows coat color gradients and spine line | Skipping entirely — most people forget this one |
| Natural/diffused lighting | Accurate color reproduction for the print | Using flash, which washes out brindle patterns |
| Close-up of face | Wrinkle depth, eye color, nose texture | Blurry or too far away to read fine detail |
One order that stuck with us: a customer sent eleven photos, every single one taken at a dog park with motion blur. Their blue brindle Frenchie was mid-zoomie in all of them. We asked for just two still shots in the kitchen. Those two photos gave our sculptor more usable data than the original eleven combined.
The smell of kibble in the background of a photo doesn't translate to resin, obviously. But the relaxed posture of a dog who just ate? That does. Dogs photographed in familiar spaces—where the scent of their own bed and their person's morning coffee surrounds them—tend to hold more natural, characteristic expressions. It's a small thing, but our sculptors notice.
Inside the Digital Sculpting Studio: Where Anatomy Meets Intuition
This is the stage most people are curious about, and honestly, it's the stage that separates a generic dog figurine from something that actually looks like your dog.
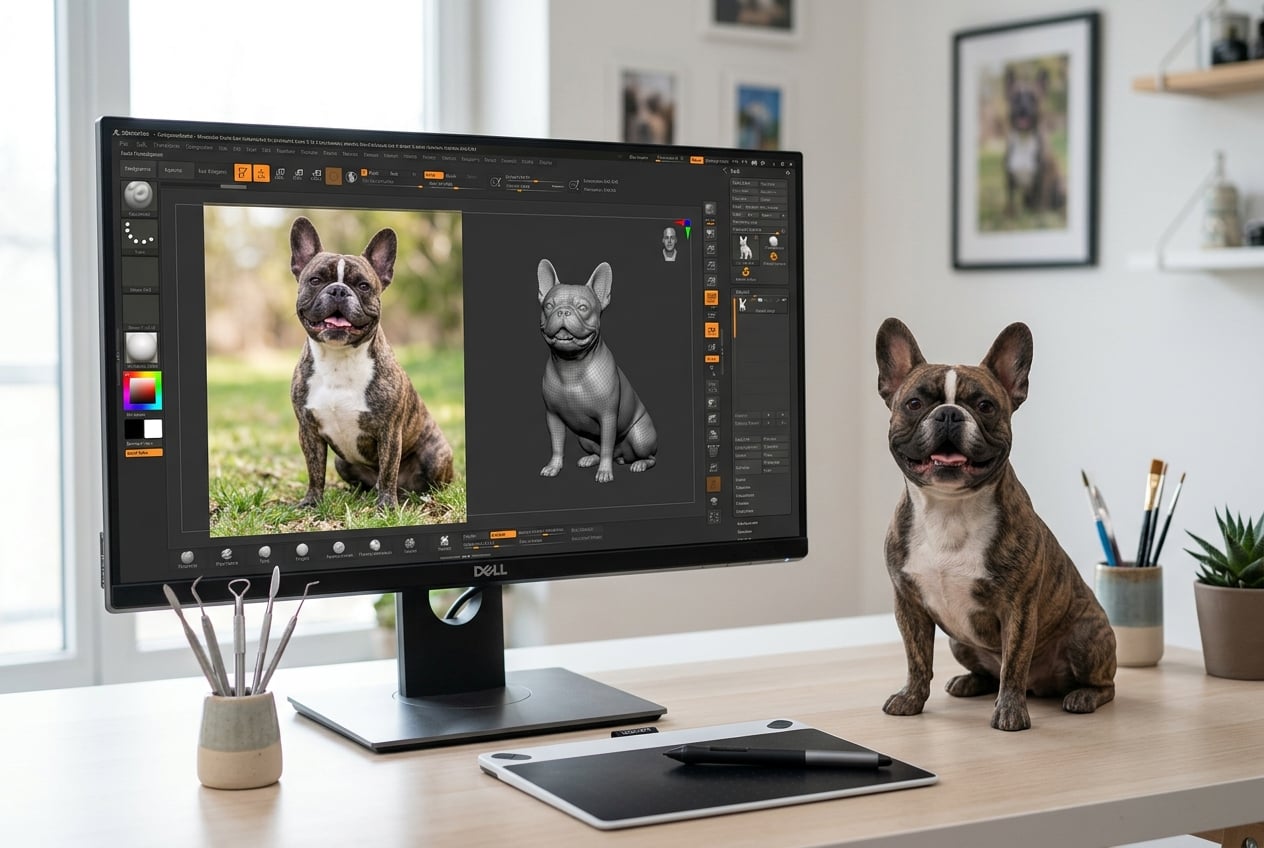
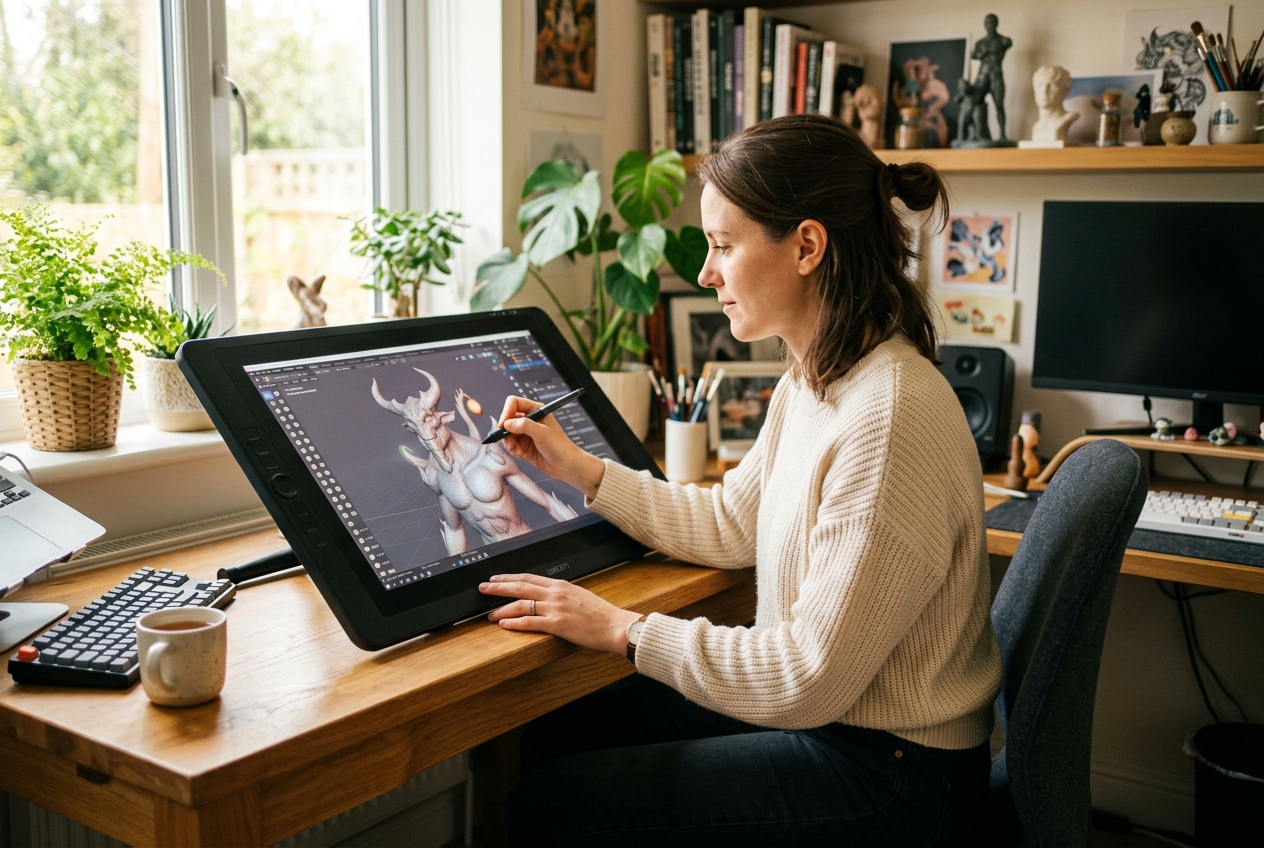
Digital sculpting means an artist builds a three-dimensional model of your pet on screen using software like ZBrush or Blender. They're not tracing a photo. They're constructing a fully realized 3D form—every curve, every fold, every millimeter of ear cartilage—using digital clay that they push, pull, smooth, and carve with a stylus on a drawing tablet.
Think of it like a sculptor working in clay, except the clay is virtual, infinitely undoable, and precise down to fractions of a millimeter.
For French Bulldogs specifically, the sculpting challenge is unique. Frenchies are a breed defined by exaggerated features—the bat ears, the compressed muzzle, the barrel chest, those deep facial wrinkles that shift dramatically between relaxed and alert expressions. A sculptor working on a Frenchie spends a disproportionate amount of time on the face compared to, say, a Labrador. The wrinkle topology alone can take hours.
Here's what the process actually looks like, step by step:
- Base mesh construction — the sculptor starts with a rough dog-shaped form and adjusts the overall proportions to match your Frenchie's specific build. Stocky and compact? Leggier than average? This gets dialed in first.
- Primary form sculpting — the big shapes come next. Skull width, chest depth, the curve of the back, leg stance. The sculptor is constantly flipping between the reference photos and the 3D viewport, rotating the model to check it from every angle.
- Secondary detail pass — wrinkles, ear folds, the subtle bulge of the eyes, the way the lip line curves. This is where breed knowledge matters enormously. A sculptor who's modeled fifty Frenchies knows that the skin between the nose rope and the eye socket creates a specific shadow pattern that reads as "French Bulldog" even in silhouette.
- Coat and texture work — Frenchies have short, smooth coats, which sounds simple but is actually tricky. There's no fluffy fur to hide imperfections. Every surface contour is visible. The sculptor adds subtle skin texture, the fine grain of short hair, and any scarring or unique skin features from the photos.
- Color mapping — this is where the magic of full-color 3D printing starts to matter. The sculptor doesn't just model the shape; they also paint a texture map directly onto the 3D model. This texture map defines exactly what color every point on the surface will be when printed. Brindle stripes, fawn gradients, the pink of the inner ear, the dark mask around the eyes—all of it gets mapped digitally.
- Proportional verification — the sculptor runs dimensional checks, comparing ratios (head-to-body, ear height-to-skull width) against the reference photos. This catches drift—the subtle distortion that happens when you've been staring at a model for hours and stop noticing that the head has crept 5% too large.
"Every wrinkle on a Frenchie's face tells you something about their personality. Our job is to read those wrinkles like a map and rebuild them in three dimensions."
— The PawSculpt Team
The spiritual dimension of this work is something we don't talk about enough. A sculptor spending three, four, five hours staring at photos of your dog—studying the way light falls across their face, the exact tilt of their head when they're curious, the weight distribution in their stance—develops a kind of intimacy with your pet's presence. We've had sculptors tell us they feel like they know the dog by the time the model is finished. There's a ritual quality to it. The careful, meditative attention paid to each feature becomes an act of honoring that specific animal's existence.
That's not marketing language. That's what happens when a skilled person spends hours in focused attention on a single subject.
Myth vs. Reality: What People Get Wrong About Pet Figurines
We hear the same misconceptions constantly. Let's clear a few up.
Myth: "Custom pet figurines are hand-painted, like miniature wargaming figures."
Reality: At PawSculpt, there are zero brushes involved. The figurine is produced through full-color resin 3D printing, a process where pigment is deposited voxel-by-voxel (think of a voxel as a 3D pixel) directly into the resin material during printing. The color isn't a coating on top—it's embedded in the material itself. This is fundamentally different from the miniature painting hobby, where you start with a gray or white model and apply layers of acrylic. Our process is closer to how a color inkjet printer works, except in three dimensions and with UV-cured photopolymer resin instead of paper.
Myth: "3D printed means it looks cheap and plasticky, with visible ridges."
Reality: Modern full-color resin printing operates at layer heights often in the 25–50 micron range (a micron is one-thousandth of a millimeter). At 25 microns, you'd need a magnifying glass to see individual layers. The surface has a fine-grained texture that actually works in favor of pet figurines—it reads as organic and natural rather than injection-mold smooth. After clear coat application, the finish has depth and warmth. It looks like a collectible, not a toy.
Myth: "The digital sculpting part is basically automated—you just upload a photo and software does the rest."
Reality: We'll be real—this one frustrates us. Photogrammetry (scanning a real object from photos to create a 3D model) exists, but it produces a noisy, distorted mesh that looks nothing like a polished figurine. Every PawSculpt figurine is digitally sculpted by a human artist who interprets your photos, understands breed anatomy, and makes hundreds of creative decisions about pose, expression, and detail emphasis. The software is a tool. The artist is the irreplaceable element.
The 3D Printing Process: From Digital File to Physical Object
Once the digital sculpture is approved, it moves to the print stage. This is where the file becomes a physical thing you can hold, and the engineering decisions matter as much as the artistic ones.
Full-color resin 3D printing (the PolyJet/MJF-style technology we use) works by depositing tiny droplets of UV-curable photopolymer resin, each droplet carrying specific color pigments, onto a build platform layer by layer. Each layer is cured (hardened) by UV light immediately after deposition. The result is a solid resin object with color throughout its structure.
Here's what happens behind the scenes, and why it matters for your figurine's quality:
Print Orientation and Why It's a Big Deal
The orientation of the model on the build platform affects everything: surface quality, structural strength, and where support marks end up. Support structures are temporary scaffolding that the printer builds to hold up overhanging features (like a Frenchie's bat ears or an extended paw) during printing.
The print technician's job is to orient the model so that:
- Support contact points land on the least visible surfaces (the underside, the base, behind the ears)
- Overhangs are minimized to reduce the risk of sagging or warping during the build
- The highest-detail features (face, eyes, nose) are positioned where layer resolution is optimal
- Suction cup effects are avoided—this happens when a large flat area creates a vacuum against the build surface during printing, which can cause delamination or distortion
For a French Bulldog figurine specifically, the broad, flat skull and wide-set ears create orientation challenges. Printing face-up gives the best facial detail but puts supports on the belly and base. Printing at a 30–45 degree tilt is often the sweet spot—it balances detail quality across the face and body while keeping support scars manageable.
Hollowing and Structural Integrity
Solid resin figurines at collectible scale would be unnecessarily heavy and expensive. Most figurines are hollowed digitally before printing, leaving walls typically 2–4mm thick (depending on the geometry). The sculptor or print technician adds drain holes—small openings, usually hidden on the base—that allow uncured liquid resin to escape from the interior after printing.
If you skip the drain holes, trapped resin can slowly cure inside the model from ambient UV exposure, causing internal stress that leads to cracking weeks or months later. It's one of those failure modes that doesn't show up on the print bed but ruins the piece on someone's shelf. We check for this every time.
| Print Stage | What Happens | Key Risk If Done Wrong |
|---|---|---|
| Orientation setup | Model angled on build platform for optimal detail | Support scars on visible surfaces; facial detail loss |
| Support generation | Scaffolding added for overhangs and islands | Pitting or dimples where supports contact the model |
| Hollowing | Interior material removed, walls set to 2-4mm | Too thin = fragile; too thick = heavy and wasteful |
| Drain holes | Small openings added to base for resin evacuation | Trapped resin cures internally, causing cracks over time |
| Layer slicing | Model divided into printable layers (25-50 microns) | Wrong layer height = visible stepping on curved surfaces |
| Full-color printing | Voxel-by-voxel resin and pigment deposition | Color calibration drift = inaccurate coat colors |
| UV curing (per layer) | Each layer hardened immediately after deposition | Under-cure = soft spots; over-cure = brittleness and yellowing |
The Color Accuracy Question
This is where the 3D printed pet figurine process gets genuinely fascinating. The printer is depositing colored resin in combinations that reproduce the full color spectrum—similar to CMYK printing but in three dimensions. The color you see isn't sitting on the surface. Cut the figurine in half (please don't) and you'd see color running through the material.
For a brindle French Bulldog, this means the dark stripes over the fawn base aren't two separate layers. They're interwoven in the resin at the voxel level. The transition between colors is smooth and organic, which is exactly how brindle patterning looks on a real dog.
The limitation—and we're honest about this—is that 3D print color resolution, while excellent, has a different character than what you'd get from a master miniature painter spending forty hours with a size-0 brush. The colors are vibrant and accurate, but the finish has the natural grain of the resin material rather than the glass-smooth look of hand-applied lacquer. For most pet owners, this is actually preferable. It looks real, not hyperreal. It looks like a portrait, not a toy.
"A figurine isn't a photograph. It's a presence—something that occupies space in your home the way your pet occupied space in your life."
Post-Processing: The Invisible Work That Makes Everything Better
The figurine comes off the printer looking close to finished, but not quite there. Post-processing is where the piece goes from "impressive 3D print" to "object you'd display in your living room."
Cleaning and Curing
First, the figurine gets washed to remove any uncured resin from the surface. This typically involves an isopropyl alcohol bath or a specialized cleaning solution, sometimes with ultrasonic agitation to reach into crevices (and Frenchies have plenty of crevices—those facial wrinkles trap uncured resin like nobody's business).
After cleaning, the piece goes into a UV curing chamber for final hardening. This is a controlled exposure—too little curing leaves the surface tacky and soft; too much makes the resin brittle and can cause yellowing or bloom (a hazy, whitish discoloration on the surface). The curing time and intensity depend on the resin formulation and the piece's geometry. Thicker sections need more attention than thin ones.
The smell during this stage, if you're curious, is faintly chemical—a clean, slightly sweet resin scent that dissipates completely once curing is done. Nothing like paint fumes. More like a new electronics smell.
Support Removal and Surface Cleanup
Remember those support structures? They get carefully removed now—snipped, sanded, or broken away depending on the support type. This is where support pitting can occur: small dimples or rough patches where the support contacted the model surface.
On a well-oriented print, these marks are on the base or other hidden areas. But when they do land on visible surfaces, the technician sands them smooth with fine-grit abrasives (typically 400–800 grit) and blends the area to match the surrounding texture. On a full-color print, sanding removes color from the surface layer, so the technician has to be judicious—sand too aggressively and you'll expose the lighter subsurface resin.
This is skilled manual work. It's the one stage where human hands directly shape the final appearance.
Clear Coat Application
The final step—and the only "coating" that goes on the figurine—is a clear protective finish. This serves multiple purposes:
- UV protection — prevents the resin colors from fading over time with light exposure
- Surface unification — evens out any slight texture differences between printed surfaces and sanded support areas
- Depth and richness — a satin or gloss clear coat makes colors pop and gives the piece a finished, collectible quality
- Durability — adds a protective shell against fingerprints, dust, and minor handling wear
The clear coat is the difference between a figurine that looks like a 3D print and one that looks like a keepsake. It's a small step with outsized impact.
What to Expect: The Journey from Photo to Shelf
We get asked about this constantly, so here's the general creative arc without getting into specifics that might change (for current details on timelines and policies, PawSculpt's FAQ page has the latest).
The broad strokes:
- You submit photos — the more angles and lighting conditions, the better. Follow the guidance above and you're already ahead of most orders.
- A sculptor begins the digital model — working from your photos, building the 3D form and color map.
- You receive a digital preview — a rendered image of the 3D model from multiple angles, so you can check likeness and request adjustments before anything gets printed.
- Revisions happen — this is your chance to say "the ears are a little too wide" or "his left eye has more brown than that." The digital medium makes changes straightforward.
- Printing and post-processing — once you approve the digital model, it goes to the printer, then through cleaning, curing, support removal, and clear coat.
- Quality control — dimensional checks against the approved digital model, symmetry verification, surface inspection under raking light (light held at a steep angle to reveal any surface imperfections invisible under normal lighting).
- Packaging and shipping — the figurine is carefully packed and sent to you.
The part of this process that surprises most people is step 3—the digital preview. Most customers expect a rough draft. What they actually receive is a photorealistic rendering that looks like a product photo of a finished figurine. It's detailed enough to spot whether the sculptor got the exact fold pattern above your French Bulldog's nose right, or whether the tail needs a slight curl adjustment.
This preview stage is where the collaboration happens. You're not just approving a product—you're co-authoring a portrait. And because it's all digital at this point, changes that would be catastrophic in physical media ("can you tilt the head 5 degrees left?") are achievable in hours.
What the Camera Sees vs. What the Sculptor Sees
Your phone camera flattens your French Bulldog into a 2D plane. It compresses depth, loses texture, washes out subtle color gradations in certain lighting. A photograph of a fawn Frenchie often looks like a single shade of beige. In reality, that coat shifts through cream, apricot, golden brown, and sometimes a faint charcoal underlay around the ears.
A skilled sculptor sees past the photo's limitations. They look at multiple images and mentally reconstruct volume, depth, and color range. They study how light falls across the face to infer the skull structure underneath. They examine ear thickness, nostril width, and the specific way your dog's lower jaw protrudes—because every French Bulldog's underbite is slightly different.
This gap between what the camera captures and what the sculptor interprets is where craftsmanship lives. It's also why the best figurines look more like the real dog than any photograph does.
The Resin Itself: Why Material Matters More Than You Think
Not all 3D printed figurines are equal, and the difference almost always comes down to resin quality and post-processing.
Industrial full-color resin printing deposits color voxel by voxel—imagine millions of tiny colored cubes placed precisely in three-dimensional space. The color isn't painted on the surface; it's embedded throughout the material. Scratch a well-printed resin figurine (please don't, but hypothetically), and the color continues below the surface.
After printing, the figurine goes through a UV curing process that hardens the resin to its final state. Then comes a hand-applied clear coat—typically a UV-resistant matte or semi-gloss finish that protects the surface from dust accumulation and light degradation. This is the step that separates a figurine that looks professional from one that looks like a prototype.
The result is a piece that weighs satisfyingly in your hand, catches light naturally, and displays fine details like individual whisker bumps and the subtle texture gradient between your Frenchie's smooth belly and their slightly rougher back.
Ready to See Your French Bulldog in Three Dimensions?
Every French Bulldog has a face that breaks the mold—that combination of wrinkles, ear tilt, and underbite that belongs only to them. A custom PawSculpt figurine captures exactly those details, sculpted by artists who understand the breed's anatomy inside and out.
Visit pawsculpt.com to start your order—free AI preview, a 3D artist preview within 7 days, and 5 free revisions
Frequently Asked Questions
How long does it take to make a custom pet figurine from a photo?
The typical turnaround is about 14 business days from photo submission to delivery. The digital sculpting phase takes 3-5 days, followed by a 48-hour customer preview period where you can request revisions. Printing and post-processing add another 5-7 days, and shipping usually takes 2-3 business days domestically.
What kind of photos work best for a custom pet figurine?
High-resolution photos in natural lighting are ideal. Provide at least 3-5 images: a full-body side profile, a straight-on face shot, and close-ups of distinctive markings or features. Avoid harsh flash or heavy shadows. Photos where your pet is relaxed and in a natural pose give sculptors the best reference for capturing their personality.
What is the figurine made of and how durable is it?
Most custom pet figurines are printed in full-color sandstone or high-detail resin using industrial 3D printers. Resin figurines are hand-coated with a protective UV-resistant clear coat, making them durable for indoor display. They are not designed for outdoor use or rough handling, but treated with normal care, they last indefinitely.
Can I get a figurine of a pet that has already passed?
Absolutely. Many of the figurines we create are memorial pieces. As long as you have clear photos that show your pet's features, markings, and build, a skilled sculptor can work from those reference images. Some families send photos spanning different life stages and choose the pose that best represents their pet's personality.
How accurate will the figurine look compared to my French Bulldog?
Modern full-color 3D printing reproduces coat colors, markings, and subtle features like wrinkles and ear positioning with remarkable accuracy. The color is embedded in the material itself—every voxel is individually colored—so details like brindle patterns or facial folds come through authentically. You will review a digital preview before printing begins.
