From Photo to Figurine: How Your Favorite Calico Cat Snapshot Becomes a 3D Printed Sculpture
You're scrolling through your camera roll at midnight, past the blurry action shots and the ones where she's mid-yawn, hunting for that photo—the one where her tortoiseshell patches catch the afternoon light just right, where you can see the tiny white comma on her left paw.
Quick Takeaways
- Full-color 3D printing embeds your calico's unique markings directly into resin—no painting required, just precision technology
- Photo quality matters more than quantity—three clear shots from different angles beat fifty mediocre ones
- Digital sculpting happens first—artists hand-model your cat in 3D software before any printing begins
- The process takes patience but delivers permanence—explore custom pet figurines to see how digital craftsmanship preserves what matters
- Post-processing is minimal—support removal and clear coat application, not hours of hand-painting
"The best figurines start with photos that show personality, not perfection. We're looking for the ear tilt, the whisker spread, the way she sits."
Here's what nobody tells you about turning a snapshot into sculpture: the technology isn't the hard part. The hard part is choosing which version of your cat to freeze in time. The one who sprawls across your keyboard? The one who sits like a loaf by the window? The one who looks perpetually annoyed that you exist?
Because once you commit to a photo, that's the cat you get. Forever. In full color. On your shelf.
Let's walk through how that actually happens—from the moment you upload that photo to the moment you're holding a 3D printed version of your calico in your hands. No fluff. Just the real process, with all the technical decisions and tradeoffs that most companies don't bother explaining.
Why Your Photo Matters More Than You Think
Most people assume the 3D printer does the heavy lifting. Wrong. The photo is the blueprint, and blueprints with missing information produce sculptures with guesswork.
When you send in a photo of your calico, you're not just sharing a memory. You're providing reference data for a digital sculptor who needs to understand:
- How her ears sit on her head (forward? slightly back? one crooked?)
- Where the orange patches end and the black begins
- The exact shape of her face (round? angular? somewhere between?)
- How her whiskers fan out
- The texture of her coat (sleek? fluffy? that weird combination calicos sometimes have?)
A single photo—even a great one—can't answer all those questions. That's why the process starts with photo submission and assessment, not with firing up the 3D printer.
What Makes a Reference Photo Actually Useful
You need three angles minimum: front, side, and three-quarter view. Not because we're picky. Because 3D space has depth, and a single photo collapses that depth into a flat image.
Think about it: if we only see your cat from the front, we're guessing at the shape of her haunches. If we only see her from the side, we're inventing the width of her face. Calicos are already complex—those irregular color patches don't follow symmetrical patterns—so we need multiple perspectives to map them accurately.
Photo quality requirements (the stuff that actually matters):
| Requirement | Why It Matters | What Happens If You Skip It |
|---|---|---|
| Natural lighting | Shows true coat colors and texture | Colors print too dark or washed out |
| Sharp focus | Reveals whisker detail and fur direction | Sculptor has to guess at fine features |
| Neutral background | Makes it easier to see your cat's outline | Edge detection gets messy, proportions suffer |
| Relaxed pose | Captures natural body language | Figurine looks stiff or unnatural |
The smell of your cat's fur—that specific combination of sun-warmed laundry and whatever she rolled in this morning—won't translate to resin. But the way light catches the copper tones in her coat? That can. If the photo shows it.
The Photos That Don't Work (And Why)
Backlit photos where your cat is a silhouette? Useless. We can't see color distribution.
Action shots where she's mid-leap? Beautiful, but blurry. Motion blur destroys the detail we need for facial features.
Photos where she's curled into a tight ball? Adorable, but we can't see her body proportions or how her legs attach to her torso.
Extreme close-ups of just her face? Great for capturing expression, but we need full-body shots too. A floating cat head isn't the goal here.
The mistake most people make: sending their favorite photo instead of the most informative one. Your favorite might be the one where she's yawning at the perfect moment, but if it's backlit and slightly out of focus, it's not going to help the sculptor understand her anatomy.
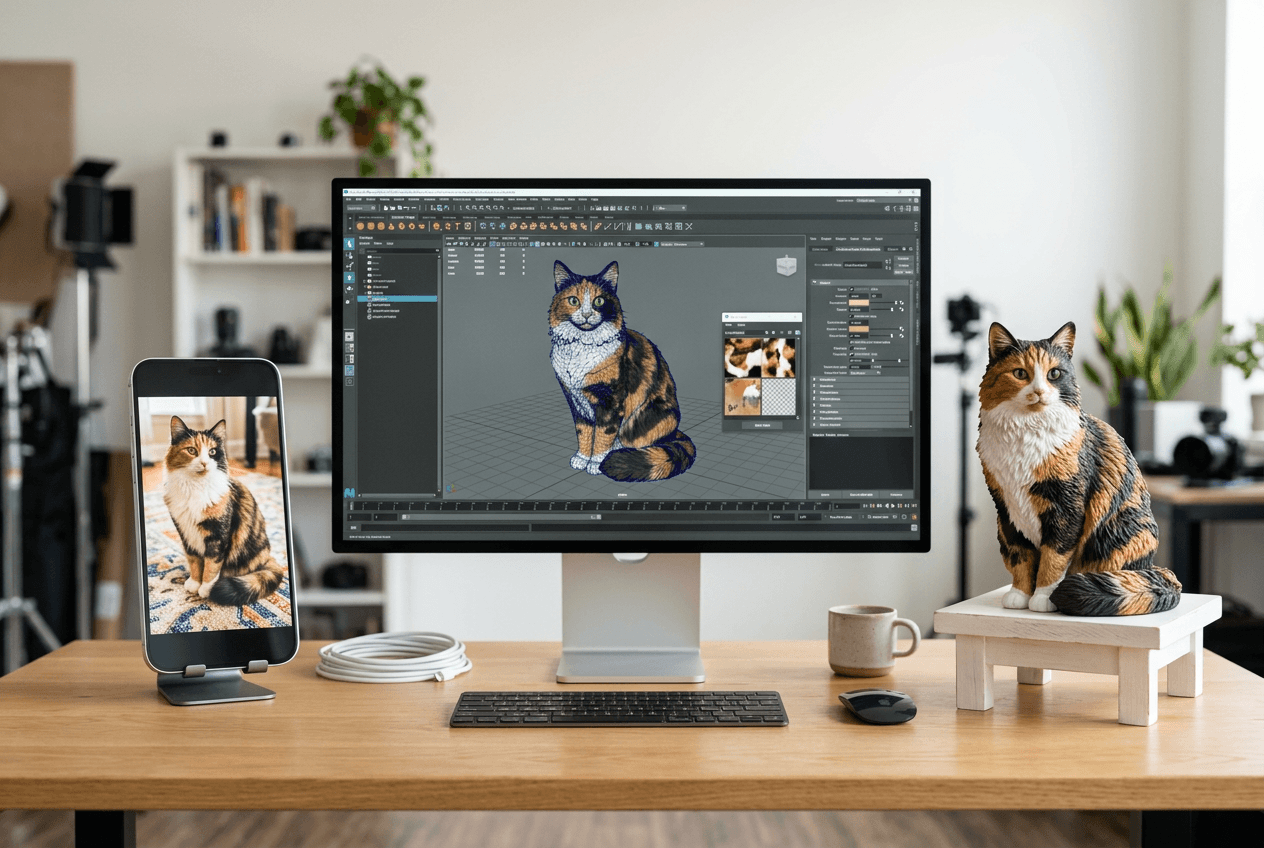
From Pixels to Polygons: The Digital Sculpting Phase
Once photos are approved, the actual creation begins—and it starts in software, not in a printer. Digital sculpting is where an artist hand-models your cat in 3D space using tools like ZBrush or Blender.
This isn't automated. There's no "upload photo, press button, get 3D model" magic happening. A real person is looking at your reference photos and building your cat from scratch, polygon by polygon.
How Digital Sculpting Actually Works
The sculptor starts with a base mesh—think of it as a generic cat-shaped blob. Then they push, pull, and refine that blob until it matches your specific cat's proportions.
The workflow looks like this:
- Proportional blocking: Getting the overall size relationships right (head to body ratio, leg length, tail thickness)
- Anatomical refinement: Adding muscle structure, bone landmarks, the way her shoulder blades move under her coat
- Feature detailing: Sculpting ears, eyes, nose, mouth, paw pads—the parts that make her her
- Coat texture: Adding fur direction and clumping patterns (calicos often have different fur textures in different color zones)
- Color mapping: Painting the 3D model with her exact markings, using your photos as reference
This phase takes hours. Sometimes days, depending on complexity. Calicos are particularly time-intensive because their color patterns are asymmetrical and irregular. There's no mirroring shortcut—the artist has to manually place every orange patch, every black splotch, every white accent.
The Anatomy Check (Where Experience Shows)
A sculptor who's been doing this for years knows that cats don't sit like humans imagine they sit. The spine curves in a specific way. The hind legs tuck at a particular angle. The tail doesn't just stick straight out—it has weight, and gravity affects it.
Common anatomical mistakes that separate amateur work from professional:
- Eyes placed too far apart (makes the cat look alien)
- Ears too large or too small relative to head size
- Legs too straight (cats have a natural bend even when standing)
- Tail too thin at the base (should taper gradually, not start skinny)
- Paws too flat (cats have toe beans that create subtle curves)
The sculptor checks these details against your reference photos constantly. If your calico has that distinctive "one ear slightly more forward than the other" thing going on, that asymmetry gets built into the model. If her left front paw turns out slightly, that gets captured too.
This is where the smell of your cat's favorite blanket might come back to you—that specific scent that means "home"—because you're looking at progress photos of the digital model and suddenly she's recognizable. Not finished, but her.
What We Wish We Knew Sooner
From the PawSculpt team:
- Clients who send video clips (even short ones) give us better information than a dozen static photos. We can see how the cat moves, how the coat shifts, how the tail curves naturally.
- The "ugly" photos where your cat looks annoyed or mid-sneeze? Often more useful than the pretty ones. They show facial structure without the softening effect of a relaxed expression.
- If you have a photo of your cat next to a common object (a soda can, a book, your hand), it helps us nail the scale. We've made figurines too large or too small because we misjudged the cat's actual size from photos alone.
The 3D Printing Process: Full-Color Resin Technology
Now we get to the part most people think happens first: the actual 3D printing. But by the time the digital model hits the printer, most of the creative work is done. The printer's job is to translate that digital sculpture into physical resin with embedded color.
This isn't FDM printing (the kind where plastic filament gets squirted out in layers). This is full-color resin printing—specifically PolyJet or Multi Jet Fusion style technology—where the printer deposits photopolymer resin and color simultaneously, voxel by voxel.
How Full-Color 3D Printing Actually Works
The printer has multiple print heads: some deposit clear or white resin, others deposit colored resin (cyan, magenta, yellow, black—like an inkjet printer, but in 3D). These mix in real-time to create the exact color needed for each microscopic point in the model.
The process:
- Slicing: Software divides the 3D model into horizontal layers (typically 25-50 microns thick—about half the width of a human hair)
- Layer-by-layer deposition: The printer deposits resin for one layer, then UV light instantly cures it solid
- Color mixing: As each layer prints, the printer mixes resin colors to match the digital model's color map
- Support structure generation: The software automatically adds temporary support structures where needed (overhangs, thin features)
- Build completion: After hundreds or thousands of layers, you have a full-color resin sculpture
The colors aren't painted on afterward. They're part of the material itself, embedded throughout the resin. If you were to cut the figurine in half (please don't), you'd see the color goes all the way through.
Print Orientation and Support Strategy
Here's where technical knowledge matters. How you orient the model in the printer affects everything: surface quality, support scarring, dimensional accuracy, even structural integrity.
Print a cat standing upright, and you'll need supports under the belly, between the legs, possibly under the tail. Those supports leave marks when removed—small dimples or rough patches that need sanding.
Print the same cat at an angle, and you might eliminate some supports but introduce layer lines in visible areas. It's a tradeoff.
Orientation considerations for cat figurines:
| Orientation | Advantages | Disadvantages | Best For |
|---|---|---|---|
| Upright | Minimal layer lines on face | Heavy support scarring on underside | Sitting poses |
| Angled 45° | Balanced support needs | Visible layer lines on one side | Standing poses |
| On side | Excellent face detail | Requires support on entire underside | Lying down poses |
For calicos specifically, we're thinking about color boundaries. If there's a sharp transition from orange to black on the face, we want that edge to print cleanly, not stair-stepped across layer lines. Sometimes that means orienting the model in a way that seems counterintuitive but produces better color definition.
The Resin Itself: Material Properties
Full-color resin isn't as durable as solid-color engineering resins. That's the tradeoff for getting vibrant, embedded color. The material is:
- Moderately brittle: Drop it on tile, and it might crack
- UV-sensitive: Prolonged sun exposure can cause yellowing or brittleness
- Slightly porous: Without a protective coating, it can absorb oils from handling
This is why post-processing matters. The raw print coming out of the machine is fragile and needs protection.
Post-Processing: From Raw Print to Finished Sculpture
The figurine that comes out of the printer looks... okay. Not great. It's covered in support structures, there's uncured resin in crevices, the surface has a matte finish that makes colors look dull, and there might be a waxy residue from the printing process.
Post-processing transforms it from "3D printed object" to "sculpture."
Support Removal and Surface Cleanup
First step: remove all support structures. This is done manually with flush cutters and hobby knives. Each support leaves a small mark where it attached to the model—a tiny nub or dimple.
Those marks get sanded smooth using progressively finer grits (usually 400 → 800 → 1200 grit). The goal is to blend the support scars into the surrounding surface so they're invisible.
Critical areas that need extra attention:
- Under the belly (where supports are densest)
- Between legs (tight spaces, easy to miss spots)
- Under the tail (if it's not touching the body)
- Chin and neck (supports often needed here for overhangs)
For calicos, we're careful not to sand through color boundaries. The color goes deep, but aggressive sanding can blur a sharp edge between orange and black patches.
Washing and Curing
Even after supports are removed, there's uncured resin on the surface. Washing (usually in isopropyl alcohol) removes this residue. Then the figurine goes into a UV curing chamber for final hardening.
Curing time matters. Under-cure, and the resin stays slightly tacky and weak. Over-cure, and it becomes brittle and prone to cracking. We're typically looking at 10-15 minutes under high-intensity UV, but it varies based on resin formulation and figurine thickness.
The Clear Coat: Protection and Finish
This is the only manual finishing step that involves applying something to the surface. A clear protective coating—usually a UV-resistant polyurethane or acrylic varnish—gets brushed or sprayed onto the figurine.
What the clear coat does:
- Protects against UV yellowing
- Seals the slightly porous resin surface
- Adds sheen (matte, satin, or gloss—customer choice)
- Makes colors appear more vibrant (like how water makes pebbles look brighter)
- Provides a barrier against oils from handling
This isn't paint. We're not adding color. We're adding a transparent protective layer that also happens to enhance the appearance of the colors already embedded in the resin.
The smell here is distinct—that sharp, chemical scent of solvent-based varnish, nothing like the warm-fur smell of your actual cat. But it fades as it cures, and what you're left with is a surface that feels smooth and looks finished.
Quality Control Checks
Before a figurine ships, it goes through inspection:
- Dimensional accuracy: Does it match the intended size?
- Color accuracy: Do the patches match the reference photos?
- Surface quality: Any visible support scars, layer lines, or defects?
- Symmetry check: Are the eyes level? Ears balanced?
- Structural integrity: Any cracks, weak points, or areas that might fail?
We use raking light—a bright light held at a low angle—to reveal surface imperfections that aren't visible under normal lighting. It's the same technique used in automotive paint inspection.
The Technical Tradeoffs Nobody Mentions
Every manufacturing process involves compromises. Here are the ones that matter for full-color 3D printed pet figurines:
Detail vs. Durability: Higher detail (thinner features, finer textures) means more fragility. A calico with individually sculpted whiskers looks amazing but those whiskers are breakage points. Most figurines use slightly thickened whiskers as a compromise.
Color Vibrancy vs. Longevity: The most vibrant colors (especially reds and oranges—common in calicos) are also the most UV-sensitive. We use UV-resistant clear coat to slow degradation, but nothing stops it completely. Keep your figurine out of direct sunlight.
Print Speed vs. Layer Quality: Thinner layers (better quality) mean longer print times. A 6-inch cat figurine at 25-micron layers might take 12-18 hours to print. At 50-micron layers, maybe 8-10 hours. We typically use 30-35 microns as a sweet spot.
Support Density vs. Cleanup Time: More supports mean better print success but more post-processing work. Fewer supports mean faster cleanup but higher risk of print failure (sagging, warping, collapsed features).
What to Expect: The Timeline and Process Flow
Here's the realistic timeline for a custom calico figurine, from photo submission to delivery:
| Stage | Duration | What's Happening | What You See |
|---|---|---|---|
| Photo Review | 1-2 days | Team assesses if photos are usable | Approval or request for better photos |
| Digital Sculpting | 3-7 days | Artist creates 3D model from photos | Preview images for approval |
| Revisions | 1-3 days | Adjustments based on your feedback | Updated preview images |
| 3D Printing | 1-2 days | Full-color resin printing | Nothing (internal process) |
| Post-Processing | 1-2 days | Support removal, curing, clear coat | Nothing (internal process) |
| Quality Check | 1 day | Final inspection and photography | Final photos before shipping |
Total time varies, but expect 1-2 weeks from photo approval to shipping. Rush options exist but require coordination—visit pawsculpt.com for current service details.
The Revision Process
After you see the first digital preview, you can request changes. Common revision requests for calicos:
- "The orange patch on her left ear is too large"
- "Her eyes should be more green, less yellow"
- "Can you make her look slightly less grumpy?"
- "The white on her chest should extend further down"
These are digital changes—the sculptor adjusts the 3D model before printing. Once you approve the digital preview, that's what gets printed. Physical revisions (reprinting an already-printed figurine) are more complicated and depend on the specific issue.
Common Questions We Get About the Process
"Can you make her look younger/healthier than in the photos?"
Yes, within reason. If your photos show an elderly cat with cloudy eyes or thinning coat, we can digitally restore her to a healthier appearance. But we need you to tell us what "younger her" looked like—additional reference photos from earlier years help immensely.
"What if I only have one photo?"
We can work with it, but expect more back-and-forth during the preview stage. The sculptor will make educated guesses about angles not shown in the photo, and you'll need to provide feedback on whether those guesses are accurate.
"Can you add details that aren't in the photos?"
Depends. If you want to add a collar that she's not wearing in the photos, yes—just describe it or send a reference image. If you want us to invent what her back looks like when we only have front-facing photos, that's guesswork, and the result might not match reality.
"How do you handle really complex calico patterns?"
Carefully. And slowly. A calico with dozens of small, irregular patches takes longer to color-map than a cat with large, simple color blocks. The digital sculpting phase extends because the artist is essentially painting your cat's coat pattern onto the 3D model, patch by patch.
"Every whisker tells a story. Our job is to capture the ones that matter most."
— The PawSculpt Team
Why This Process Matters for Calicos Specifically
Calicos are genetically complex. Their coat patterns result from X-chromosome inactivation, which creates random patches of color. No two calicos are identical—not even close.
That genetic uniqueness makes them challenging to replicate. Unlike a solid-colored cat where you can describe the color in one word ("gray"), a calico requires a map. "Orange here, black there, white on the chest, a little orange spot above the left eye, black on the right ear but orange on the left..."
Full-color 3D printing is ideal for calicos because it can reproduce that complexity without requiring hours of hand-painting. The digital color map gets embedded directly into the resin during printing. Every patch, every transition, every subtle gradient—it's all data that the printer executes precisely.
Compare that to traditional hand-painting: an artist would need to mask off areas, apply colors in layers, wait for drying between coats, and hope their hand is steady enough to follow the irregular boundaries between patches. It's time-consuming, expensive, and prone to human error.
With 3D printing, once the digital model is color-mapped correctly, the printer reproduces it identically every time. If you order two figurines of the same cat, they'll match. Try that with hand-painting.
The Photos That Make This Possible
Let's circle back to where this started: your camera roll at midnight, hunting for the right photo.
Now you know what "right" means. It's not the prettiest photo. It's not the one with the best lighting or the most artistic composition. It's the one that shows your calico clearly, from an angle that reveals her structure, with enough detail that a sculptor can understand her anatomy.
The photos that work best:
- Taken at her eye level (not looking down at her)
- Natural window light from the side (shows texture and dimension)
- Neutral background (solid color wall, floor, blanket)
- Relaxed pose (sitting, standing, lying—not mid-action)
- Sharp focus on her face and body (not just one or the other)
And here's the thing: you probably already have these photos. They're the boring ones. The ones where she's just sitting there, looking at you, doing nothing interesting. Those are gold.
The action shots, the artistic angles, the dramatic lighting—those are beautiful, but they're not blueprints. Save them for your Instagram. Send us the boring ones.
What Happens After You Receive Your Figurine
The figurine arrives. You open the box. And there she is—your calico, frozen mid-sit, with that specific ear tilt and that exact pattern of patches you've memorized.
Care instructions are simple:
- Keep out of direct sunlight (UV degrades resin over time)
- Dust with a soft brush or compressed air (don't use water)
- Handle by the base, not by delicate features (ears, tail, whiskers)
- Store in a stable location (not on a high shelf where it might fall)
The resin is durable enough for display but not for play. This isn't a toy. It's a sculpture that happens to be made with 3D printing technology instead of traditional methods.
Over time, you'll notice things. The way light catches the orange patches differently than the black ones. The subtle texture of the "fur" that's actually layer lines from the printing process. The fact that her expression doesn't change—she's always that specific version of herself, the one captured in the reference photo you chose.
That permanence is the point. Your actual cat changes—ages, gains weight, loses teeth, develops gray hairs. The figurine doesn't. It's a bookmark in time, a physical reminder of who she was in that moment.
The Technology Will Improve (But the Process Won't Change Much)
3D printing technology advances constantly. Printers get faster, resins get tougher, colors get more vibrant, layer resolution gets finer. In five years, the figurines will probably look even better than they do now.
But the core process—photo to digital sculpture to physical print—that's not changing. The bottleneck isn't the printer. It's the human sculptor who needs to understand your cat's anatomy, interpret your reference photos, and make hundreds of small decisions about proportions and details.
AI might eventually help with some of that. Maybe. But for now, and for the foreseeable future, there's a person looking at your photos and building your cat by hand in 3D software. That's where the quality comes from.
The printer just executes the plan. The sculptor creates it.
Why People Choose This Over Other Memorial Options
Not everyone wants a figurine. Some people prefer photo albums, or paw print impressions, or cremation jewelry. Those are all valid ways to remember a pet.
Figurines offer something specific: physical presence without biological decay. Your calico's actual body won't last. Photos are flat. A figurine occupies space—it has weight, dimension, a presence on your shelf that feels more substantial than a picture frame.
It's not a replacement. Nothing replaces your actual cat. But it's a tangible anchor for memory, something you can hold (carefully) or look at from across the room and think, "Yeah, that's her. That's exactly how she sat."
For some people, that matters. For others, it doesn't. If you're reading this far, you're probably in the first group.
Frequently Asked Questions
How long does it take to create a custom cat figurine?
From photo approval to shipping, expect 1-2 weeks. This includes digital sculpting (3-7 days), any revisions you request (1-3 days), 3D printing (1-2 days), and post-processing (1-2 days). The timeline can vary based on complexity—calicos with intricate patterns may take longer during the sculpting phase. For current service details and any rush options, check the website.
What kind of photos do I need for a calico cat figurine?
You need at least three clear photos: front view, side view, and three-quarter view. Natural lighting works best—window light from the side shows texture and dimension. Use a neutral background (solid wall, floor, or blanket) so your cat's outline is clear. The photos should be sharp, well-lit, and show your cat in a relaxed pose. Action shots and artistic angles are beautiful but not useful as reference material.
Is the figurine hand-painted?
No. Colors are 3D printed directly into the resin using full-color printing technology (similar to PolyJet or Multi Jet Fusion). The printer deposits colored resin voxel-by-voxel, embedding your cat's markings into the material itself. The only manual finishing step is applying a clear protective coat for UV resistance and sheen. There's no hand-painting involved—the color is part of the resin structure.
How durable are 3D printed pet figurines?
They're durable for display but moderately brittle. The full-color resin is tougher than it looks but won't survive a drop onto tile or concrete. Keep the figurine out of direct sunlight (UV causes yellowing and brittleness over time), dust it with a soft brush or compressed air, and handle it by the base rather than delicate features like ears or tail. Think of it as a sculpture, not a toy.
Can you make changes after I see the digital preview?
Yes. Revisions happen at the digital stage, before printing. You can request changes to color accuracy, proportions, pose details, or specific features. Common requests include adjusting patch sizes, tweaking eye color, or modifying expression. Once you approve the digital preview, that's what gets printed. Physical revisions (reprinting an already-printed figurine) depend on the specific issue and are handled case-by-case.
What if I only have one photo of my cat?
We can work with a single photo, but expect more collaboration during the preview stage. The sculptor will make educated guesses about angles not visible in your photo—the shape of her haunches, the width of her face, how her tail curves. You'll need to provide detailed feedback on whether those guesses match reality. Additional photos from any angle, even if they're not perfect quality, help fill in the gaps.
Ready to Preserve Your Calico's Unique Beauty?
Every calico tells a different story through her patches—the orange that spreads across her shoulder, the black that frames her face, the white comma on her paw that you'd recognize anywhere. A custom figurine captures those details that make your cat irreplaceable, transforming a favorite photo into a 3D printed sculpture you can hold.
Visit pawsculpt.com to see how full-color 3D printing brings your calico cat snapshot to life as a lasting sculpture
