From Order to Arrival: The 14-Day Journey of Your Custom Labrador Figurine (With Photos)
She was standing in the pet store aisle, running her thumb across a generic ceramic Labrador on the clearance shelf, when her phone buzzed—a text from PawSculpt confirming her custom figurine timeline had entered the digital sculpting phase. She set the mass-produced dog back on the shelf. It looked nothing like Biscuit.
Quick Takeaways
- Your custom figurine goes through 5+ distinct production stages — understanding each one helps you submit better photos and set realistic expectations
- Photo quality is the single biggest factor in figurine accuracy — three specific angles matter more than dozens of random shots
- Full-color 3D printing embeds pigment directly into resin — there's no painting step, which means color consistency you can't get by hand
- The digital sculpting review is your most important moment — explore the PawSculpt revision process before your order begins so you know what to look for
- Post-processing and quality control add days but protect your investment — rushing this stage is how figurines end up with defects
Why Most "How Long Does It Take?" Articles Miss the Point
Here's something that genuinely surprised us when we started explaining our process to customers: people don't actually want to know how long. They want to know what's happening during that time.
There's a meaningful difference. Knowing a custom Labrador figurine takes roughly two weeks is surface-level information. Knowing that on day four, a digital sculptor is adjusting the exact droop of your Lab's left ear based on the reference photo where he's mid-yawn—that changes the wait entirely. It turns anxiety into anticipation.
Most ordering guides for custom pet figurines read like shipping trackers. Stage 1, stage 2, estimated delivery. But the journey from your photo submission to the moment you unwrap a full-color resin figurine of your dog involves decisions, tradeoffs, and technical processes that most pet owners never hear about. And honestly? Understanding those details makes you a better collaborator in the process.
"We don't just print a figurine—we reverse-engineer a living, breathing animal from a handful of frozen moments."
— The PawSculpt Team
So we're going to walk through the entire custom figurine timeline, stage by stage, with the kind of shop-floor detail you'd get if you were standing next to our production team. We'll cover what happens, why it takes the time it does, where things can go wrong, and—most importantly—what you can do at each step to get the best possible result.
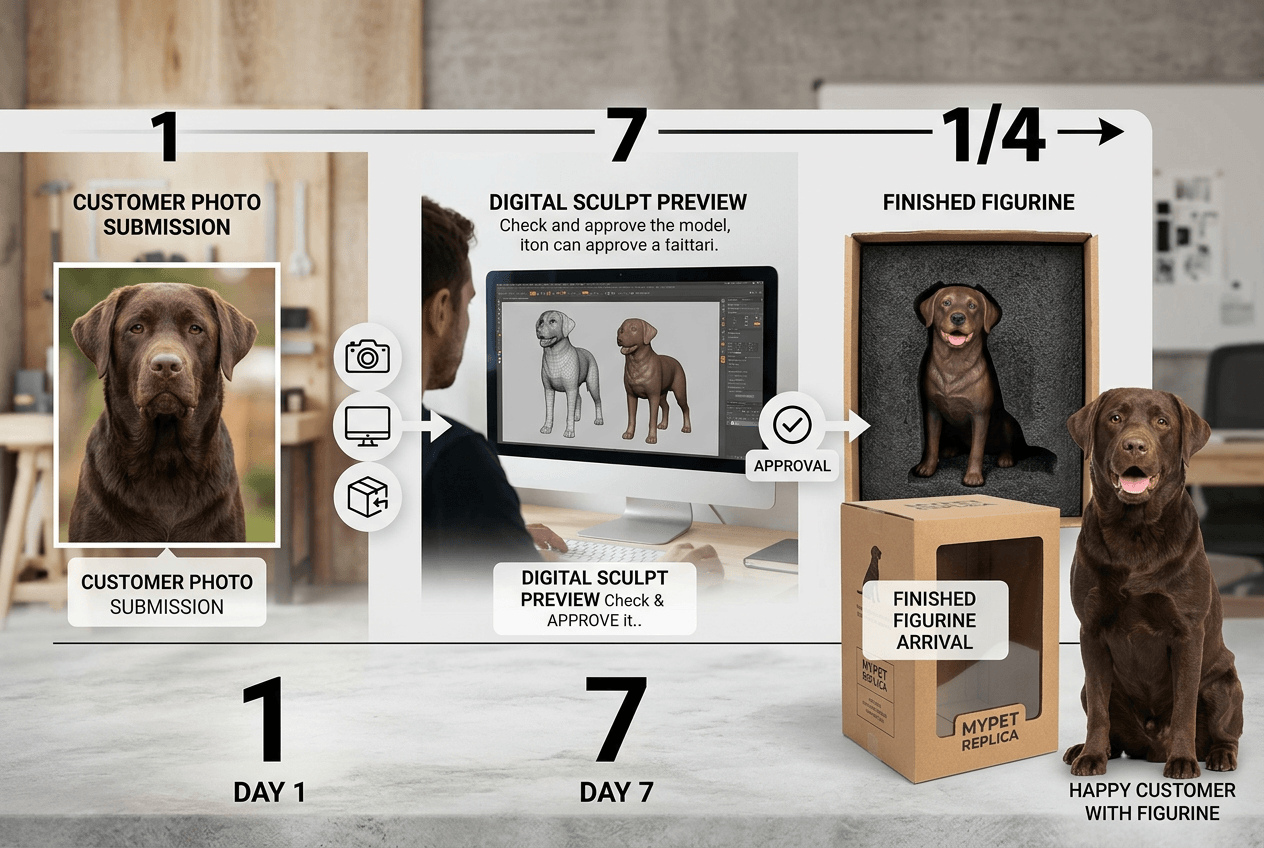
Stage 1: Photo Submission and Reference Analysis (The Part You Control Most)
This is the stage where 80% of the final figurine's accuracy is determined. Not during sculpting. Not during printing. Right here, when you choose which photos to submit.
We've worked with thousands of pet families, and the pattern is remarkably consistent: customers who submit 3–5 carefully chosen reference photos end up significantly happier with their figurines than those who submit 30 random snapshots. More isn't better. Better is better.
What Your Photos Need to Show
Think of reference photos like architectural blueprints. Our digital sculptors need to reconstruct a three-dimensional animal from two-dimensional images. That means they need:
| Photo Type | What It Shows | Why It Matters | Common Mistake |
|---|---|---|---|
| Front-facing | Facial proportions, ear set, eye spacing | Defines the "personality" of the figurine | Shooting from above (distorts the snout) |
| Side profile | Body length, leg proportions, tail carriage | Establishes the overall silhouette | Dog is sitting, hiding body shape |
| 3/4 angle | How features connect in three dimensions | Bridges the gap between front and side | Blurry or backlit shot |
| Detail shots | Unique markings, collar, scars, spots | Captures what makes YOUR Lab different | Too far away to see detail |
| Color reference | True coat color in natural light | Ensures printed pigment matches reality | Indoor tungsten lighting (makes everything orange) |
The Counterintuitive Photo Insight
Here's what most guides won't tell you: the best reference photo for a figurine is often the worst photo by Instagram standards. You know that perfectly posed shot where your Lab is sitting pretty with gorgeous backlighting? Useless for sculpting. The harsh, flash-on, slightly unflattering photo where every whisker and fur clump is visible in sharp focus? Gold.
Our sculptors need information, not aesthetics. Flat, even lighting—like overcast daylight or a well-lit room—reveals the true topology of your dog's face and body. Dramatic shadows hide exactly the details we need to see.
A quick day-in-the-life scenario: You're in the kitchen on a Saturday morning, your Lab is sprawled on the tile floor waiting for a dropped egg. The overhead light is on, the room is bright and shadowless. Grab your phone, get down to floor level, and take a front shot, a side shot, and a three-quarter shot. Thirty seconds. Those three photos—taken in boring kitchen light—will likely be more useful than anything from your camera roll.
What Happens Behind the Scenes During Reference Analysis
Once your photos arrive, a sculptor doesn't just glance at them and start modeling. There's a deliberate reference analysis phase:
- Breed proportion check — Labradors have well-documented breed standards (the American Kennel Club's Labrador breed profile is a common cross-reference), but individual Labs vary widely. Your dog's proportions override breed averages.
- Coat flow mapping — Labs have a double coat with specific directional patterns. The sculptor notes where fur flows forward vs. backward, where it parts naturally, and where cowlicks exist.
- Color mapping — This is critical for full-color printing. The sculptor identifies distinct color zones: the darker saddle area, lighter underbelly, any brindle patterns, nose pigmentation, eye color.
- Pose selection — If you haven't specified a pose, the sculptor recommends one based on what the reference photos best support. A pose that requires guessing at anatomy the photos don't show will always be less accurate.
This analysis typically happens before any 3D software is opened. It's quiet, careful work—more like a detective reviewing evidence than an artist feeling inspired.
Stage 2: Digital Sculpting — Where Your Lab Becomes a 3D Model
This is the stage most people are curious about, and also the stage most people misunderstand.
Digital sculpting is not automated. There's no "scan a photo, get a model" button. A trained 3D artist opens a program like ZBrush or Blender—professional-grade digital sculpting software—and builds your Labrador from scratch, polygon by polygon. It's the same technology used in Pixar movies and AAA video games, applied to a 4-inch figurine of your dog.
The Sculpting Workflow
The sculptor starts with a base mesh—a rough, breed-appropriate starting shape—and progressively refines it through what the industry calls subdivision levels. Think of it like a clay sculptor starting with a rough lump and gradually adding finer detail, except the "clay" is digital and the "tools" are pressure-sensitive stylus inputs on a drawing tablet.
Here's a simplified breakdown of how the detail builds:
| Sculpting Phase | What's Happening | Detail Level | Typical Time Investment |
|---|---|---|---|
| Blocking | Overall proportions, body mass, head shape | Very rough—like a dog-shaped blob | Early hours |
| Primary forms | Muscle groups, skull structure, limb positioning | Recognizably a Labrador | Mid-phase |
| Secondary forms | Ear folds, toe pads, jowl wrinkles, tail taper | Recognizably your Labrador | Bulk of the work |
| Tertiary detail | Fur texture, individual whisker bumps, eye reflections | Close-up-ready detail | Final refinement |
| Color application | UV mapping + digital texture painting in software | Full-color surface ready for print | Separate pass |
That last row is worth pausing on. Unlike traditional figurine production where a white model gets colored after the fact, full-color 3D printing requires the color information to be embedded in the digital file before printing begins. The sculptor doesn't just build the shape—they also build the appearance. Every color gradient in your Lab's coat, every pink spot on the nose, every amber fleck in the eyes gets mapped onto the 3D model digitally.
This is why our process says "digitally sculpted, then precision 3D printed in full color." The color is part of the model file itself.
The Review Preview: Your Most Important Moment
Before anything gets printed, you receive a digital preview—rendered images of the 3D model from multiple angles. This is your chance to request adjustments.
And here's the counterintuitive insight many customers miss: the best time to be picky is right now, not after printing. Changing the tilt of an ear or the shade of a coat patch takes minutes in digital sculpting software. Making the same change after the figurine is physically printed means starting the entire print from scratch.
We'll be real—most customers approve on the first or second preview. But the ones who take time to compare the preview against their reference photos, zooming in on specific features, asking "can the eyes be just a touch wider?"—those customers consistently report higher satisfaction with the final product.
Check the PawSculpt FAQ page for specifics on revision options and preview formats.
"A figurine isn't finished when it looks like a Labrador. It's finished when it looks like your Labrador."
Stage 3: Print Preparation — The Hidden Engineering Phase
This is the stage almost nobody talks about, and it's one of the most technically demanding parts of the entire custom figurine process. After the digital sculpt is approved, the model doesn't just go straight to the printer. It has to be prepared for printing, and this preparation involves engineering decisions that directly affect quality.
Orientation: Why Which Way Your Dog Faces in the Printer Matters
Full-color resin 3D printing builds objects layer by layer, from bottom to top. The orientation of the model inside the printer—which direction is "up"—affects everything:
- Surface quality: Surfaces that face the build plate (the bottom) often have slightly different texture than those facing upward. For a Lab figurine, this means the sculptor's orientation choice determines whether the smoothest surface is on the face (high priority) or the belly (lower priority).
- Support placement: Overhanging features need temporary support structures during printing—think of them as scaffolding. These supports leave tiny marks where they're removed. Orientation determines where those marks end up. A good print technician hides support scars on the underside of the belly, between the legs, or on the bottom of the base—never on the face.
- Structural integrity: Thin features like a Lab's tail or individual legs are strongest when their longest dimension aligns with the layer direction. Print the tail horizontally and it's weaker at each layer boundary. Print it more vertically and those layers stack like bricks.
Hollowing and Drain Holes
Solid resin figurines are heavy, expensive (more resin), and prone to internal stress that can cause cracking over time. So most figurines are hollowed—the interior is scooped out digitally, leaving walls typically 2–4mm thick.
But hollowing creates a problem: uncured resin gets trapped inside. During printing, liquid resin fills the hollow cavity. If it can't drain out, it sits inside your figurine forever—slowly degrading, potentially leaking, or causing the walls to warp as it cures unevenly. The solution is drain holes, small openings (usually on the underside or base) that let trapped resin flow out during post-processing.
For a Labrador figurine standing on a base, drain holes are typically placed on the bottom of the base itself—completely invisible in the finished piece. Smart placement means you'd never know they're there.
Layer Height: The Resolution of Your Dog
Layer height in 3D printing is like pixel resolution in photography—it determines how fine the detail can be. For full-color resin figurines, layer heights are often in the 25–50 micron range (a micron is one-thousandth of a millimeter). At 25 microns, each layer is roughly one-third the width of a human hair.
At that resolution, individual fur texture sculpted into the digital model actually reproduces on the physical print. But there's a tradeoff: finer layers mean more layers total, which means longer print times. A figurine printed at 25-micron layers might take twice as long as the same figurine at 50 microns. The production team balances resolution against schedule, choosing the layer height that captures the detail your Lab needs without unnecessarily extending the timeline.
Stage 4: Full-Color 3D Printing — When Digital Becomes Physical
This is the part that feels like magic, even to those of us who've watched it happen thousands of times.
Full-color resin 3D printing (PolyJet-style or similar multi-jet technology) works by depositing microscopic droplets of UV-curable photopolymer resin—each droplet precisely tinted—onto a build platform. Layer by layer, voxel by voxel (a voxel is a 3D pixel), the machine builds your Labrador from the paws up.
Here's what makes this different from the 3D printing most people imagine: the color is embedded in the resin during printing. There are no white models that get colored afterward. No painting booth. No acrylics. The machine jets different colored resins simultaneously, blending them at the voxel level to achieve the exact shade specified in the digital file.
Think of it like a full-color inkjet printer, but instead of laying ink on paper in two dimensions, it's laying tinted resin in three dimensions.
What Can Go Wrong (And Why Quality Control Matters)
Honest talk—3D printing isn't flawless. Even with excellent machines and experienced operators, several failure modes can occur:
- Bloom or fogging: UV-cured resins can develop a hazy surface bloom if curing parameters are off. It looks like condensation trapped under the surface. Controlled curing environments minimize this.
- Support pitting: Where support structures are removed, tiny pits or rough spots can remain. Skilled post-processing addresses these, but it's a manual step requiring care.
- Color shift: Ambient temperature and humidity during printing can subtly affect how resin pigments cure, leading to slight color differences from the digital preview. Controlled print environments mitigate this, but if you're looking for exact Pantone matching, know that resin printing has inherent variability in the ±5% range.
- Warping or curling: Thin features (ear tips, tail ends) can warp slightly if internal stresses build during curing. This is why print orientation and support strategy matter so much.
None of these issues are catastrophic, and a well-run shop catches them in quality control before anything ships. But understanding that they exist helps you appreciate why a few extra days in post-processing isn't wasted time—it's protective.
| Potential Issue | What It Looks Like | How It's Prevented | How It's Fixed |
|---|---|---|---|
| Bloom/fogging | Hazy, milky surface | Controlled UV cure timing and environment | Re-cure or surface treatment |
| Support pitting | Small rough spots, usually on underside | Strategic support placement | Careful sanding and clear coat |
| Color shift | Slightly different shade than preview | Climate-controlled print chamber | Reprint if outside tolerance |
| Warping | Bent ear tips or curved tail | Optimized orientation, proper supports | Reprint with adjusted parameters |
| Layer lines | Visible stepping on curved surfaces | Finer layer height, optimal orientation | Light sanding + clear coat fills lines |
Stage 5: Post-Processing — The Transformation Nobody Sees
When a figurine comes off the printer, it doesn't look like the finished product. It's encased in support material, covered in uncured resin residue, and lacks the polished sheen you see in final product photos. Post-processing is where raw print becomes finished figurine, and it involves several distinct steps.
Washing
The freshly printed figurine goes through a solvent wash (typically isopropyl alcohol or a specialized cleaning solution) to remove uncured resin from the surface. This step is time-sensitive—too short and residue remains, making the surface tacky. Too long and the solvent starts attacking the cured resin itself, softening fine details.
For a Lab figurine with intricate fur texture, washing requires special attention to recessed areas where resin pools—between the toes, inside the ears, under the chin. A combination of submersion and gentle agitation (sometimes ultrasonic cleaning) ensures these pockets clear out.
Support Removal
This is one of the most skill-dependent manual steps. Support structures—the temporary scaffolding that held overhanging features during printing—need to be carefully removed without damaging the figurine surface.
For a standing Labrador, supports are typically concentrated under the belly, between the legs, and possibly under the jaw if the head is tilted. A technician uses flush cutters, fine-grit sanding sticks, and sometimes dental-style picks to remove supports and smooth the contact points.
The goal: when you pick up the finished figurine and flip it over, you shouldn't be able to tell where supports were. That's the standard.
UV Curing
After washing and support removal, the figurine goes through a final UV cure—exposure to ultraviolet light that fully hardens any remaining partially-cured resin and maximizes the material's mechanical properties. Under-curing leaves the figurine slightly soft and prone to yellowing over time. Over-curing can make it brittle and prone to chipping.
The sweet spot depends on the specific resin chemistry, the wall thickness of the figurine, and even the ambient temperature. It's one of those parameters that experienced production teams dial in through repetition, not just spec sheets.
Clear Coat Application
The final step—and the only traditionally "manual" step in our entire process—is applying a clear coat. This is a transparent protective layer (typically a spray-on or brush-on UV-resistant varnish) that serves multiple purposes:
- Protection: Shields the pigmented resin from UV degradation, handling oils, and minor abrasion
- Sheen control: Allows the finish to be matte, satin, or gloss depending on preference
- Surface unification: Smooths out minor surface texture differences between support-contact areas and free-printed areas, creating a consistent look and feel
- Color pop: A clear coat subtly deepens and enriches the printed colors, similar to how a wet stone looks more vibrant than a dry one
This is worth emphasizing: the clear coat is the only hand-applied element of the entire figurine. Every color, every marking, every gradient in your Lab's coat comes from the printer itself. The clear coat is purely protective and cosmetic.
Stage 6: Quality Control — The Boring Stage That Matters Most
This is the stage that separates professional operations from hobby-level printing, and it's the stage most timeline breakdowns skip entirely.
Dimensional Checks
The finished figurine is compared against the approved digital model using reference measurements. Is the overall height within tolerance? Is the head-to-body ratio correct? Are the ears symmetrical (or intentionally asymmetrical, if your Lab has that endearing one-up-one-down thing going on)?
Surface Inspection Under Raking Light
Raking light—light angled nearly parallel to the surface—reveals defects invisible under normal lighting. Support scars, layer inconsistencies, clear coat drips, and surface bloom all become visible under raking light. A QC technician slowly rotates the figurine under a raking light source, inspecting every surface.
This is the stage where, honestly, a lot of figurines get pulled for minor touch-ups. A tiny rough patch from a support nub. A barely-visible drip in the clear coat. Most customers would never notice these issues, but catching them before shipping is what "museum-quality" actually means in practice.
The Sound Test (Yes, Really)
This is a shop-floor trick that probably won't appear in any other figurine ordering guide: experienced QC technicians will gently tap a figurine and listen. A properly cured, fully solid figurine has a crisp, almost ceramic-like tink. A figurine with internal voids, trapped uncured resin, or inadequate wall thickness sounds dull or hollow in the wrong places. It's not scientific instrumentation—it's the kind of heuristic that comes from handling thousands of pieces.
"The final quality check isn't visual. It's the moment you hold it and it feels like your dog looking back at you."
What You Can Do at Each Stage to Get a Better Result
Most guides position you as a passive customer—submit photos, wait, receive figurine. But you're actually an active participant, and what you do (or don't do) at key moments meaningfully affects the outcome.
During Photo Submission
- Include a written note about features photos might not capture. "His left ear is slightly thinner than his right." "The black spot on his nose has a brownish edge." Sculptors work from visual reference, but written notes catch things photos miss.
- Specify the exact pose you want, or explicitly say "sculptor's choice." Ambiguity leads to revisions. Clarity saves time.
- Send a photo of the spot where you'll display the figurine. This sounds odd, but it helps the team suggest the best base size and orientation for viewing angle.
During Digital Preview Review
- Compare the preview to your photos on the same screen. Color perception changes between devices. Looking at both images on the same monitor eliminates that variable.
- Check proportions before details. It's natural to zoom into the eyes first, but start with the overall silhouette. If the body looks too long or the legs too short, that's a bigger fix than tweaking an eye.
- Don't rush the approval. Sit with the preview for at least a few hours. First impressions are often positive, but small discrepancies reveal themselves over time—the same way you notice a crooked picture frame after walking past it three times.
After Arrival
- Unbox the figurine in natural light, not under warm overhead lamps. Artificial lighting can make colors appear different than expected. Judge the color accuracy in the same lighting you photographed your dog in.
- Handle it by the base, not the figurine itself. Resin is durable but not indestructible. The clear coat protects against casual handling, but oils from fingers accumulate over time.
For care and display tips specific to full-color resin figurines, the PawSculpt contact page can connect you with their team for personalized guidance.
The Part Nobody Talks About: Why the Wait Feels Different for Memorial Orders
We need to address something here, because it affects a significant portion of custom figurine orders and it changes the emotional texture of every stage we've just described.
For many pet owners, ordering a custom Labrador figurine isn't a fun hobby purchase. It's a memorial. The dog in the reference photos is no longer here. And that changes the wait entirely.
The sound of it—or rather the absence of sound—is what hits hardest. No collar jingling in the next room. No toenails clicking on hardwood. No heavy thump of a Lab flopping onto the kitchen floor. The house has a different acoustic signature now, and every day you're waiting for the figurine, you're living in that altered soundscape.
We've seen families tell us that the preview approval stage is emotionally complicated. Seeing a digital rendering of their dog, lifelike and dimensional, triggers something unexpected—a strange mix of comfort and fresh grief. One customer told us she stared at the preview email for twenty minutes before she could open it.
This is normal. It's common. You're not alone in feeling that way.
If you're ordering a memorial figurine, here are a few things that might help:
- Give yourself permission to take extra time with the preview. There's no rush. Review it when you're ready, not when email anxiety pushes you.
- Have someone else look at the preview first if you're worried about the emotional impact. A friend or family member can flag any obvious issues before you see it.
- Know that the finished figurine will feel different than the preview. Holding a physical object that captures your dog's likeness engages different neural pathways than viewing a screen image. Many families describe it as simultaneously painful and deeply comforting—and most say the comfort wins over time.
The American Kennel Club's resources on pet loss offer additional support if you're navigating this process while still in active grief.
A Realistic Timeline Breakdown (Without False Promises)
We're not going to give you exact day-counts, because those depend on factors specific to each order—complexity of the pose, number of revision rounds, current production volume, printing queue, and more. Visit pawsculpt.com for the most current timeline estimates.
But here's the general sequence and what drives the duration of each stage:
| Stage | What Determines Duration | What You Can Do to Help |
|---|---|---|
| Photo review & analysis | Clarity and completeness of submitted photos | Submit sharp, well-lit, multi-angle photos |
| Digital sculpting | Complexity of pose, unique features, coat pattern | Provide clear written notes alongside photos |
| Preview & revision | How quickly you review; number of revision rounds | Compare carefully, be specific in feedback |
| Print preparation | Technical complexity (supports, orientation, hollowing) | Nothing—this is entirely on the production team |
| 3D printing | Physical print time based on size and resolution | Nothing—physics sets the pace here |
| Post-processing | Complexity of support removal, cure requirements | Nothing—patience is the only contribution |
| Quality control | Whether figurine passes on first inspection | Nothing—but be glad this stage exists |
| Packaging & shipping | Carrier transit time to your location | Choose appropriate shipping option |
The pattern here is clear: the stages where you have the most influence are the earliest ones. By the time the figurine hits the printer, you've already made the decisions that matter most. Front-load your effort and attention into photo selection and preview review, and the rest of the process rewards that investment.
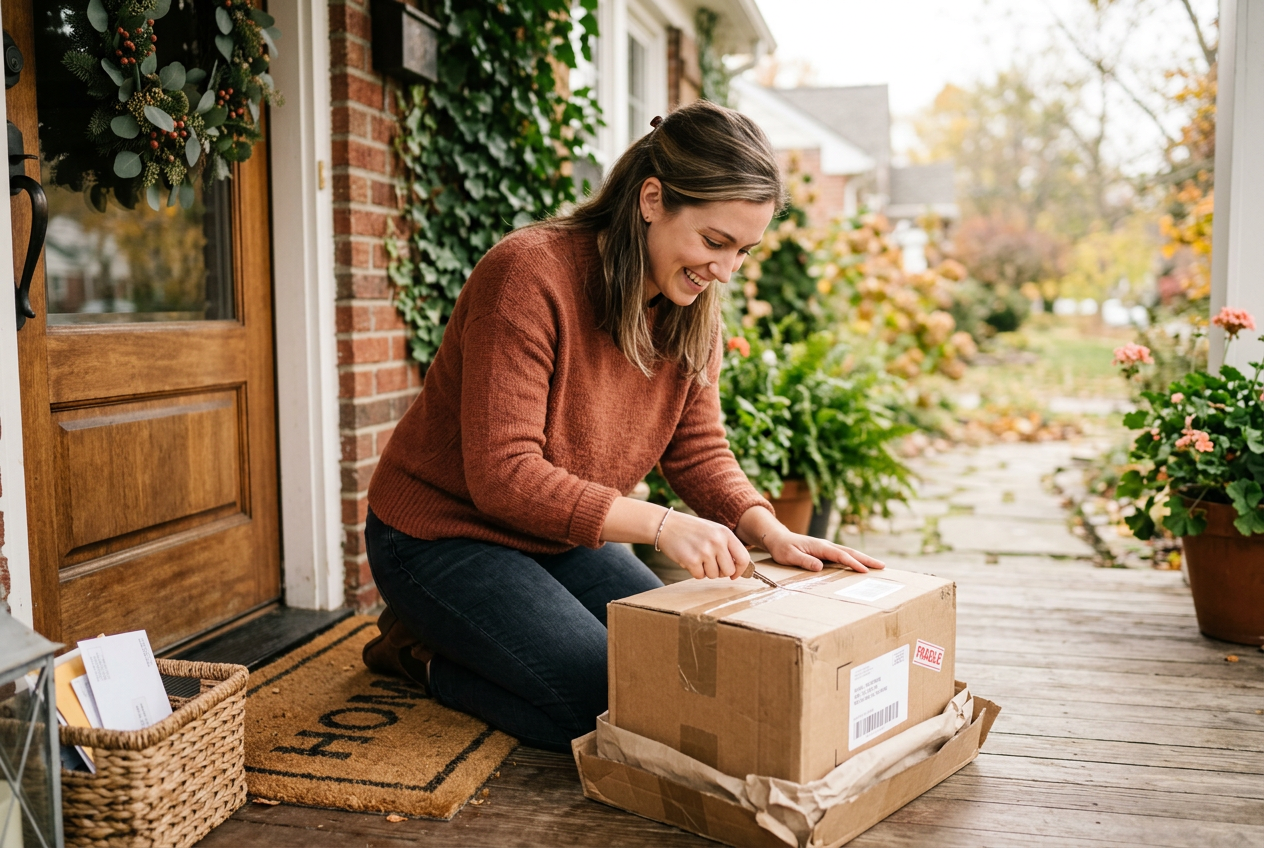
When the Box Arrives
Picture this: it's a Tuesday evening. You hear the delivery truck outside—that distinct hydraulic groan of the lift gate. Your doorbell rings. You bring the box inside and set it on the kitchen counter.
The house is quiet in that particular way it's been quiet since your Lab left.
You open the box. Lift out the figurine. And there he is—ears slightly askew, that goofy underbite, the specific chocolate-fading-to-caramel gradient across his shoulders that you've never seen on any other Lab.
The colors aren't sitting on top of the surface. They're in it—embedded in the resin during printing, as much a part of the material as the shape itself. The clear coat gives it a soft sheen, and when you turn it in the light, the fur texture catches shadows exactly the way real fur does.
You set it on the shelf next to that one good photo. And the sound it makes when it touches the wood—a small, solid tink—tells you it's real. It's here. A piece of your dog, translated into something permanent.
That's what the 14-day journey is for.
Frequently Asked Questions
How long does a custom pet figurine take to make?
The full custom figurine timeline—from photo submission to delivery—generally spans around two weeks, though this varies based on the complexity of your pet's features, how many revision rounds the preview needs, and current production volume. The digital sculpting and preview stages are where most time variability occurs. Check pawsculpt.com for the most up-to-date timeline estimates.
What photos work best for a custom Labrador figurine?
Three to five sharp, well-lit photos beat thirty blurry ones every time. You need a front-facing shot, a side profile, and a 3/4 angle at minimum. Shoot in natural or even artificial light—flat and shadowless is ideal. Get at your dog's eye level rather than shooting from above. Include close-ups of any unique markings, scars, or color patterns that make your Lab distinctive.
Are custom pet figurines hand-painted?
No—and this is one of the most common misconceptions. PawSculpt uses full-color 3D printing technology where color is embedded directly into the resin material during the printing process, voxel by voxel. There are no brushes, no acrylics, no painting stage. The only hand-applied element is a clear protective coat applied after printing and curing.
What material are PawSculpt figurines made from?
The figurines are made from UV-cured photopolymer resin with embedded pigments—essentially a high-resolution, full-color plastic resin that's hardened by ultraviolet light during manufacturing. The material is solid, lightweight, and protected by a clear coat that guards against UV degradation and minor wear.
How should I care for my custom pet figurine?
Display it away from direct, prolonged sunlight (UV-resistant clear coat helps, but no material is immune to years of direct sun). Handle it by the base rather than gripping the figurine body. Dust with a soft, dry brush or microfiber cloth. Avoid submerging in water or using chemical cleaners. Treated well, these figurines maintain their color and detail for years.
Can I request changes after seeing the digital preview?
Absolutely—that's the whole purpose of the preview stage. This is your best opportunity to request adjustments, because changes in the digital model take minutes compared to reprinting a physical figurine. Be specific in your feedback ("the left ear should droop slightly more") rather than vague ("something feels off"). Visit pawsculpt.com for details on their revision process.
Ready to See Your Labrador Captured Forever?
You now know every stage of the custom figurine timeline—from the reference photos you choose to the final quality check under raking light. That knowledge makes you a better collaborator and a more confident customer. Whether you're celebrating a Lab who's currently hogging the couch or honoring one whose collar still hangs by the door, a custom figurine built through full-color 3D printing captures the details that generic products never will.
Visit pawsculpt.com to explore the full process, see examples, and learn about current timelines and guarantees
