DIY 3D Scan vs. PawSculpt: A Before-and-After Photo Walkthrough with My Scottish Fold
You're kneling on the front porch with your phone six inches from your Scottish Fold's face, trying to get her to hold still long enough for a 3D scan app to register her folded ears—and the smell of rain-soaked wood beneath your knees is mixing with the warm, biscuity scent of her fur as she blinks at you like you've lost your mind. This is the moment you realize: DIY 3D scan pet vs custom figurine is not just a Google search. It's a lived experience.
Quick Takeaways
- DIY 3D scanning apps produce inconsistent geometry — expect 2-5 hours of cleanup work even with a cooperative cat
- Fur is the enemy of photogrametry — consumer-grade scanning cannot resolve fine textures like Scottish Fold plush coats
- Color accuracy separates amateur from professional results — printed color-in-resin technology captures markings that post-processing paint never matches
- A custom pet figurine service handles the technical burden — you provide photos, artists handle topology, texture, and output
- The "good enough" trap costs more long-term — failed prints, wasted filament, and re-scans add up faster than a single professional order
The Experiment Nobody Warns You About
Here's what actually happens when you decide to 3D scan your cat at home. Not the YouTube tutorial version—the real one. The one where your Scottish Fold, Mochi, decides the spinning turntable is a threat and the photogrammetry app on your phone keeps losing tracking because her silver taby coat reflects light in seventeen contradictory directions.
We're going to walk through this honestly. We did it. We photographed every stage. And then we compared the DIY result against what PawSculpt's team produced from the same reference photos.
The difference wasn't subtle. But the reasons for the difference? That's what nobody talks about.
Why Scottish Folds Are Particularly Brutal Test Subjects
Scottish Folds present a unique scanning nightmare that most "scan your pet!" tutorials conveniently ignore. Their signature folded ears create undercut geometry—areas where the surface folds back on itself, creating shadows that confuse depth sensors and photogrammetry algorithms alike.
Add to that:
- Dense, plush double coats that absorb structured light patterns
- Round faces with minimal angular landmarks for software to lock onto
- Compact bodies where legs tuck close, creating merged geometry
- The fact that they tend to sit in loaf position, hiding their paws entirely
A Greyhound? A Doberman? Those are scanning-friendly shapes. Clean lines, short coats, visible muscle definition. A Scottish Fold is essentially a sphere covered in velvet. Your scanning app doesn't know where the cat ends and the shadow begins.

My DIY 3D Scanning Setup (And Where It Fell Apart)
Let me lay out exactly what I used, because specifics matter more than generalities here.
Hardware:
- iPhone 14 Pro (LiDAR sensor)
- Polycam app (photogrammetry mode)
- A lazy Susan from the kitchen
- Ring light,18-inch
- Gray backdrop (reduces reflection interference)
The Process:
- Placed Mochi on the lazy Susan with treats
- Slowly rotated while capturing ~120 photos in Polycam
- Let the app process the point cloud
- Exported to Meshmixer for cleanup
- Attempted to print on an Elegoo Mars 3 (resin printer)
Time invested: Roughly 4.5 hours from first photo to printable file. Not counting the print itself.
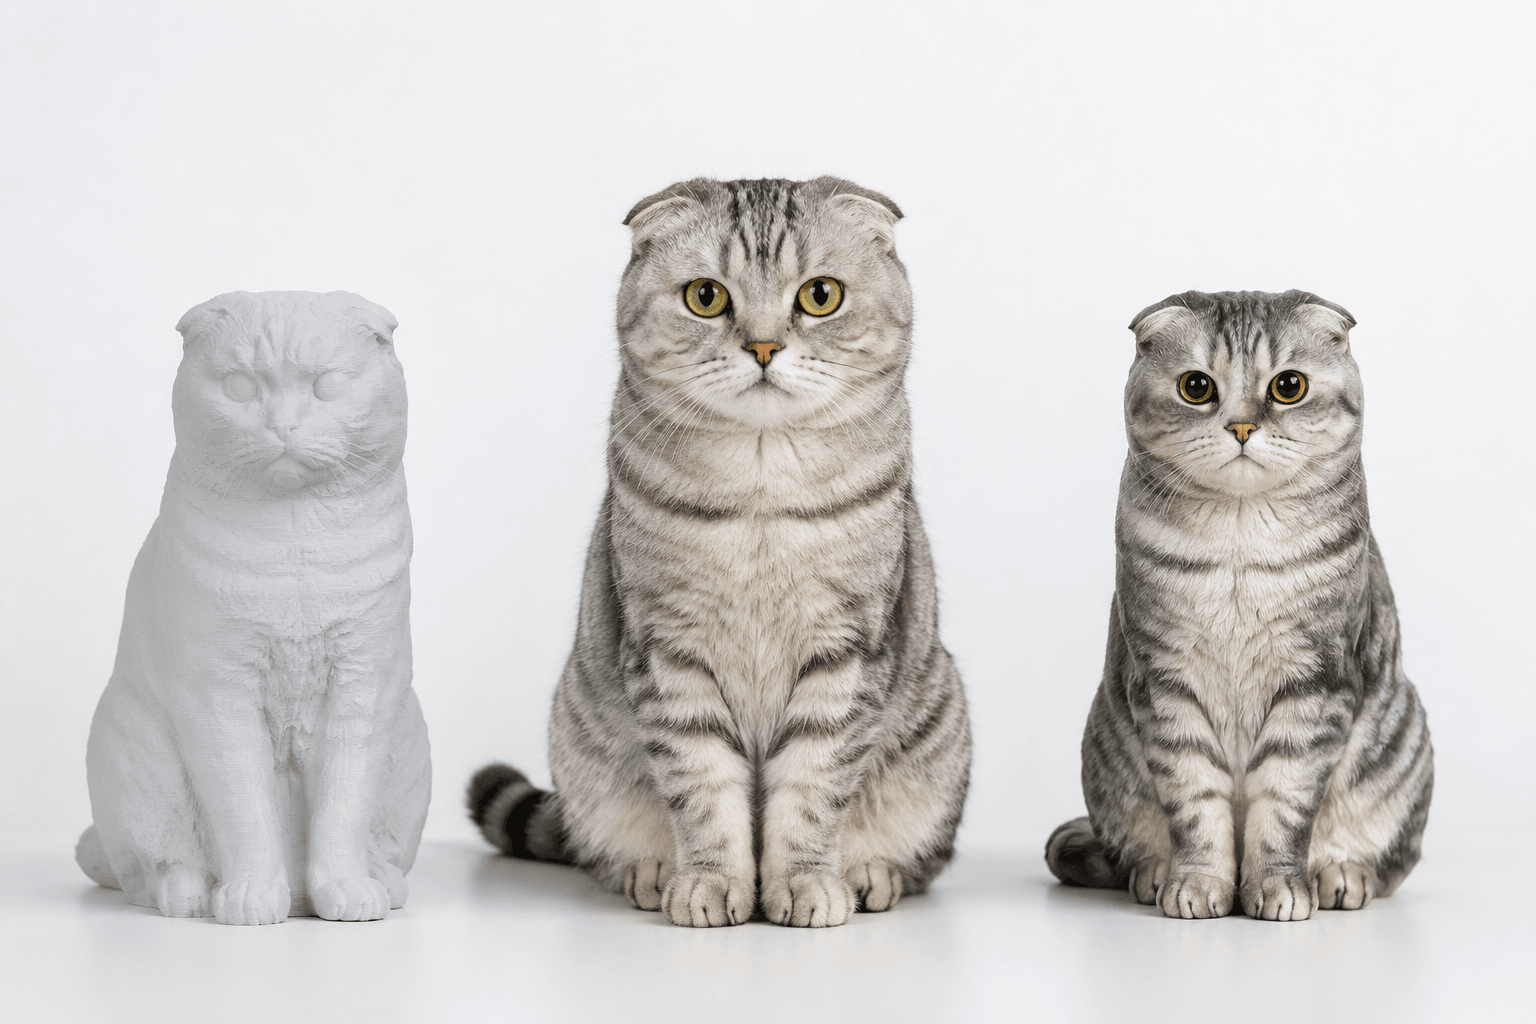
What the Raw Scan Actually Looked Like
Imagine someone took a clay model of your cat, left it in the sun until it partially melted, then tried to re-form it while wearingoven mitts. That's generous.
The ears—Mochi's defining feature—rendered as flat, fused lumps. The software couldn't distinguish the fold from the skull beneath. Her eyes were shallow divots rather than the round, copper-penny shapes she actually has. And her coat? The scan interpreted it as a smooth, featureless surface with occasional noise spikes where individual hairs caught the light wrong.
The smell of resin from my printer filled the garage for hours while I waited for the first test print. When it finished, I held up this... object... next to Mochi sleeping on the couch. My partner walked in, looked at the print, looked at the cat, and said: "Is that supposed to be a seal?"
"The gap between what scanning software promises and what fur actually does to light is where most DIY projects quietly die."
The Counterintuitive Truth About "Good Enough" Scanning
Here's what surprised me, and what you won't find in most comparison articles: the problem isn't the scanning technology. It's the interpretation layer.
Modern LiDAR and photogrammetry can capture geometry reasonably well—even on a fidgety cat. The real failure point is that consumer software has no concept of what a Scottish Fold should look like. It doesn't know that those ears fold forward. It doesn't understand that the coat has depth and direction. It captures raw data and makes its best mathematical guess.
A professional 3D artist, on the other hand, looks at your photos and understands anatomy. They know where the ear cartilage bends. They know how fur lays across the bridge of a Scottish Fold's nose. They're not guessing—they're interpreting with knowledge.
This is the part that changes the equation entirely. You're not paying for someone to do what your phone does, but better. You're paying for anatomical literacy applied to digital sculpture.
| Factor | DIY 3D Scan | Professional Custom Figurine |
|---|---|---|
| Geometry Accuracy | 60-70% (smooth surfaces only) | 95%+ (artist-interpreted anatomy) |
| Fur Texture | Lost entirely or noise artifacts | Digitally sculpted strand patterns |
| Color Reproduction | Single-color print + manual painting | Full-color resin, markings printed in material |
| Ear Detail (Folds) | Fused/flattened undercuts | Accurate fold geometry with depth |
| Time Investment | 4-8 hours (scanning + cleanup + printing) | Photo submission only (~15 minutes of your time) |
| Emotional Accuracy | "That's... a cat?" | "That's my cat." |
Myth vs. Reality: What DIY 3D Pet Scanning Actually Delivers
Myth 1: "LiDAR on modern phones is accurate enough for detailed figurines"
Reality: LiDAR excels at room-scale mapping and AR placement. At the scale of a cat's face—where millimeters determine whether an expression reads as "slepy" or "angry"—consumer LiDAR resolution falls dramatically short. The sensor's point density at close range (under 12 inches) creates gaps that software fills with interpolation. Your cat's unique expression gets averaged into generic cat-shape.
Myth 2: "You can fix scan errors in post-processing software"
Reality: You can smooth noise and fill holes, yes. But you cannot add detail that was never captured. If the scan missed the way Mochi's left ear folds slightly more than her right—a detail visible in photos but invisible to the depth sensor—no amount of Meshmixer work recovers it. You'd need to manually sculpt it in ZBrush or Blender, which requires... the exact skill set you were trying to avoid neding.
Myth 3: "Painting the print afterward solves the color problem"
Reality: This is where the gap becomes a canyon. Hand-painting a 3-inch figurine to match a silver tabby Scottish Fold's coat pattern—with its subtle warm undertones, darker dorsal stripe, and lighter belly fade—requires miniature painting skill that takes years to develop. One wrong shade and the whole thing looks off. PawSculpt's full-color resin printing embeds the color into the material itself, voxel by voxel, reproducing those gradients without a single brush touching the surface. The only manual step is a protective clear coat for UV resistance and sheen.
The PawSculpt Process: What I Actually Submitted
After the DIY attempt, I submitted photos of Mochi to PawSculpt. Here's exactly what I sent:
- 4 photos from different angles (front, both profiles, three-quarter)
- 1 close-up of her face showing ear fold detail
- 1 full-body shot showing her sitting pose
- A note mentioning her slightly kinked tail tip (a detail invisible in most photos)
That's it. Fifteen minutes of photo selection from my camera roll. No turntable. No ring light. No fighting with an app that keeps telling me to "move slower."
The difference in effort alone is staggering. But effort isn't the point—outcome is.
"Every whisker tells a story. Our job is to capture the ones that matter most."
— The PawSculpt Team
What Came Back
When the preview render arrived in my inbox, I zomed in on the ears first. Because that's where the DIY version failed hardest.
The fold was correct. Not just "folded forward" in a generic way—but folded at the specific angle Mochi's ears sit, with the slight asymetry between left and right that I'd mentioned in my notes. The digital sculptor had clearly studied the reference photos and understood Scottish Fold anatomy well enough to interpret what the camera captured.
The coat texture showed directional fur flow. Not individual strands (that would look uncanny at figurine scale) but the impression of fur direction—the way it parts slightly along her spine, the way it's denser around her neck ruff.
And the color. The silver tabby pattern with its warm nose leather, the darker mackerel stripes, the pale chest—all printed directly into the resin. No paint. No brush marks. No color sitting on top of the surface. The color is the surface.
A Side-by-Side Breakdown: Where Each Method Wins and Loses
Let me be fair here. The DIY approach isn't worthless. It has legitimate use cases. But for a Scottish Fold figurine comparison where emotional accuracy matters, the gap is significant.
Where DIY Wins:
- Speed of first attempt — you can have a (rough) physical object within 24 hours if you own a printer
- Iterability — failed? Print again. Tweak the mesh. Print again.
- Learning value — you'll understand 3D modeling fundamentals deeply
- Cost per unit — if you already own the equipment, material cost per print is low
Where DIY Fails:
- Emotional recognition — the "that's my pet" factor is almost always missing
- Fine detail — ears, eyes, whisker pads, paw toe beans
- Color accuracy — unless you're a skilled miniature painter
- Time-to-quality — getting a good result takes dozens of hours across multiple attempts
- Fur and coat — the fundamental physics of how scaners interact with fur
Where Professional Service Wins:
- Anatomical interpretation — artists understand breed-specific structure
- Color-in-material printing — no painting, no fading, no chipping
- Emotional accuracy — the pose, the expression, the personality
- Your time — 15 minutes of photo selection vs. hours/days of technical work
- Consistency — every output meets a quality standard
| Evaluation Criteria | DIY Result (1-10) | PawSculpt Result (1-10) | Notes |
|---|---|---|---|
| Overall Shape | 6 | 9 | DIY captured general silhouette; pro nailed proportions |
| Ear Accuracy | 2 | 9 | Fold detail completely lost in scan |
| Facial Expression | 3 | 8 | DIY eyes were divots; pro captured Mochi's slepy look |
| Coat Color | 1 (unpainted) / 5 (painted) | 9 | Full-color resin vs. amateur brush work |
| Fur Texture | 1 | 7 | Scan = smooth blob; pro = directional texture |
| Paw Detail | 4 | 8 | Toes partially fused in scan |
| "That's My Cat" Factor | 2 | 9 | The only metric that truly matters |
The Smell Test (Literally)
This might sound strange, but bear with me. When I placed both figurines on the shelf next to Mochi's favorite sleeping spot—the one that permanently smells like her, that warm-bread-and-cedar scent that Scottish Folds seem to carry—something interesting happened.
The DIY print looked like a cat. A generic, smooth, gray cat-shaped object. My brain registered it as "cat figurine" the same way it registers a ceramic cat from a gift shop.
The PawSculpt figurine made me do a double-take. For half a second, my brain processed it as Mochi. The pose. The ear angle. The slight head tilt she does when she's about to fall asleep. It triggered the same neural pathway as seeing her actual face.
That half-second of recognition? That's what you're actually paying for. Not resin. Not printing time. Not even artistic skill, exactly. You're paying for the emotional truth of the object.
"A figurine that looks like a cat is decoration. A figurine that looks like your cat is a piece of your life made solid."
The Technical Reality: Why Consumer Scanning Can't Match Professional Digital Sculpture
Let's get specific about the technical limitations, because understanding why helps you make a better decision about which approach fits your situation.
Resolution and Point Density
The iPhone 14 Pro's LiDAR sensor operates at a resolution of roughly576 x 192 points. At scanning distance for a cat-sized subject (12-18 inches), this translates to approximately one depth point per 2-3mm of surface. Mochi's ear fold crease is less than 1mm wide. The sensor physically cannot resolve it.
Professional 3D artists working from photos don't have this limitation. They're not measuring depth—they're interpreting visual information with anatomical knowledge. A skilled digital sculptor can infer the 3D structure of a folded ear from a single well-lit photograph because they understand the underlying cartilage geometry.
The Fur Problem Is Physics, Not Software
Here's the counterintuitive insight that changes how you think about this: fur doesn't have a surface. Not in the way scanning technology defines "surface."
A scanner looks for a definitive boundary—the point where "object" ends and "air" begins. Fur is a gradient. It's thousands of individual strands at varying heights, angles, and densities. The scanner averages this into a smooth approximation that loses all texture information.
This is why even expensive industrial scanners struggle with fur. It's not a software problem waiting to be solved by a better app. It's a fundamental mismatch between how scaners work and what fur is.
Professional figurine creation sidesteps this entirely. The artist doesn't scan the fur—they sculpt it digitally, using reference photos to place texture where it belongs. The result isn't a mathematical average. It's an artistic interpretation grounded in understanding how fur grows and lays on a specific breed.
Color: Printed-In vs. Applied-On
The difference between color printed into resin and color painted onto a surface isn't just aesthetic—it's structural.
Painted color:
- Sits on top as a separate layer (typically 0.1-0.3mm thick)
- Can chip, scratch, or wear over time
- Shows brush texture at close inspection
- Difficult to achieve smooth gradients on small surfaces
- Requires primer, base coat, detail work, and sealant (4+ steps)
Full-color 3D printed resin:
- Color is part of the material matrix—there's no "layer" to chip off
- UV-resistant when clear-coated
- Gradients are mathematically precise (the printer places colored voxels)
- No brush marks because no brush was involved
- Reproduces photographic color data directly
For a Scottish Fold's subtle silver tabby pattern—where the color shifts gradually from darker dorsal areas to lighter undersides, with distinct but soft-edged stripes—the printed-in approach reproduces what a camera captures. The painted approach reproduces what a human hand can approximate.
What Photos Actually Work Best (Practical Guide)
Since we've established that the professional route relies on photo quality rather than scanning quality, let's talk about what actually helps the artists do their best work.
Essential shots:
- Front face, straight on — both ears visible, eyes open, natural expression
- Left profile — full body visible, standing or sitting naturally
- Right profile — same as above, opposite side
- Three-quarter view — the "personality" angle, slightly above eye level
- Any unique markings — close-up of distinctive spots, scars, or patterns
What makes a photo useful vs. useless:
| Photo Quality | Useful For Artists | Not Useful |
|---|---|---|
| Lighting | Natural daylight, even illumination | Flash (flattens features), backlit (silhouette) |
| Focus | Sharp on face and body | Motion blur, soft focus |
| Angle | Eye level or slightly above | Extreme overhead, floor-level distortion |
| Background | Simple, contrasting | Busy patterns that merge with fur |
| Expression | Relaxed, natural | Mid-yawn, mid-shake, eyes closed |
| Body Position | Full body visible, paws showing | Curled in blanket, half-hidden |
Pro tip that most guides miss: Include one photo where your pet is doing their signature thing. Mochi's is the slow-blink head tilt. Your dog's might be the one-ear-up alert pose. That behavioral detail is what transforms a figurine from "accurate" to "alive."
For the full process details and photo submission guidelines, the PawSculpt FAQ page walks through everything step by step.
The Cost Equation Nobody Calculates Honestly
People compare "free DIY" against "paid service" and think the math is obvious. But let's actually run the numbers on what DIY costs when you account for everything.
DIY True Cost (assuming you don't already own equipment):
- Resin 3D printer (entry level): $200-400
- Resin (per liter): $30-50
- Failed prints before acceptable result: 3-7 attempts typical
- Isopropyl alcohol, gloves, filters: $30-50
- Painting supplies (if you want color): $40-80
- Your time at any reasonable hourly value: 8-20 hours
DIY True Cost (if you already own a printer):
- Resin per attempt: $3-8
- Your time: still 4-8 hours minimum for scanning, cleanup, and printing
- Painting time: 2-4 additional hours
- Emotional cost of looking at a result that doesn't quite capture your pet: priceless (and not in the good way)
The hidden cost: Most people who go the DIY route and end up unsatisfied still order a professional figurine afterward. So they've spent the time and money on DIY plus the professional service. We've heard this story from customers more times than we can count.
If you're a maker who genuinely enjoys the process—the scanning, the modeling, the printing the painting—then DIY is a hobby worth pursuing regardless of outcome quality. The journey is the point.
But if what you want is a figurine that makes you feel something when you look at it? The math favors going professional from the start.
When DIY Actually Makes Sense
We'll be real—there are scenarios where DIY scanning is the right call:
- You're a 3D modeling hobyist who wants the challenge and learning experience
- You want a rough prototype before committing to a professional piece
- Your pet has very simple geometry (short-haired, angular features, distinctive silhouette)
- You're making multiples for a specific project (wedding cake topers, holiday ornaments at scale)
- Budget is genuinely zero and you already own all equipment
If none of those apply—if what you want is a single, beautiful, emotionally accurate figurine of your Scottish Fold (or any pet)—the professional route saves you time, frustration, and the particular disappointment of holding a physical object that almost looks like your companion but doesn't quite get there.
That "almost" is worse than "not at all," honestly. A generic cat figurine from a store doesn't pretend to be your cat. A failed DIY scan that's 70% accurate sits in uncanny valley, reminding you of what it should look like but doesn't.
The Before-and-After: Final Verdict
Both figurines sit on my shelf now. The DIY version has become a conversation piece—"want to see what happens when you try to 3D scan a Scottish Fold?"—and honestly, it makes people laugh. It has value as a story.
The PawSculpt figurine sits next to Mochi's favorite window perch. When afternoon light hits it, the silver tabby coloring catches the same warm tones as her actual coat. Visitors have mistaken it for a very still cat from across the room (for about half a second, but still).
The smell of her—that warm, slightly dusty, bread-like scent that clings to everything she sleps on—obviously isn't something any figurine captures. But the feeling of her presence? The specific way she holds her head? The particular roundness of her folded ears?
That's there. In full-color resin. Permanent.
If you're considering the DIY route, I'd genuinely encourage you to try it. You'll learn a lot about 3D technology, about your pet's geometry, about the gap between what cameras see and what scaners capture. It's educational and humbling.
And then, when you want the version that makes your chest tight with recognition—the one that looks like your cat and not a cat—you'll know exactly why professional digital sculptors and full-color 3D printing technology exist.
You can explore the full process, see examples, and check current options at pawsculpt.com. The blog also has guides on getting the best reference photos for different breeds, which is useful whether you're going DIY or professional.
The porch where this whole experiment started still smells like rain-soaked wood on wet days. Mochi still sits there watching birds. And her figurine—the real one, the one that captured her—sits on the windowsill just inside, keeping watch in the same direction.
Some things are worth getting right the first time. Your pet's likeness is one of them.
Frequently Asked Questions
Can I 3D scan my cat at home for a figurine?
You can, and the technology is more accessible than ever with LiDAR-equipped phones. But "can" and "should" are different questions. Consumer scanning works reasonably well for hard-surface objects with clear edges. Pets—especially fluffy breeds like Scottish Folds—present fundamental challenges with fur texture, undercut geometry, and fine facial detail. Expect to spend significant time in post-processing software cleaning up the mesh, and know that certain details (ear folds, whisker pads, eye depth) may be permanently lost in the scan.
Why do 3D scans of pets usually look wrong?
The core issue physics, not software quality. Fur doesn't present a clean surface boundary for depth sensors to detect—it's a gradient of thousands of strands at varying heights. Scanners average this into smooth geometry, losing all texture. Additionally, consumer LiDAR resolution (roughly one point per 2-3mm at close range) can't capture details smaller than that threshold, which includes most of what makes your pet's face their face.
How is PawSculpt's process different from DIY 3D printing?
The fundamental difference is human interpretation. PawSculpt's digital sculptors study your reference photos and model your pet's anatomy with breed-specific knowledge—they understand how a Scottish Fold's ears fold, how fur lays across a particular body type. The figurine is then produced using full-color 3D printing where color is embedded directly into the resin material (not painted on afterward). Visit pawsculpt.com for full process details and examples.
What photos work best for a custom pet figurine?
You need 4-6 photos: front face (both ears visible, eyes open), left and right profiles showing full body, a three-quarter "personality" angle, and close-ups of any unique markings. Natural daylight with even illumination works best—avoid flash (flattens features) and backlit situations. The single most helpful addition is one photo of your pet doing their signature pose or expression.
Is DIY actually cheaper than ordering a professional figurine?
Only if you already own a resin printer and have modeling experience. When you factor in equipment cost, multiple failed prints (3-7 attempts is typical for beginers), painting supplies, and 8-20 hours of your time, the total investment often approaches or exceeds professional service pricing—with significantly lower quality results. Many customers tell us they tried DIY first and ordered from us after.
Can any 3D printing method capture Scottish Fold ear details accurately?
The printing method isn't the bottleneck—the modeling method is. If a skilled digital sculptor accurately models the fold geometry from reference photos, any quality printer can reproduce it. The issue with DIY is that scanning can't capture the undercut ear structure, and most hobyists lack the ZBrush or Blender skills to manually sculpt breed-accurate ear anatomy from scratch.
Ready to Celebrate Your Pet?
You've seen what DIY produces and what's possible when professional digital artists and full-color 3D printing technology work together. Whether your Scottish Fold is curled on your lap right now or lives on in photos that still make you smile, a custom figurine captures the details—the ear fold angle, the coat pattern, the specific way they hold their head—that make them irreplaceably yours. When comparing a DIY 3D scan pet vs custom figurine, the difference comes down to one question: do you want something that looks like a cat, or something that looks like your cat?
Create Your Custom Pet Figurine →
Visit pawsculpt.com to explore the full process, see examples, and learn about current service options
