How to Photograph Your Curly-Coated Poodle for a 3D Figurine: The Technical Deep-Dive Nobody Else Gives You
Your Poodle's curls catch the afternoon light slanting through the living room window — and for a split second, you see exactly the photograph you need to photograph your dog for a 3D figurine. Then she moves, and it's gone.
Quick Takeaways
- Shoot in natural window light, never flash — flash flattens curly coats and erases the depth that makes Poodle texture readable
- Capture all four cardinal angles plus a close-up of the face — a single "good photo" is never enough for accurate 3D sculpting
- Wet or freshly groomed coats photograph differently than dry coats — shoot your dog in the exact style you want immortalized
- Curly coats require higher contrast lighting than smooth coats — the shadows between curls are what give the sculptor dimensional information
- Start your figurine journey at PawSculpt — where digital sculptors use your photos to build a full-color 3D model before a single layer of resin is printed
Why Poodle Photography Is a Different Problem Entirely
Most pet photography guides treat all dogs the same. Point the camera, get the eyes sharp, call it done. That advice works fine for a Labrador. For a Poodle — with that dense, spiraling coat that absorbs light, scatters it, and creates its own micro-landscape of shadow and highlight — it is genuinely insufficient.
Here's the thing most guides miss: a Poodle's curls are not a surface, they are a structure. Each curl is a three-dimensional coil sitting above the skin, casting a shadow on the curl beneath it. When you photograph that coat for a custom 3D figurine, you are not just capturing color. You are capturing topography. And topography requires light that has direction.
This distinction matters enormously once you understand what happens on the other side of the camera — inside the studio where a digital sculptor is staring at your photos, trying to reconstruct your dog's physical reality from a flat image. We'll get to that process in detail. But first, understand that the sculptor's job is essentially archaeological. They are excavating the three-dimensional truth of your dog from the evidence your photographs provide. The richer that evidence, the more faithful the result.
"The photos you send us are the only window we have into your dog's world. Every shadow in a curl, every tilt of the ear — that's the data we sculpt from."
— The PawSculpt Team
The Sculptor's Perspective: What Your Photos Actually Need to Communicate
Before we talk about f-stops and golden hour, it helps to understand what a 3D digital sculptor is actually looking for when they open your photo files. This is the insider knowledge that almost no photography guide for pet figurines ever explains — and it changes everything about how you approach the shoot.
A sculptor working in ZBrush or Blender is not admiring your photo. They are interrogating it.
They need to answer questions like: Where does the skull sit beneath the coat? How far does the muzzle protrude relative to the brow? Where does the neck meet the chest? How thick is the coat on the topknot versus the legs? What is the natural resting position of the ears? These are anatomical and structural questions, and your photographs either answer them or they don't.
For a Poodle specifically, the coat adds a layer of interpretive difficulty that sculptors genuinely wrestle with. A Standard Poodle in a continental clip has dramatically different visual mass than the same dog in a puppy clip. The topknot can add two inches of apparent height to the skull. The leg pompons create the illusion of thicker bone structure. A sculptor who doesn't have reference photos from multiple angles — and who doesn't have a clear photo of the face without the topknot obscuring the skull shape — is essentially guessing at the architecture beneath the fur.
The photos you provide are not decoration. They are engineering drawings.
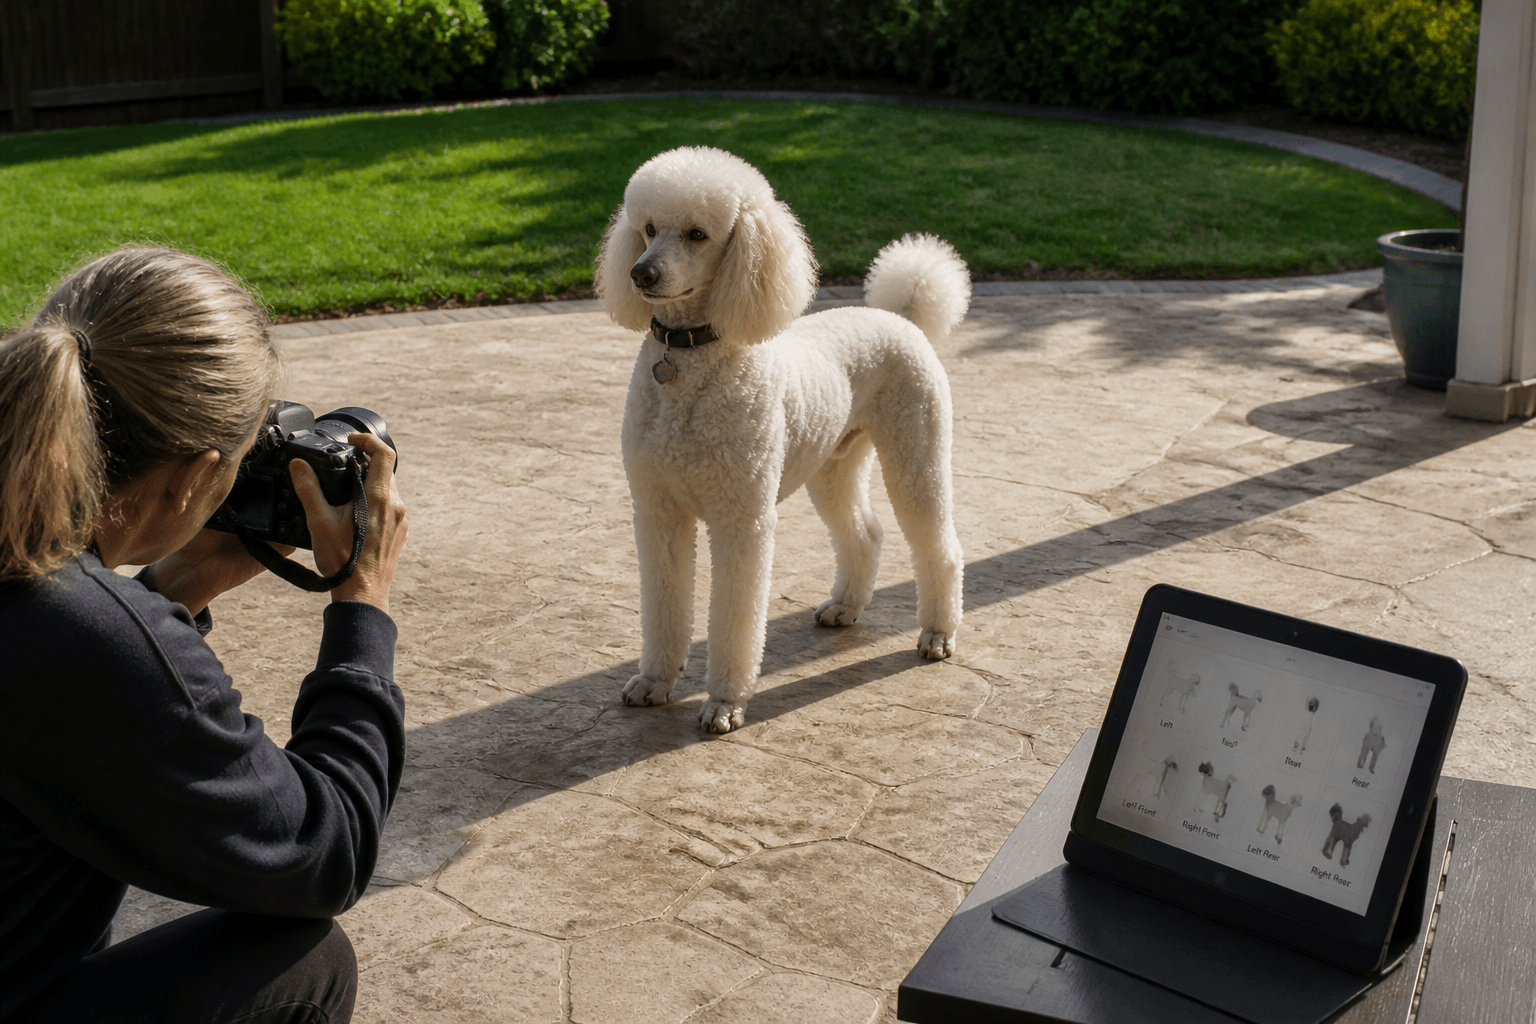
The Four Angles That Are Non-Negotiable
Every figurine commission, regardless of breed, requires a minimum set of reference angles. For Poodles, these are not optional:
| Angle | What It Reveals | Common Mistake |
|---|---|---|
| Direct side profile (left or right) | Leg length ratios, back topline, tail set, overall silhouette | Shooting slightly above or below true horizontal — distorts proportions |
| Straight-on front | Chest width, eye spacing, muzzle width, ear placement | Dog looking up or down — foreshortens the face |
| Three-quarter front (45°) | Depth of chest, muzzle projection, coat volume relationship | Too much angle — loses the front-facing symmetry data |
| Rear three-quarter | Hindquarter muscle, tail carriage, coat distribution on back legs | Often skipped entirely — leaves sculptor guessing at the back half |
| Close-up face, eye level | Eye color, expression, specific facial markings | Shot from above — the most common and most damaging mistake |
Notice that "cute pose from above" is not on this list. That angle — the one that gets the most Instagram likes — is nearly useless for sculpture reference. It compresses the dog's body into a pancake, hides the leg structure entirely, and makes the face look like a different dog.
The Curly Coat Problem: Why Poodles Need More Light Than You Think
Here is the counterintuitive insight that most pet photography guides will never tell you: for curly-coated dogs, you actually want more shadow, not less.
Every instinct in portrait photography pushes you toward soft, even, flattering light. Diffused overcast light. Reflectors filling in shadows. The goal is usually to eliminate harsh shadows from a face. For a Poodle's coat, that instinct will destroy the very information the sculptor needs.
The shadows between curls are the sculptor's depth map. When you photograph a Poodle in flat, diffused light, the coat becomes a uniform texture — a gray or cream or black mass with no internal structure visible. The sculptor sees a blob. When you photograph that same coat in directional light — light coming from one side at roughly a 45-degree angle — each curl casts a shadow on its neighbor, and suddenly the coat has visible three-dimensional structure. The sculptor can see where one curl ends and another begins. They can see the depth of the coat. They can see the direction of the curl pattern.
This is why window light is the gold standard for Poodle figurine photography. Not because it's soft (though it is), but because it has direction. A large window on a bright but overcast day gives you light that is soft enough to avoid harsh shadows on the face, but directional enough to give the coat its structure.
Position your dog so the window is roughly to one side — not directly behind you, not directly behind the dog. That 45-to-90-degree angle from the light source to the dog is where the coat comes alive in photographs.
Lighting Setups That Actually Work (And One That Doesn't)
We've reviewed thousands of photo submissions over the years, and the lighting mistakes we see most often are not random. They cluster around a few specific misunderstandings. Here's what we've learned.
The Setup That Works Best: Single Window, Overcast Day
Find the largest window in your home. Wait for an overcast day, or shoot in the morning or late afternoon when direct sun isn't blasting through the glass. Place your dog so the window is to their left or right — not behind them (backlit silhouette) and not directly in front of them (flat, shadowless).
Stand with the window roughly at your 10 o'clock or 2 o'clock position relative to the dog. This gives you the directional light that reveals coat structure while keeping the face well-lit.
What you'll hear: the ambient sounds of the room — maybe a refrigerator hum, traffic outside, the creak of the floor as you shift your weight. Your dog will hear all of this too, and their ears will move. That's fine. Capture it. Ear position in motion is useful reference data.
The Setup That Works Second Best: Outdoor Shade
Open shade — the shadow cast by a building, a large tree, or an overcast sky — gives you beautiful, directional light without the harshness of direct sun. Direct sun on a Poodle's coat creates blown-out highlights that erase curl detail just as effectively as flat indoor light does.
The trick with outdoor shade is to position your dog at the edge of the shade, not deep within it. At the edge, the bright sky acts as a large, directional light source. Deep in the shade, the light becomes flat and ambient again.
The Setup That Doesn't Work: Flash
We'll be direct about this one. On-camera flash is the enemy of curly coat photography. It fires from the same axis as the lens, which means it eliminates every shadow in the coat simultaneously. The result is a flat, textureless mass of fur with no dimensional information. We've received beautiful, loving photos taken with flash that we simply cannot use as primary reference — the coat looks like a painted wall.
If you're shooting indoors in low light and feel tempted to use flash, try this instead: turn on every lamp in the room, open every curtain, and shoot with a slightly slower shutter speed. The result will be noisier and less sharp than a flash photo, but it will have the directional light information that makes the coat readable.
A Note on Phone Cameras vs. DSLRs
Honestly? Modern phone cameras are fine for this purpose. The resolution on a current iPhone or Android flagship is more than sufficient for figurine reference photography. What matters far more than the camera is the lighting and the angles.
That said, phone cameras do have one significant weakness for this application: portrait mode. The artificial background blur (bokeh) that portrait mode creates is generated by software that sometimes misidentifies the edges of a curly coat as background and blurs them. This can erase the very edge detail — the individual curl silhouettes at the coat's perimeter — that sculptors use to understand coat volume and texture. Turn portrait mode off for figurine reference photos.
The Grooming Question: When to Shoot and What Style to Capture
This is a question we get constantly, and the answer is more nuanced than most people expect.
Shoot your dog in the exact grooming style you want the figurine to represent. This sounds obvious, but the implications run deep.
If your Poodle is usually kept in a puppy clip but you're thinking "maybe I'll photograph them in a continental clip because it looks more impressive" — don't. The figurine will look like a different dog to you, because it will be a different dog. The topknot, the pompons, the shaved areas — these are not decorative details. They are structural elements that define the dog's visual identity.
More importantly: shoot within 24-48 hours of a professional groom, but not immediately after. A freshly bathed and blown-out Poodle coat is fluffier and more voluminous than the coat looks in daily life. The curls are more separated, the coat stands away from the body more dramatically. If you photograph immediately post-groom, the figurine will capture a slightly idealized version of your dog. If you wait a week, the coat will have settled and compressed, and you'll capture the everyday version.
Neither is wrong. But know which one you're choosing.
"A Poodle photographed the day after grooming and the same dog photographed two weeks later can look like different breeds in a photo. We always ask: which version do you want to live on your shelf?"
The Topknot Problem
The Poodle topknot is one of the most challenging elements in figurine photography, and it deserves its own discussion.
The topknot sits directly above the skull and, in photographs, it can completely obscure the shape of the head beneath it. A sculptor looking at a photo of a Poodle with a full topknot cannot determine where the skull ends and the hair begins. They cannot accurately model the head shape, the ear attachment point, or the relationship between the skull and the neck.
The solution: take at least one photo with the topknot down or pulled back, so the skull shape is visible. This doesn't need to be a "pretty" photo — it's purely reference data. A quick snapshot with the topknot held flat against the head, shot from the front and from the side, gives the sculptor the architectural information they need to build an accurate skull beneath the decorative hair.
This single additional photo can be the difference between a figurine that looks exactly like your dog and one that looks like a generic Poodle.
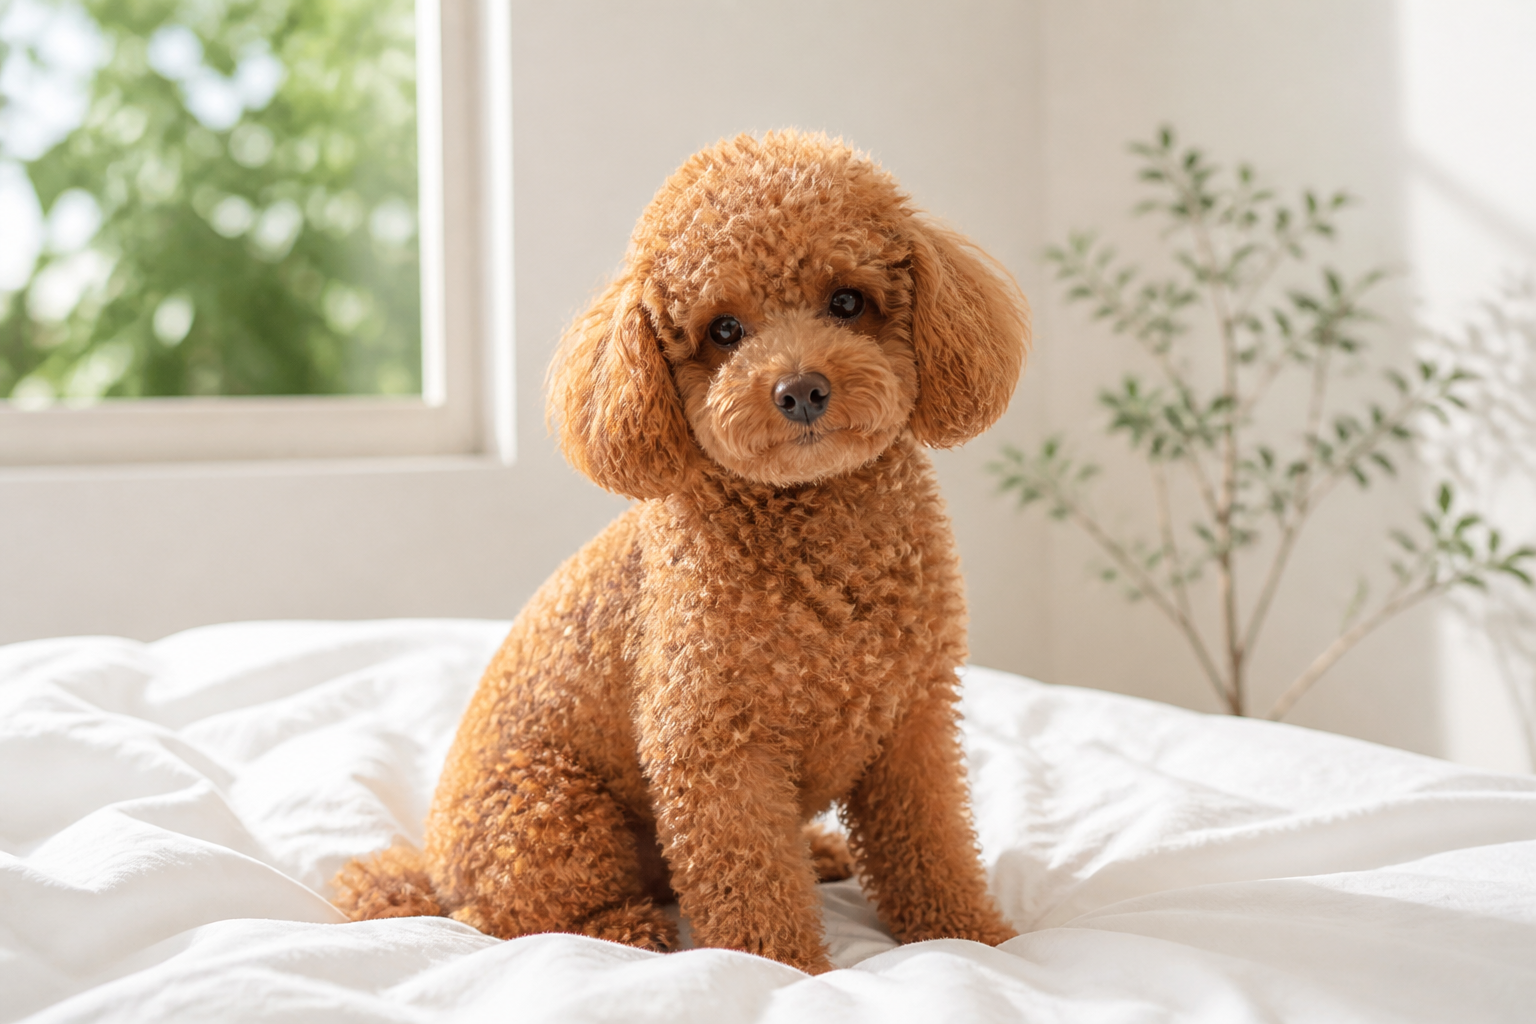
Color and Markings: The Specific Challenge of Parti and Phantom Poodles
For solid-colored Poodles — your blacks, your whites, your apricots — color documentation is relatively straightforward. The challenge is exposure: black Poodles need slightly more light to reveal coat texture, white and cream Poodles need slightly less to avoid blown-out highlights.
But for parti-colored Poodles (two-color patches) and phantom Poodles (specific tan point markings), color documentation becomes a critical part of the photo session.
The full-color 3D printing process used to create figurines like those at PawSculpt reproduces color with remarkable fidelity — the pigments are printed directly into the resin material, voxel by voxel, so the color is embedded in the object rather than sitting on its surface. But that process is only as accurate as the color information in the reference photos.
For a parti Poodle, you need to document:
- The exact boundary lines between color patches (these are often irregular and asymmetrical)
- Whether the patches are the same on both sides of the body (they usually aren't)
- The color of the muzzle, eyebrows, and chest markings specifically
- Any ticking or roaning within the white areas
Photograph each distinct marking area in close-up, with the coat lying flat so the boundary between colors is clearly visible. A photo of the full dog from six feet away will not give the sculptor enough information to accurately reproduce a complex parti pattern.
For phantom Poodles, the tan point locations — above the eyes, on the muzzle, on the chest, on the legs — need to be documented individually. These markings are often subtle and can be lost in a full-body shot.
Here's a practical reference for what photos to capture based on coat pattern:
| Coat Pattern | Required Additional Photos | Why It Matters |
|---|---|---|
| Solid black | Close-up of face in strong directional light | Black absorbs light; texture detail is easily lost |
| Solid white/cream | Shoot slightly underexposed; close-up of ear color | White blows out easily; ear color often differs from body |
| Apricot/red | Natural light only; avoid warm artificial light | Warm bulbs shift apricot toward orange in photos |
| Parti (two-color) | Close-up of each patch boundary, both sides of body | Patch patterns are asymmetrical; both sides need documentation |
| Phantom | Individual close-ups of each tan point location | Subtle markings disappear in full-body shots |
| Silver/blue | Overcast outdoor light preferred | Artificial light shifts silver toward gray or brown |
From Your Photos to a Finished Figurine: What Actually Happens
This is the part of the process that most pet owners never get to see, and understanding it will make you a dramatically better photographer for this purpose.
When your photos arrive at a studio like PawSculpt, a digital sculptor opens them in their reference panel alongside their 3D modeling software. They are not tracing your photos. They are using them as a three-dimensional puzzle — each angle providing a different piece of information about the dog's true form.
The Digital Sculpting Phase
The sculptor begins with a base mesh — a rough digital armature in roughly the right proportions for the breed. Then the real work begins: pulling, pushing, and refining the digital clay (it's not actually clay, but the software tools mimic the feel of it) to match the specific dog in the photos.
This is where your reference photos either make the sculptor's job possible or force them to guess. Every time a sculptor has to guess — because the topknot is obscuring the skull, because the rear three-quarter photo is missing, because the coat is so flat-lit that the texture is invisible — they are making an interpretive decision. Sometimes those decisions are right. Sometimes they produce a figurine that looks like a Poodle, but not quite like your Poodle.
The coat is modeled as actual three-dimensional geometry. Individual curl clusters are sculpted into the surface of the model. The topknot is built as a separate volume sitting above the skull. The pompons on the legs are modeled as distinct spherical masses. This is painstaking work, and it is guided entirely by what the photos show.
The Full-Color 3D Printing Phase
Once the digital sculpture is approved, it goes to the printer. This is where the technology becomes genuinely remarkable.
Full-color resin 3D printing — the technology used for premium pet figurines — works by depositing tiny droplets of photopolymer resin in multiple colors simultaneously, layer by layer, building the object from the bottom up. The colors are not applied afterward. They are printed into the material itself, voxel by voxel (a voxel is the 3D equivalent of a pixel), so the color exists throughout the object's surface layer.
The layer height in high-quality figurine printing is typically in the 25–50 micron range (a micron is one-thousandth of a millimeter). At that resolution, the individual layers are invisible to the naked eye, and the surface captures fine detail — individual curl clusters, the texture of the nose leather, the subtle color gradation in an apricot coat.
The print orientation matters more than most people realize. The sculptor and print technician choose the orientation carefully to minimize support structures — the temporary scaffolding that holds overhanging geometry in place during printing. Support structures leave small marks where they attach to the model's surface, so the orientation is chosen to place those attachment points in locations that are least visible on the finished piece. For a Poodle figurine, this typically means the underside of the body and the inner surfaces of the legs.
Post-Processing: The Final Steps
After printing, the figurine goes through a cleaning process to remove uncured resin from the surface, followed by a UV curing cycle that fully hardens the material. Support structures are carefully removed — this requires patience and precision, because the resin is brittle at this stage and a careless removal can chip the surface.
The final step is the application of a clear coat — a protective varnish that seals the surface, adds a controlled level of sheen, and protects the embedded colors from UV degradation over time. This is the only manual step in the finishing process. There is no painting. There are no brushes. The color you see in the finished figurine is the color that was printed into the resin.
The result has a quality that is distinct from both traditional hand-crafted figurines and mass-produced plastic toys. It has the dimensional accuracy of precision manufacturing and the color fidelity of digital reproduction. What it captures — if the photos were good — is the specific, unrepeatable physical reality of your specific dog.
According to the American Kennel Club's breed standards, the Poodle is distinguished by its "squarely built" proportions and its "harsh, dense" curly coat texture. These are exactly the qualities that a well-photographed, well-sculpted figurine should capture — not a generic Poodle, but the specific proportional reality of your dog.
Myth vs. Reality: What Pet Owners Get Wrong About Figurine Photography
Myth 1: "More photos are always better"
Reality: Quantity without quality creates confusion, not clarity. We've received submissions with 200 photos that were less useful than a submission with 12 well-chosen ones. What matters is coverage of the required angles in appropriate lighting — not volume. Twenty photos of your dog from the same slightly-above-and-to-the-left angle tell the sculptor almost nothing new after the first one.
What actually helps: Eight to twelve photos covering all required angles, in consistent lighting, with your dog in a natural resting or standing position.
Myth 2: "The best photo is the one where my dog looks happiest"
Reality: The photo where your dog looks happiest is often the photo where they're moving, looking up at you, or in an unusual position. These are wonderful photos. They are poor reference photos. A sculptor needs to see the dog in a neutral, natural position — standing or sitting with the head level — to accurately capture proportions.
What actually helps: Capture the happy expression in a close-up face shot. Use a calm, standing or sitting pose for the full-body reference shots.
Myth 3: "I should photograph my dog against a white background for clarity"
Reality: A white background can actually make a white or cream Poodle nearly invisible at the edges, where the coat meets the background. The sculptor loses the silhouette — the outer edge of the coat — which is critical information for understanding coat volume and shape.
What actually helps: A medium-toned, neutral background — gray, tan, or muted green — that contrasts with your dog's coat color. The goal is a clean edge between dog and background, not a white studio look.
The Sound of a Good Photo Session (And Why It Matters)
There is a particular quality of attention that dogs respond to, and it has a sound.
It's the sound of a room that has gone quiet in a specific way — not the absence of sound, but the presence of focused stillness. No television. No music. No other dogs. Just you, your Poodle, and the ambient sounds of the space: the tick of a clock, the distant sound of a car, the soft percussion of your dog's nails on the floor as they shift their weight.
Poodles are extraordinarily attuned to human attention. They read your focus. When you are genuinely present — not half-watching your phone, not distracted by the noise of the house — they settle into a different quality of stillness themselves. Their ears come forward. Their expression sharpens. They look at you with that particular Poodle intelligence that owners describe as almost unsettling in its depth.
That expression is what you're trying to capture. Not the goofy open-mouthed panting look (though that has its charm). The alert, present, I see you expression that Poodle owners know is the truest face of the breed.
To get it: sit on the floor. Be quiet for two full minutes before you start shooting. Let your dog settle. Then make a small, interesting sound — a soft whistle, a quiet "what's that?" — and shoot in the two seconds before they move toward you.
You'll know when you've got it. The photo will look like your dog is thinking something.
Practical Checklist: Your Complete Poodle Photo Session
Here is the complete workflow, distilled from everything above into a sequence you can follow on the day of the shoot.
Before the session:
- Groom your dog 24-48 hours before shooting (not the same day)
- Choose the room with the largest window
- Clear the background — move furniture, remove clutter
- Turn off all artificial lights (they conflict with window color temperature)
- Have high-value treats ready but out of sight
- Full body, left side profile — dog standing, head level
- Full body, right side profile — dog standing, head level
- Full body, straight front — dog sitting or standing, looking at camera
- Full body, rear three-quarter — dog standing, tail visible
- Close-up face, eye level — dog looking at camera, topknot visible
- Close-up face, eye level — topknot down or pulled back (skull reference)
- Close-up of any distinctive markings (parti boundaries, phantom points, etc.)
- One natural expression shot — whatever makes your dog look most like themselves
Technical settings (phone camera):
- Portrait mode: OFF
- Flash: OFF
- HDR: ON (helps with high-contrast lighting situations)
- Shoot in the highest resolution available
- Take 3-5 shots of each angle (dogs move; you need options)
The quality check:
Before you finish, review your shots on a larger screen if possible. Ask yourself: if I were a sculptor who had never seen this dog, could I build an accurate three-dimensional model from these photos alone? If the answer is yes, you're done.
What to Expect When You Submit Your Photos
The process of turning your photographs into a finished figurine has a rhythm to it, and understanding that rhythm helps you engage with it more meaningfully.
After submission, a digital sculptor reviews your photos and begins the modeling process. At PawSculpt, the team will send you a digital preview of the sculpt before anything is printed — this is your opportunity to review the likeness and request adjustments. Look carefully at the proportions, the coat volume, the expression. This is the moment when your knowledge of your dog matters most. You know things about your dog that no sculptor can see in a photograph: the way one ear sits slightly lower than the other, the particular way the coat swirls at the base of the tail, the exact shade of the eyes in different light.
For specific details about turnaround times, revision policies, and pricing, visit pawsculpt.com — these details are worth reading directly from the source, as they reflect the current process and any recent updates.
What we can say from experience: the customers who engage most actively with the preview process — who look carefully, who ask specific questions, who say "the left ear should be a little lower" — consistently receive figurines that feel most like their dogs. The process is collaborative. Your expertise about your specific dog is irreplaceable.
"Every whisker tells a story. Our job is to capture the ones that matter most — but we need your eyes to confirm we got it right."
— The PawSculpt Team
The Deeper Reason You're Doing This
There is something worth naming here, something that sits beneath the practical advice about f-stops and coat texture and topknot reference photos.
You are doing this because you understand, on some level, that your dog's physical presence in the world is temporary. Not in a morbid way — in the way that all beautiful things are temporary, which is part of what makes them beautiful. The specific weight of your Poodle's head in your lap. The particular sound of their nails on the kitchen floor. The way the afternoon light catches their coat and turns it briefly golden.
These are not generic experiences. They are yours, specific to this dog, this life, this particular arrangement of love and time.
A figurine is not a replacement for any of that. It is something different: a physical anchor for memory. An object that holds the shape of a presence. When you photograph your dog with the care and attention this guide describes — when you sit on the floor and wait for the right expression, when you document the exact boundary of a parti marking, when you take the topknot-down reference shot because you understand why it matters — you are participating in an act of preservation.
You are saying: this specific creature, in this specific form, at this specific moment in time, was real. Was here. Was loved.
The photograph is the beginning of that act. The figurine is its completion.
Frequently Asked Questions
How many photos do I actually need to submit for a Poodle figurine?
Eight to twelve well-chosen photos covering all required angles will serve you far better than a hundred photos from similar angles. The non-negotiable shots are: left profile, right profile, straight front, rear three-quarter, close-up face with topknot, and at least one close-up with the topknot down for skull reference. For parti or phantom Poodles, add individual close-ups of each distinct marking area.
What's the best lighting setup if I don't have a professional photography setup?
A large window on an overcast day is genuinely the best option available to most people — better than most amateur studio setups. Position your dog so the window is to their side, not behind them or directly in front of them. Turn off all artificial lights in the room, as they create conflicting color temperatures. If you must shoot at night, use multiple lamps positioned to one side rather than overhead lighting.
Should I photograph my Poodle right after grooming?
Wait 24-48 hours after grooming rather than shooting immediately. A freshly blown-out coat is more voluminous than the coat looks in daily life, and the figurine will capture that idealized version rather than the everyday one. More importantly, shoot in the exact grooming style you want the figurine to represent — don't photograph in a continental clip if your dog lives in a puppy clip.
Is the color in a PawSculpt figurine painted on afterward?
No. PawSculpt uses full-color resin 3D printing, where the color is embedded directly into the resin material during the printing process — voxel by voxel, layer by layer. There is no painting step, no brushes, no acrylics. The only manual finishing step is the application of a clear protective coat. The color is part of the material itself.
Why does my Poodle's topknot create problems for the sculptor?
The topknot sits directly above the skull and, in photographs, completely obscures the head shape beneath it. A sculptor cannot accurately model the skull, the ear attachment points, or the neck-to-head relationship without seeing the underlying structure. One reference photo with the topknot held flat or pulled back — even an informal snapshot — gives the sculptor the architectural information they need to build an accurate head beneath the decorative hair.
Can I use my phone camera, or do I need a DSLR?
Your phone camera is fine — current flagship phones have more than sufficient resolution for figurine reference photography. The critical thing is to turn off portrait mode, which uses software to blur backgrounds and can accidentally blur the edges of a curly coat. Lighting and angles matter far more than camera hardware for this specific purpose.
Ready to Preserve Your Poodle's Presence?
You've spent time learning to see your dog the way a sculptor sees them — as a three-dimensional structure of light, texture, and specific, unrepeatable detail. That attention is the first act of preservation. The figurine is the second.
Whether you're creating a keepsake of a beloved companion who is no longer here, or capturing your living dog at this exact moment in their life, a custom figurine built from your photographs for a 3D figurine commission is a way of saying: this specific creature existed, in this specific form, and was worth the effort of remembering precisely.
Create Your Custom Poodle Figurine →
Visit pawsculpt.com to explore the full process, review examples, and learn about current pricing and turnaround details
