The Art of the Scars: Why We Model the Imperfections of a Rescued Pit Bull
The jagged scar running from his left ear down to his jowl wasn't just a mark of past trauma; it was the map of his survival. When his owner sent us the reference photos for the custom pet figurine, she circled that specific spot in red marker and wrote just one word: Essential.
Quick Takeaways
- Perfection isn't the goal — authentic details like scars, chipped teeth, or gray muzzles tell the real story.
- Photos need honesty — don't filter out the "flaws"; use high-resolution lighting to show texture and depth.
- Digital sculpting offers control — unlike physical clay, we can dial opacity and depth of scars for artistic balance.
- Preserve the history — a PawSculpt custom figurine honors the survivor your dog became, not just the breed standard.
The Engineering of Imperfection
In the world of additive manufacturing, we spend years fighting for perfection. We calibrate lasers, level build plates to the micron, and obsess over surface finish to eliminate the slightest blemish. But when I sit down at the digital sculpting station to model a rescue dog—especially a Pit Bull with a history—the objective flips. Suddenly, the "flaws" become the most technically demanding part of the job.
Most people assume 3D printing is about clicking a button and getting a plastic clone. In reality, capturing the rugged history of a rescue dog requires a blend of forensic analysis and artistic intuition. We aren't just printing a dog; we are printing your dog.
"A scar on a rescue dog isn't a blemish. It's a badge of honor that says, 'I made it through.'"
When we receive photos of a rescue Pit Bull, we often see clipped ears, tail kinks, or skin tags. The instinct for some might be to "Photoshop" these out in the 3D model to make the dog look "new." We advise against it. Those imperfections are usually where the deepest emotional connection lies.
Why "Flawless" Feels Fake
I remember a project involving a Boxer mix named Duke. He had a prominent lipoma (a fatty lump) on his flank. The owner initially asked us to remove it digitally. We did. We sent the 3D render for approval, and she emailed back almost immediately: "It looks like a Boxer, but it doesn't look like Duke."
We added the lump back in. She approved it instantly.
Our eyes are incredibly sensitive to the "Uncanny Valley"—that strange feeling when something looks almost real but slightly wrong. In pet replicas, that wrongness usually comes from idealized symmetry. Real living things are asymmetrical.
| Feature | Idealized Model | Authentic Rescue Model |
|---|---|---|
| Ears | Perfectly symmetrical, perky | One slightly folded, tattered edges, or "rose" set |
| Coat | Uniform texture, smooth | Patches of thinning fur, scars, cowlicks |
| Eyes | Identical size and shape | Slight squint, cloudiness (lenticular sclerosis), or heterochromia |
| Stance | Standard show pose | Leaning on one hip, favoring a leg, or the "pit sit" |
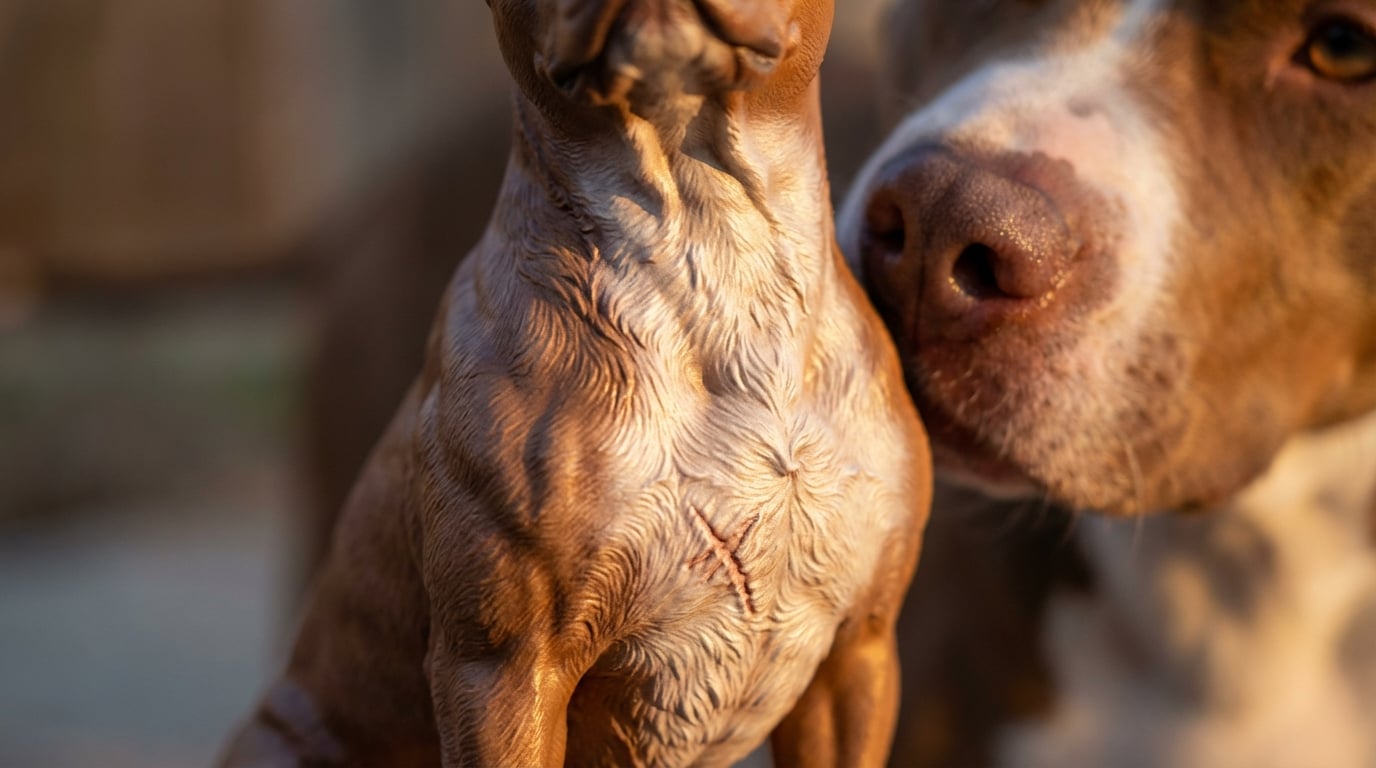
The Technical Challenge of Printing Scars
Creating a scar in a full-color 3D print isn't as simple as drawing a line. This is where the engineering reality hits the artistic vision.
We use PolyJet-style technology. Think of it like an inkjet printer, but instead of ink on paper, it jets tiny droplets of liquid photopolymer resin that cure instantly under UV light. We build the object voxel by voxel (a voxel is a 3D pixel).
To make a scar look real, we have to manipulate the geometry and the color simultaneously.
- Geometry (The Shape): A scar isn't just a color change; it's a texture change. Old scars are often shiny and raised (keloid) or sunken and matte. In the digital sculpting phase (using software like ZBrush), we have to disrupt the "fur" texture. If we just paint a line on top of the fur texture, it looks like a tattoo. We have to smooth out the geometry where the scar tissue is, mimicking how hair doesn't grow there.
- Color Depth: This is where full-color resin shines. If this were a hand-painted model, a painter would use opaque paint on top. But resin is translucent. We can print "sub-surface" colors. For a pinkish scar on a dark nose, we print deep reds underneath a semi-transparent skin tone layer. This mimics the way light scatters through actual skin, giving the scar a fleshy, organic look rather than a painted-on appearance.
The "Resolution" Trap
Here is a counterintuitive insight: Higher resolution doesn't always mean better fur.
If we print every single hair strand at 10 microns, the result can look noisy and messy to the naked eye, almost like visual static. For a rescue dog with a short, stiff coat (like a Staffy or Bully breed), we actually have to stylize the fur clumps slightly in the digital model to ensure the print reads correctly under room lighting.
However, for the scars, we crank the detail up. The contrast between the stylized fur and the highly detailed, smooth scar tissue creates a tactile difference you can feel with your thumb.
Capturing the "Pit Sit" and Body Language
Rescued Pit Bulls often carry their history in their posture. It’s not just about the physical marks; it’s about how they hold themselves.
A show dog stands square. A rescue who spent three years in a shelter might have a permanent slouch, or that famous "lazy sit" where one leg kicks out to the side. We call this "structural narrative."
When we rig the digital model (putting a digital skeleton inside the 3D mesh), we aren't looking for the breed standard. We are looking for the arthritis in the back left knee. We are looking for the way the neck cranes forward because of a lifetime of pulling on a chain before they were rescued.
Key considerations for your reference photos:
- Don't force a pose. If your dog hates sitting, don't send us photos of them sitting. Send us photos of them sprawling on the couch.
- Get low. Photos taken from human eye level distort the proportions (big head, tiny legs). Get on your stomach and take photos at the dog's eye level.
- Lighting matters for texture. Flash photography flattens texture. Natural light from a window (raking light) shows us the topography of the scars and muscle definition best.
The Post-Processing Reality
Once the printer finishes its job—usually a 10 to 14-hour cycle—the figurine is encased in a gel-like support material. This is the most dangerous part of the process.
We take the model to a water-jet station to blast away the support material. This is high-pressure work. If we have modeled a fragile ear tip or a thin tail, the water jet can snap it.
This is why we sometimes have to thicken certain features artificially. If your rescue dog has a very thin, whip-like tail, we might increase its diameter by 10-15% in the digital file. It’s a necessary tradeoff for durability. A broken accurate tail is worse than a slightly thicker intact one.
"We don't just print pixels; we print the moments that made them who they are."
— The PawSculpt Team
After cleaning, the model feels slightly matte/chalky. The magic happens when we apply the clear coat. We use a UV-resistant varnish. This "wets" the resin, deepening the blacks and making the colors pop. It also protects the resin from yellowing over time.
Note: We do NOT hand-paint. The color is integral to the material. This means the color won't chip off if you accidentally scratch it, because the color goes deep into the part.
Why We Do It
I’ll be honest—modeling a pristine Golden Retriever is easier. The fur flows predictably; the anatomy is standard.
But the rescue dogs? The ones with the notched ears and the gray muzzles? They are the ones that make the team gather around the monitor. There is a specific kind of beauty in resilience.
When we model a Pit Bull rescue, we are often modeling a transformation. We are capturing the dog after the safety set in. We aim for the expression in the eyes—soft, relaxed, finally home. The scars remain, but the tension is gone.
Modeling these imperfections isn't about focusing on the pain of the past. It's about acknowledging that the past happened, and that love won anyway.
Frequently Asked Questions
Can you fix a missing ear or tail in the figurine?
Yes. While we recommend keeping authentic details to honor their journey, we can digitally reconstruct missing limbs, ears, or tails if you prefer to remember your pet before their injury or surgery. It is entirely your choice.Do scars cost extra to include?
No. The complexity of the digital sculpting is included in our service. We encourage you to include these details as they make the figurine truly unique to your pet. You simply need to provide clear photos of the area.My dog has vitiligo or changing skin spots. Can you match that?
Absolutely. Full-color 3D printing is excellent for complex skin patterns like vitiligo, merle coats, or ticking. Because the printer lays down color pixel-by-pixel, we can achieve soft gradients and spotting that is incredibly difficult to replicate with traditional hand-painting.How durable are the figurines?
They are made of UV-cured resin. Think of them as similar to a high-end ceramic or hard plastic collectible. They are durable for shelf display and handling, but thin parts (like ears or tails) can break if dropped on a hard surface. They are keepsakes, not toys.Ready to Celebrate Your Pet?
Every pet has a story worth preserving. Whether you're honoring a beloved companion who's crossed the rainbow bridge or celebrating your furry friend's unique personality, a custom PawSculpt figurine captures those details that make your pet one-of-a-kind.
Free instant AI preview • 3D artist preview within 7 days • 5 free revisions
