How to Photograph Your Curly-Coated Labradoodle for a 3D Figurine — Stop Losing Detail in That Fluff
"The camera is the least important part of the photograph." — Ansel Adams
That quote hit different the morning one of our customers sat in her parked car, engine off, trying to photograph her Labradoodle through the back window. She'd taken sixty-three photos. Every single one looked like a caramel-colored cloud with eyes. If you've ever tried to photograph curly coat dog breeds for anything requiring precision—a custom figurine, a portrait commission, a breed profile—you already know the frustration she felt.
Quick Takeaways
- Curly coats eat light and erase detail — you need directional lighting at 30–45 degrees to reveal curl structure
- Shoot in clusters of 8–12 angles minimum — a single "good photo" won't give a3D sculptor enough spatial data
- Wet or freshly brushed fur lies — photograph your Labradoodle in their natural, dry coat state for an accurate figurine
- Your phone camera is fine, but your technique matters more — focal length and distance affect proportion accuracy dramatically
- PawSculpt's team can work with imperfect photos if you follow the reference photo guidelines — but better input always means a better result
Why Curly Coats Are the Hardest Fur Type to Capture (And What That Means for Your Figurine)
Here's something we rarely see discussed in photography guides: curly fur is optically deceptive. It creates what we call in the 3D sculpting world a "volume illusion"—the coat appears 20–40% larger than the dog's actual body structure underneath. When our digital sculptors receive reference photos of a Labradoodle, the first challenge isn't color matching or pose selection. It's figuring out where the dog ends and the fluff begins.
This matters enormously for a 3D printed figurine. Our artists digitally sculpt your pet in software like ZBrush, building the model layer by layer—skeletal proportions first, then musculature, then the coat on top. If your photos only show a uniform poof of curls, the sculptor is essentially guessing at the body shape beneath. And guessing means revisions. Revisions mean waiting longer for your finished piece.
The counterintuitive insight most Labradoodle owners miss: the goal isn't to make your dog look their fluffiest or most photogenic. It's to make them look readable. A slightly windblown coat that reveals shoulder structure is infinitely more useful than a freshly gromed show-day coat that turns your dog into a perfect sphere.
"We can sculpt what we can see. Give us the architecture of the curl, not just the cloud."
— The PawSculpt Team
The Optical Problem, Explained Simply
Curly fur does three things that straight fur doesn't:
- It scatters light omnidirectionally. Each curl acts like a tiny cylinder, bouncing light in multiple directions. This eliminates the shadow gradients that normally reveal body contour.
- It compresses depth perception. In a photo, tight curls at the shoulder look identical to tight curls at the ribcage. There's no visual "step" between planes.
- It obscures landmarks. On a short-coated dog, you can see the point of the hip, the tuck of the waist, the angle of the stifle. On a Labradoodle, these landmarks vanish under three inches of ringlets.
For a digital sculptor preparing a model for full-color 3D printing, these landmarks are everything. They determine whether your figurine looks like your dog or like a generic doodle shape.
Lighting That Actually Reveals Curl Structure
Most pet photography advice says "use soft, even lighting" or "shoot in open shade." That's fine for Instagram. It's terrible for figurine reference photos.
Here's why: soft, even light is specifically designed to minimize texture and shadow. It makes skin look smooth, fur look silky, and everything look flat. For a curly-coated Labradoodle, you want the opposite. You want light that digs into the curls and creates micro-shadows between each ringlet.
What actually works:
| Lighting Condition | Curl Visibility | Body Contour Visibility | Best For |
|---|---|---|---|
| Direct sun,30–45° angle | Excellent | Good | Texture reference shots |
| Overcast/open shade | Poor | Color-only reference | |
| Golden hour (low sun) | Excellent | Full-body structure shots | |
| Indoor window light (single source) | Good | Moderate | Face and head detail |
| Flash/ring light | Terrible | Avoid entirely |
The sweet spot is low-angle directional light—think late afternoon sun coming from one side. This creates what photographers call "raking light," where photons skim across the surface at a shallow angle. Every curl casts a tiny shadow. Every wave in the coat becomes visible. Suddenly your caramel cloud has topography.
The Smell of the Right Moment
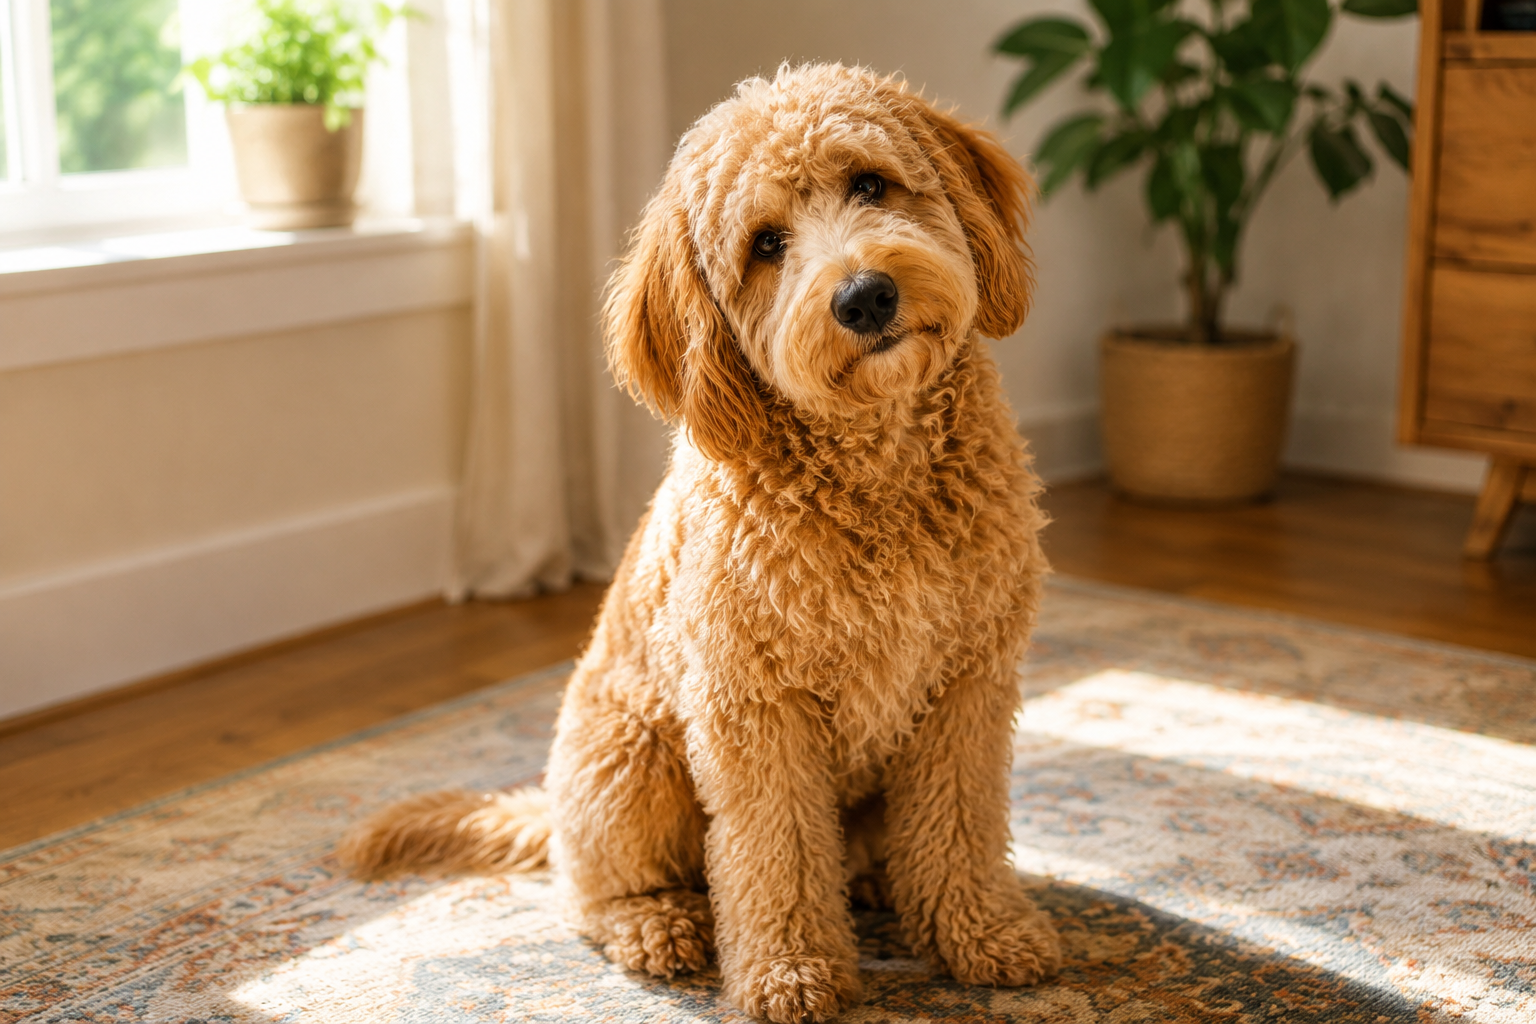
This might sound odd, but many of our customers have told us the same thing: the best reference photos happen during those ordinary moments when you're not trying. The dog is lying on the porch in late afternoon light, and you can smell the warm concrete and the faint yeasty scent of their coat after a nap. That relaxed, natural state—ears soft, body loose, coat settling into its natural fall pattern—that's when the curl structure is most honest.
Freshly bathed Labradoodles smell like coconut shampoo and look like cotton candy. Beautiful, but useless for our sculptors. Wait at least 48 hours after a bath before shooting reference photos. The natural oils need to return to weight the curls back into their characteristic pattern.
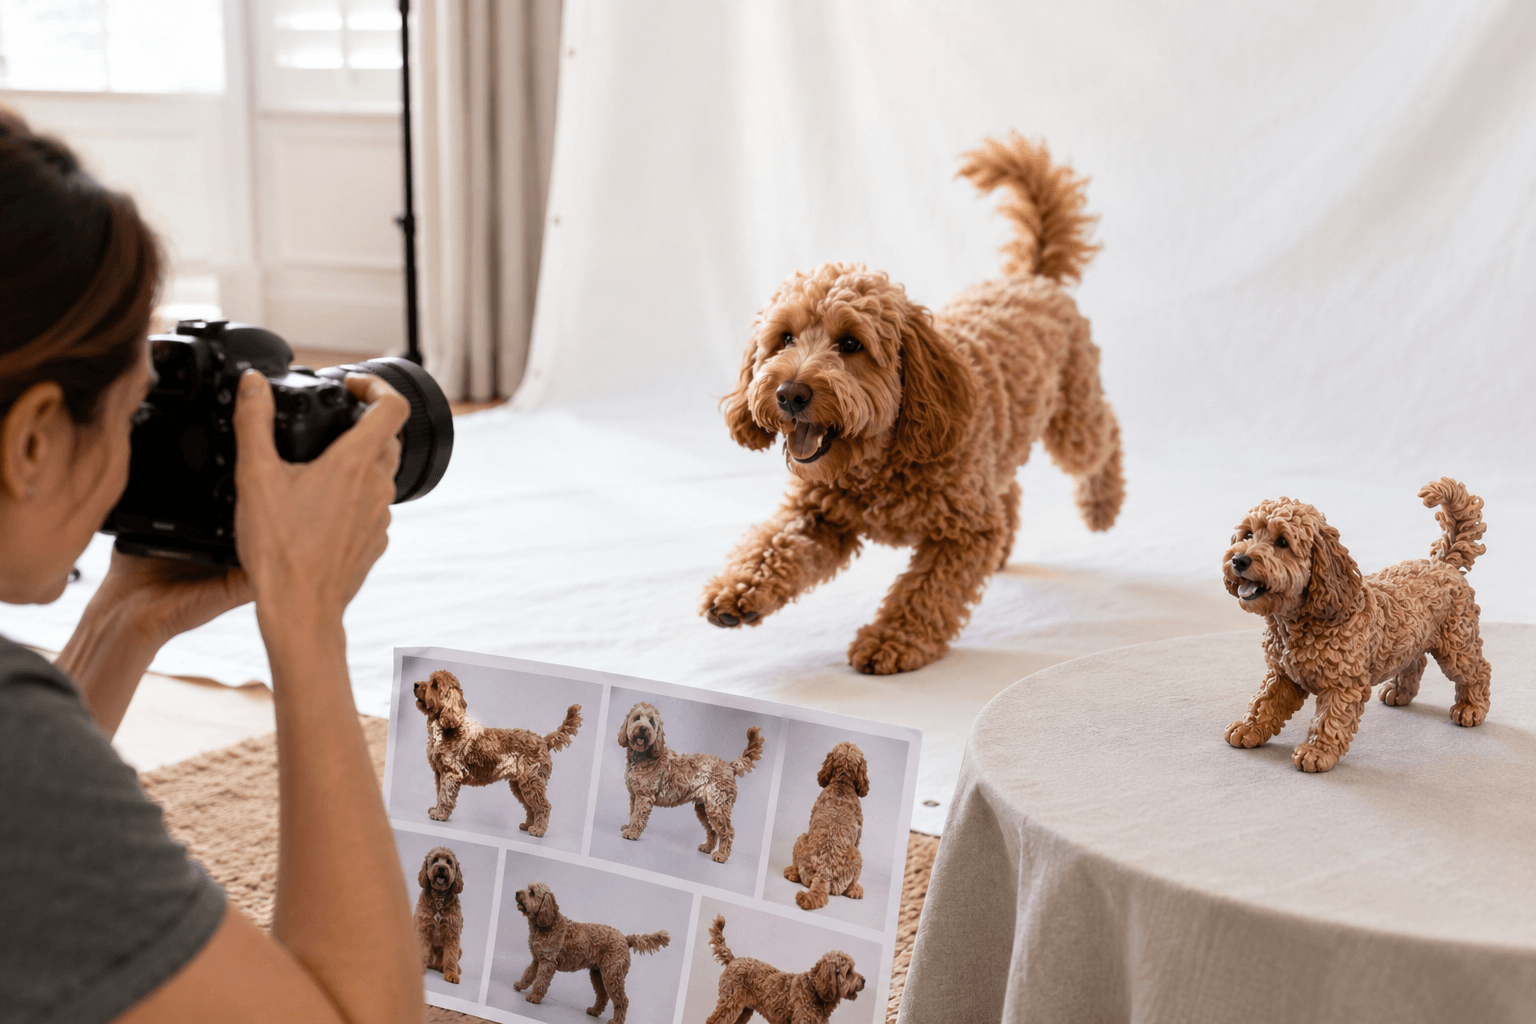
The 8-Angle Protocol: What Our Sculptors Actually Need
A single beautiful portrait of your Labradoodle tells us about15% of what we need to digitally sculpt their figurine. Here's the uncomfortable truth: most customers send us2–3 photos, all from roughly the same angle (standing in front of the dog, phone at chest height). That's like trying to build a house from one architectural drawing.
Our sculptors need to understand your dog as a three-dimensional object. That means photos from multiple angles, heights, and distances.
The Minimum Viable Photo Set
- Direct front — face-on, camera at the dog's eye level
- Direct rear — yes, photograph your dog's butt (tail set, hip width, rear curl pattern)
- Left profile — perfectly perpendicular, camera at shoulder height
- Right profile — same as left (dogs aren't perfectly symmetrical)
- Three-quarter front left — 45° between front and profile
- Three-quarter front right — same from the other side
- Top-down — standing directly above, showing the back/spine line and coat part
- Low angle, front — camera near ground level, looking slightly up (reveals chest depth and jaw structure)
Bonus Shots That Make a Real Difference
- Ear close-up — curly-coated dogs have wildly variable ear shapes hidden under the fluff. Pull the ear gently forward so we can see its length and set.
- Paw close-up — doodle paws range from tight and cat-like to splayed and hairy. This detail matters at figurine scale.
- Tail in motion vs. at rest — a Labradoodle's tail cariage changes their entire silhouette. Show us both states.
- Wet photo (if available) — a photo of your dog after swimming reveals the true body structure beneath the coat. This is gold for our sculptors.
"A wet Labradoodle photo is worth ten dry ones. It's the cheat code for curly-coat figurines."
What We Wish We Knew Sooner
A candid sidebar from the PawSculpt production team:
- We used to ask for "your best photos." Now we ask for "your most informative photos." The distinction matters. A blurry backyard shot with perfect side-profile angle is more useful than a professional portrait with bokeh that blurs the body outline.
- Ear placement is the single most-revised feature on doodle figurines. Not because our sculptors get it wrong—because owners don't realize how much ear shape varies until they see it rendered in 3D. Photograph the ears from multiple angles. Seriously.
- Dark-colored Labradoodles (chocolate, black) need more light than you think. Underexposed dark curls become an unreadable mass. Slightly overexpose if you must choose.
- The "tedy bear cut" that groomers love actually makes our job harder. If your dog currently has a short gromer cut but you want the figurine to show their full natural coat, send us older photos of the full coat AND current photos for face/body structure. We can combine references.
Camera Settings and Distance: The Proportion Trap
Here's something that will change how you think about pet photography for figurines: your phone's default camera lens distorts your dog's proportions.
Most smartphone cameras have a wide-angle lens (roughly 24–28mm equivalent). At close range—say, 2–4 feet from your dog—this lens makes the nose look enormous, the body look compressed, and the rear legs look tiny. It's the same effect that makes selfies look weird. Photographers call it barrel distortion or "wide-angle distortion."
For a figurine, this is a serious problem. Our sculptors need accurate proportions. If every photo makes your Labradoodle's snout look 30% longer than reality, the first sculpt draft will reflect that distortion—and you'll look at the preview and think "that doesn't look like my dog."
The fix is simple: stand farther back and zoom in.
| Distance from Dog | Lens Setting | Proportion Accuracy | Detail Level |
|---|---|---|---|
| 2–3 feet | 1x (wide) | Poor — significant distortion | High but warped |
| 5–6 feet | 2x zoom | Good — mild distortion | Good |
| 8–10 feet | 3x zoom | Excellent — near-accurate | Moderate |
| 10+ feet | 3x+ zoom | Excellent | Lower — may need cropping |
The sweet spot for most phones: stand 6–8 feet away and use2x optical zoom (if your phone has it). This approximates a 50mm focal length, which is considered "normal" perspective—closest to how the human eye perceives proportion.
If your phone only has digital zoom (which just crops and enlarges), it's better to stand at6–8 feet with no zoom and crop the image afterward. Digital zoom degrades resolution; cropping in post gives you the same framing without the quality loss.
Resolution Requirements for3D Sculpting
Our digital artists don't need magazine-quality resolution, but they do need enough pixels to zoom into details. Here's the practical minimum:
- Overall body shots: 3megapixels minimum (most modern phones shoot 12MP+, so you're fine)
- Detail shots (face, ears, paws): Fill at least 50% of the frame with the detail area
- Avoid heavy digital zoom: If the image looks grainy/pixelated when you pinch-zoom on your phone, it's too low-res
The real resolution killer for curly coats isn't megapixels—it's motion blur. Labradoodles are not known for holding still. A 12MP photo with motion blur is less useful than a 3MP photo that's tack-sharp. Use burst mode. Take dozens of shots. We'd rather sort through 50 photos to find 8 sharp ones than work with 3 blurry "best" shots.
Color Accuracy: Why Your Dog Looks Different in Every Photo
This section matters more than most people realize, because PawSculpt's full-color 3D printing process reproduces color directly in the resin material. The pigments are embedded voxel-by-voxel (think of it like a color inkjet printer, but in three dimensions) during the print itself. There's no painting step afterward—what the machine prints is what you get, protected by a clear coat for durability and UV resistance.
That means the color reference you provide directly determines the color of your figurine. If your photos have a strong orange cast from indoor tungsten lighting, your dog will look warmer/more orange in the sculpt preview. If they're shot under fluorescent lights, your apricot Labradoodle might look slightly green-tinged.
How to Get Accurate Color
Best conditions for color accuracy:
- Outdoor, overcast sky (nature's softbox—even, neutral-white light)
- Outdoor, open shade (not under a colored awning or near a brightly painted wall)
- Indoor, near a large north-facing window during daytime
Worst conditions:
- Under yellow/warm indoor bulbs (tungsten, warm-white LEDs)
- Mixed lighting (window + overhead fluorescent)
- Direct harsh sunlight (creates blown-out highlights that lose color data)
- Near colored surfaces that bounce tinted light onto the coat
Here's a trick our team recommends: include something white in at least one photo. A white piece of paper, a white wall in the background, a white t-shirt. This gives our color team a reference point. If the white object looks yellowish in the photo, we know the whole image is shifted warm, and we can mentally (and digitally) correct for it.
The Labradoodle Color Complexity
Labradoodles come in an absurd range of colors and patterns—cream, gold, apricot, red, chocolate, black, parti phantom, abstract, merle. Many of them also change color as they age (a phenomenon called "clearing" or "fading"). A pupy that was deep red at8 weeks might be light apricot by age 2.
If you want your figurine to represent your dog at a specific life stage, tell us. And send photos from that era, even if they're lower quality. We can use current high-quality photos for structure and older photos for color reference. Our sculptors do this combination work regularly.
"Color isn't just what shade your dog is. It's what chapter of their life you want to hold onto."
Pose Selection: Static vs. Dynamic (And Why It Matters for 3D Printing)
Let's talk about something most figurine guides skip entirely: the physics of 3D printing and how your chosen pose affects the final product's structural integrity.
Full-color resin 3D printing produces objects from UV-cured photopolymer resin—a material that's rigid, detailed, and vibrant, but also somewhat brittle compared to, say, injection-molded plastic. Think of it like a high-quality ceramic in terms of how you'd handle it. It won't shatter if you look at it wrong, but it's not a chew toy.
This means certain poses work better than others at figurine scale (typically 4–8 inches tall):
Structurally strong poses:
- Standing with all four feet on the ground (maximum contact points with the base)
- Sitting with tail wrapped around (compact, self-supporting)
- Lying down/sphinx pose (low center of gravity, wide base)
Structurally risky poses:
- Mid-leap with only one paw touching ground (thin connection point bears all weight)
- Standing on hind legs (tall, narrow base)
- Extended tail with no support (thin cantilevered element)
This doesn't mean we can't do dynamic poses. We absolutely can—and do. But the sculptor may need to add subtle structural supports (a thicker base connection, a slightly adjusted tail angle) to ensure the figurine survives shipping and years on your shelf. If you have your heart set on a specific action pose, send us reference photos of that pose and we'll let you know what's achievable.
The "Signature Pose" Concept
Here's what we've learned from producing hundreds of Labradoodle figurines: the pose that makes owners happiest isn't usually the most dramatic one. It's the signature pose—that position your dog defaults to constantly. The head tilt when they hear a treat bag. The "sploot" with back legs extended. The way they sit with one paw slightly lifted.
These micro-poses are what make a figurine look like your dog rather than a dog. And they're surprisingly hard to photograph intentionally because they're so fleting and habitual.
Our recommendation: Keep your phone accessible for a full week and capture your dog in their natural repeated positions. Don't stage anything. Just document what they actually do. You'll notice patterns you've never consciously registered—and those patterns are figurine gold.
The Digital Sculpting Process: What Happens After You Submit Photos
Understanding what happens on our end helps you understand why certain photos matter more than others. Here's the actual workflow, stripped of marketing language:
Step 1: Reference Assembly
Your photos get organized into a reference sheet—front, back, sides, details color swatches. The sculptor pins these around their digital workspace in ZBrush or Blender, essentially surrounding themselves with your dog from every angle. Gaps in coverage become immediately obvious at this stage. (This is why we sometimes ask for additional photos after submission.)
Step 2: Proportional Blocking
The sculptor builds a basic shape—think of it like a mannequin. No fur detail yet. Just the underlying body: ribcage depth, leg length ratios, head-to-body proportion, neck angle. For curly-coated breeds, this step relies heavily on those "architecture" photos we discussed earlier. If the sculptor can't determine where the body ends and the coat begins, this stage takes significantly longer.
Step 3: Coat Sculpting
This is where Labradoodles get interesting. The sculptor digitally "grows" the coat onto the body form, curl by curl in key areas, using broader stroke patterns in others. They're referencing your photos constantly—how tight are the curls on the ears versus the body? Does the coat part along the spine? Is there a longer "beard" under the chin?
The coat sculpting for a curly breed typically takes 2–3x longer than for a smooth-coated dog. Each curl creates geometry that must be readable at the final print scale. Too fine, and the curls merge into mush when printed. Too coarse, and it looks like a poodle from the1980s.
Step 4: Color Mapping
Because our process uses full-color 3D printing, color isn't applied after the fact—it's mapped directly onto the 3D model before printing. The artist "paints" the digital model using your photos as reference, matching color zones, gradients, and markings. For a parti-colored Labradoodle, this means precisely placing every patch and fade. For a solid-colored dog, it means capturing the subtle variations—darker roots, sun-bleached tips, the slightly different shade inside the ears.
Step 5: Print Preparation
The finished digital model gets oriented for printing (angled to minimize visible support contact points), hollowed if needed (to reduce material use and prevent over-curing), and sliced into layers—often in the 25–50 micron range (that's 0.025–0.05mm per layer, roughly half the width of a human hair).
Step 6: Printing and Post-Processing
The model prints in full color. After printing, the piece goes through support removal (carefully breaking away the scaffolding that held overhanging features during printing), cleaning, final curing, and clear coat application. The clear coat serves dual purposes: UV protection to prevent color fading, and a unified surface sheen that brings the colors to life.
For more details on the complete process and what to expect, visit PawSculpt's FAQ page.
Common Mistakes That Cost You Revisions (And How to Avoid Them)
We're going to be direct here because we've seen these mistakes hundreds of times, and each one adds days to your timeline:
Mistake #1: Only Sending "Pretty" Photos
The professional portrait session with the bokeh background and the perfect head tilt? Gorgeous for your wall. Nearly useless for 3D sculpting. The background blur obscures the body outline. The single angle gives us one view. The professional lighting flattens texture.
Fix: Send the pretty photos AND the ugly-but-informative ones. The slightly blurry backyard shot where your dog is mid-turn but you can clearly see their body shape from the side? That's the one our sculptors will reference most.
Mistake #2: Photographing After a Fresh Groom
We mentioned this earlier but it bears repeating: a freshly gromed Labradoodle looks like a different dog than one who's 4–6 weeks post-groom. The coat is shorter, more uniform, and shaped by the groomer's aesthetic rather than your dog's natural curl pattern.
Fix: If you want the figurine to show your dog's natural coat, photograph them 3–6 weeks after groming. If you prefer the gromed look, photograph within a day or two of the appointment—but know that this represents a temporary state.
Mistake #3: All Photos at Human Standing Height
When you photograph your dog while standing upright, you're shooting downward at roughly a 45° angle. This foreshortens the legs, exaggerates the back width, and hides the chest. Every photo from this angle tells us the same (distorted) story.
Fix: Get low. Kneel, sit on the ground, or lie on your stomach. Camera at your dog's shoulder height is the baseline. Below that for drama. Never above unless you're specifically capturing the top-down view.
Mistake #4: Forgetting the Face Details
Labradoodle faces are incredibly expressive, but the curly coat around the eyes, muzzle, and forehead creates a frame that varies enormously between individuals. Some have a clear "tedy bear" face with rounded cheeks. Others have a more angular, poodle-like structure visible through the coat. Some have eyebrows. Some don't.
Fix: Take 3–4 dedicated face shots: direct front, both three-quarter angles, and one profile. Make sure the eyes are visible (not hidden behind overgrown bangs). If your dog's eyes are typically obscured by coat, send one photo showing the eyes and note that the natural state is more covered.
Mistake #5: Ignoring Markings and Unique Features
"She's just cream-colored" is something we hear often. Then we get the photos and discover she has a slightly darker sadle, apricot ear tips, a pink nose with one dark spot, and heterochromia (two different eye colors). These details are what make a figurine unmistakably her.
Fix: Make a mental (or actual) list of your dog's unique physical features before photographing. Birthmarks, scars, color variations, that one ear that flops differently—document all of it. Include a written note with your submission describing anything that might not be obvious in photos.
| Common Feature | How to Photograph It | Why It Matters |
|---|---|---|
| Eye color | Close-up in natural light, face-on | Color printing reproduces exact iris shade |
| Nose pigment | Close-up, even lighting | Pink vs. black vs. spotted changes the face |
| Ear set/length | Ears pulled gently forward + natural hang | Determines silhouette accuracy |
| Tail curl/carriage | Photo from behind + side, tail at rest | Defines the figurine's rear profile |
| Coat color variations | Multiple lighting conditions | Ensures color mapping matches reality |
| Unique markings | Isolated close-ups + full-body context | Placed precisely on the 3D model |
The Emotional Weight of Getting It Right
Let's step back from the technical for a moment.
Many of the Labradoodle figurine orders we receive are memorials. The dog has already passed, and the owner is working with whatever photos exist on their phone—often taken casually, never with the thought that these would someday be the only reference for a physical kepsake.
We want to be honest about this: we can work with imperfect photos. Our sculptors are skilled at extrapolating from limited reference material. They understand breed anatomy. They can infer body structure from partial views. A memorial figurine made from five casual phone photos will still look like your dog—because our team knows how to read what's there and fill in what's missing with breed-appropriate anatomy.
But if your dog is still with you, right now, today—you have an opportunity that grieving owners wish they'd taken. Spend twenty minutes this weekend following the guidelines in this article. Get those8+ angles. Capture the curl pattern in good light. Document the weird little asymetries that make your Labradoodle yours.
You might never order a figurine. But if you do—whether next month or in ten years—you'll have exactly what's needed. And there's something quietly reassuring about knowing those reference photos exist on your phone, ready whenever you need them.
The smell of your dog's coat after they've been sleeping in the sun. The specific weight of their head on your lap. The sound of their nails on hardwood. Photos can't capture all of it. But a well-photographed set of references can give a sculptor enough to create something you'll pick up off the shelf and feel that recognition hit—that's them.
Advanced Tips: Shooting Black and Dark Chocolate Labradoodles
Dark-coated curly dogs deserve their own section because they present a unique photographic challenge that compounds the curly-coat problem. Dark fur absorbs light. Curly fur scatters it. Combined, you get photos where your dog looks like a dark blob with eyes.
The exposure problem: Your phone's camera tries to average the exposure across the whole frame. If your dark dog is against a light background (sky, white wall, bright grass), the camera exposes for the background and your dog becomes a silhouette. If you tap on your dog to set exposure, the background blows out—but at least the dog is visible.
Always tap-to-focus on your dog's face. Let the background overexpose. We don't need the background; we need your dog's details.
Additional dark-coat strategies:
- Shoot during golden hour when warm light rakes across the coat at low angles—this reveals curl texture even on black dogs
- Use a reflector (a white poster board, a car windshield sun shade) to bounce light into shadow areas
- Slightly overexpose (+0.5 to +1.0 EV if your phone allows exposure compensation)
- Avoid shooting against bright backgrounds—put your dark dog against a medium-toned background (brown fence, green hedge, gray concrete)
- Take one set of photos in direct sunlight specifically for texture reference, even if the color looks "wrong"—we can use these for curl pattern while referencing shade photos for accurate color
According to the American Kennel Club's guide on Labradoodle coat types, these dogs can have wool, flece, or hair coats—each with different curl tightness and texture. Knowing which type your dog has helps our sculptors choose the right digital brush techniques for the coat sculpting phase.
Phone vs. Camera: Does Equipment Matter?
We'll be real: for90% of figurine orders, a modern smartphone (anything from the last 4–5 years) produces perfectly adequate reference photos. The limiting factor is almost never resolution or lens quality. It's technique, lighting, and angle coverage.
That said, if you happen to own a DSLR or mirrorless camera, there are advantages:
- Optical zoom without quality loss — get accurate proportions from distance
- Manual exposure control — properly expose dark coats
- Faster shutter speeds — freeze motion on wiggly dogs
- RAW files — more color data for our team to work with (though JPEGs are fine)
But honestly? The customer who sends us12 well-lit, multi-angle iPhone photos gives us more to work with than the one who sends 3 beautifully composed DSLR portraits from the same angle. Coverage beats quality every time for3D reference work.
Putting It All Together: Your Weekend Photo Session Plan
Block twenty minutes on a sunny afternoon (or overcast morning—both work, just differently). Here's your checklist:
- Don't bathe or groom your dog beforehand. Natural coat state only.
- Choose an outdoor location with simple backgrounds and good natural light.
- Bring treats to get your dog's attention for face-on shots, but don't over-excite them.
- Start with the 8 core angles — work systematically around your dog.
- Get low — most shots should be at or below your dog's shoulder height.
- Stand6–8 feet back and use 2x zoom for proportion accuracy.
- Take 5–10 shots per angle — burst mode is your friend.
- Capture detail shots — face, ears, paws, tail, any unique markings.
- Include one photo with a white reference object for color calibration.
- If your dog is dark-coated, do an extra set in direct raking sunlight for texture.
Total photos: 60–100. That sounds like a lot. It takes twenty minutes. And from that set, you'll have 15–20 excellent reference images that give any sculptor—whether at PawSculpt or elsewhere—everything they need to capture your curly-coated companion accurately.
The Bigger Picture
Here's the thing nobody tells you about photographing your dog for a figurine: the process itself becomes a gift. You spend twenty minutes really looking at your dog. Noticing the way their left ear sits slightly higher than the right. The three white hairs on their chin. The way the curls spiral clockwise on their chest but counterclockwise on their haunches.
Most of us look at our dogs every day without truly seeing them in this granular way. The figurine photography process forces a kind of attention that feels—unexpectedly—like a form of love. You're cataloging the physical details of a creature you adore, and in doing so, you're noticing things you'll carry with you long after the photos are taken.
Whether those photos eventually become a full-color resin figurine on your bookshelf, or simply live on your phone as an unusually thorough record of your dog at this moment in time, the act of careful observation is its own reward.
Your Labradoodle won't hold still. They'll try to lick the camera. They'll shake at the worst possible moment, and you'll smell that familiar wet-dog-adjacent scent of disturbed dander and natural oils. You'll laugh. You'll get frustrated. You'll end up with forty photos of a blurry tail and six perfect ones.
And those six will be enough to stop your dog in time—curls, quirks, and all.
Frequently Asked Questions
How many photos do I need for a custom Labradoodle figurine?
We recommend a minimum of 8–12 photos covering all major angles: direct front, direct rear, both side profiles, three-quarter views from both sides, a top-down shot, and detail close-ups of the face, ears, and paws. More is always better—aim for 15–20 strong reference images selected from a larger session of 60–100 shots. The goal is complete spatial coverage so the sculptor never has to guess at anatomy hidden by curls.
Should I groom my Labradoodle before taking figurine reference photos?
No—unless you specifically want the figurine to show a freshly groomed look. Photograph your dog 3–6 weeks after their last grooming appointment to capture their natural curl pattern, length, and fall. A fresh groom creates an artificially uniform coat that doesn't represent how your dog looks90% of the time. If you do want the gromed look, shoot within 1–2 days of the appointment.
Can I use a smartphone to photograph my curly-coated dog for a 3D figurine?
Absolutely. Any smartphone from the last 4–5 years has more than enough resolution. The key is technique: stand 6–8 feet away and use 2x optical zoom to avoid wide-angle proportion distortion. Use burst mode to combat motion blur, and prioritize good directional lighting over camera specs. Coverage of angles matters far more than equipment quality.
What lighting works best for photographing curly dog fur?
Directional natural light at a 30–45 degree angle—like late afternoon sun coming from one side—is ideal. This "raking light" creates micro-shadows between individual curls, revealing both texture and underlying body contour. Avoid flat, even lighting (overcast shade), direct flash, and ring lights, which all flatten curl texture into an unreadable mass.
How does full-color 3D printing work for pet figurines?
The pet is first digitally sculpted in 3D software by a
