How to Photograph Your Great Dane for a 3D Print Withoutashed-Out Colors (A Technical Guide)
The coffee mug was still warm in Marcus's hand when his Great Dane, Odin, lumbered through the kitchen doorway and knocked the treat jar off the counter with one sweep of his tail. In that split second—Odin mid-stride, ears forward, brindle coat catching the morning light from the window above sink—Marcus thought: that's the shot. But when he grabbed his phone and snapped the photo, the image showed a washed-out ghost of a dog. Flat. Gray-brown where rich brindle stripes should be. If you've ever tried to photograph a large dog for a figurine or any kind of custom kepsake, you already know this frustration.
Quick Takeaways
- Large dogs wash out in photos because of surface area — more coat means more light reflection to manage correctly
- Shoot at your Great Dane's chest height, not from above — downward angles distort proportions and flatten color
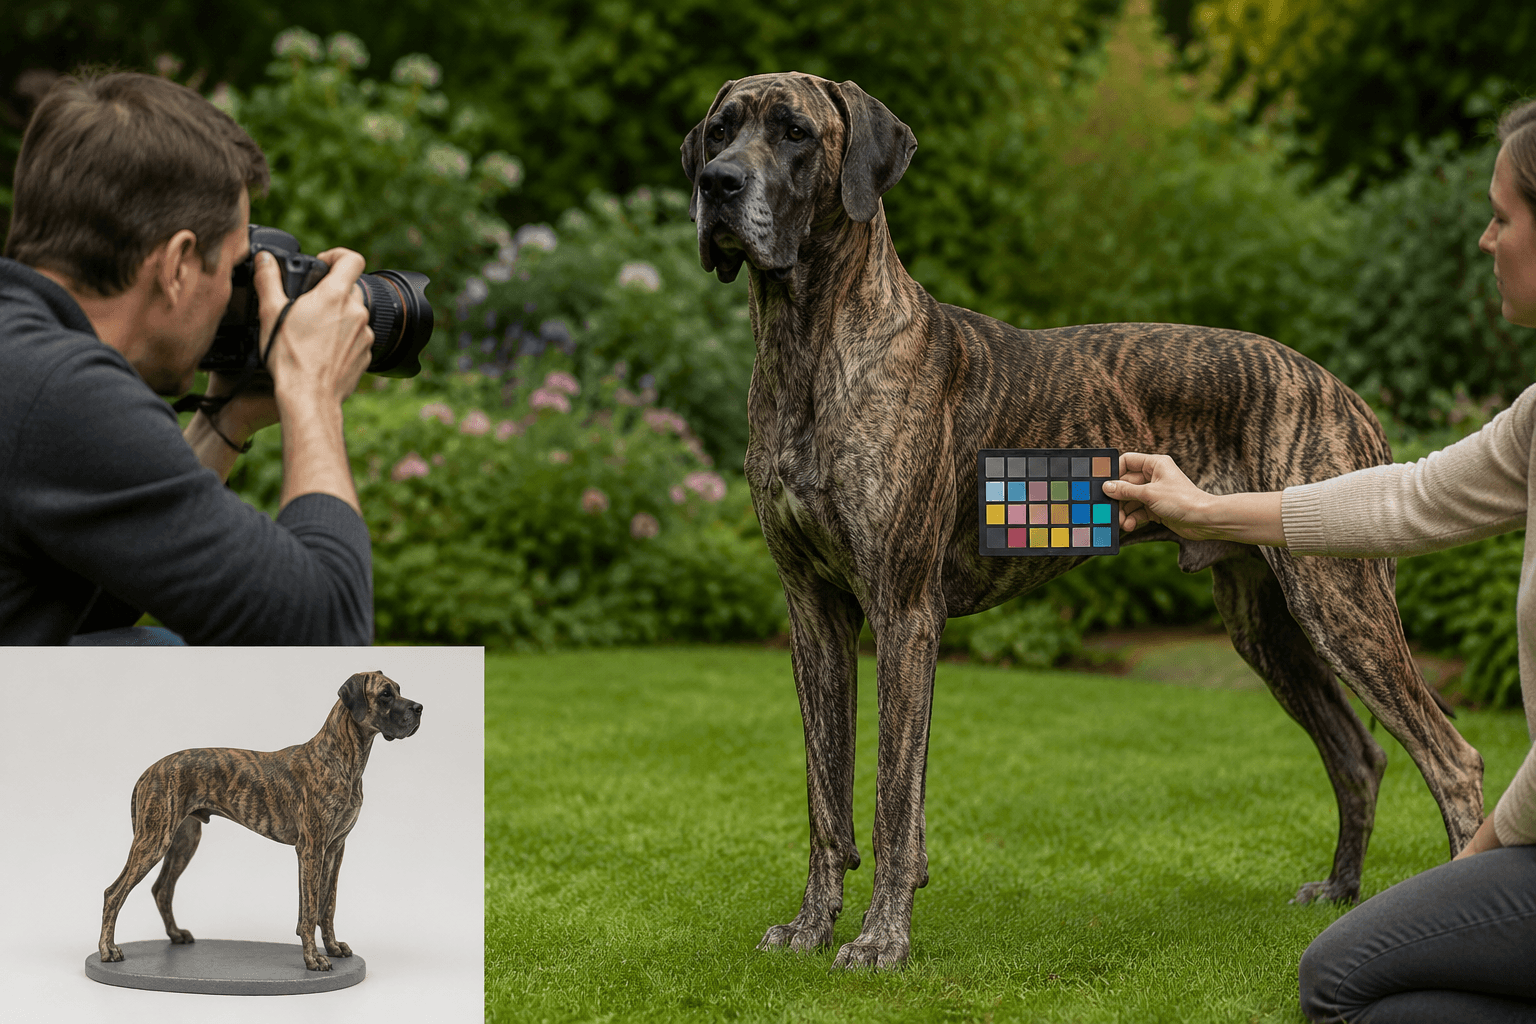
- Overcast natural light beats flash every time — direct flash destroys brindle, merle, and harlequin patterns
- Send 8-12 reference photos from multiple angles — this gives PawSculpt's digital sculptors the data they need for accurate color reproduction
- Your phone's HDR mode is likely your enemy — it smooths out the very color transitions that make your dog unique
Why Great Danes Are the Hardest Breed to Photograph for Color Accuracy
Here's something most photography guides won't tell you: the problem isn't your camera. It's physics.
Great Danes present a unique challenge that smaller breeds simply don't. Their massive, broad surfaces act almost like reflective panels. When light hits a Chihuahua, you're dealing with a few square inches of coat catching that light. When it hits a Great Dane's flank, you've got a surface area roughly the size of a card table all reflecting, absorbing, and scattering photons simultaneously.
Your phone's auto-exposure algorithm sees all that reflected light and thinks, "Wow, this scene is bright." So it compensates. It dials down exposure. And suddenly your fawn Dane looks beige. Your blue Dane looks gray. Your brindle Dane's stripes disappear into a mudy brown soup.
"The biggest color-accuracy challenge we face isn't our printing technology—it's working from photos that don't show us what the dog actually looks like."
— The PawSculpt Team
Marcus learned this the hard way. He'd submitted photos of Odin to have a custom figurine made, and the first thing our team asked was: "Is Odin's brindle more golden or more red-brown? We can't tell from these images." He'd taken thirty photos. None of them captured what his eyes saw every morning in that kitchen.
The Color Profiles That Cause the Most Trouble
Not all Great Dane colors photograph equally. Here's what we've observed across thousands of orders:
| Coat Color | Primary Problem | What Gets Lost | Difficulty Level |
|---|---|---|---|
| Brindle | Stripes merge into flat brown | Individual stripe definition and color variation | High |
| Blue | Reads as gray or silver | The warm steel undertone that makes "blue" blue | High |
| Harlequin | White blows out, patches lose detail | Edge definition between white and black patches | Medium-High |
| Mantle | Black areas lose all texture | Subtle brown/blue undertones in black coat | Medium |
| Fawn | Appears washed-out beige | The rich golden depth and mask definition | Medium |
| Merle | Pattern complexity overwhelms auto-exposure | Individual spot colors and gradients | Very High |
If your Dane is brindle or blue, you'll need to work twice as hard on your photos. That's not a knock on your skills—it's just how light interacts with those particular pigments.
Setting Up Your Space: The Kitchen-Table Approach to Pet Photography
Forget the professional studio setup. You don't need seamless backdrops or ring lights. What you need is a room with one large window, a neutral-colored floor, and about ten feet of clear space. For most people, that's the kitchen or living room.
Here's the counterintuitive insight that changes everything: the best time to photograph your Great Dane for color accuracy is on a cloudy day, between 10 AM and 2 PM, near a north-facing window. Not golden hour. Not that gorgeous sunset light that makes everything look warm and magical on Instagram. That warm light is lying to your camera about what color your dog actually is.
Why Overcast Light Is Your Secret Weapon
Direct sunlight creates two problems simultaneously. First, it produces harsh shadows that hide coat detail in dark patches. Second—and this is the one nobody talks about—it adds a color temperature bias. Morning sun is warm (yellowish). Afternoon sun shifts blue. Your dog's coat color stays the same all day, but your photos will show three different dogs depending on when you shoot.
Overcast sky acts like a giant softbox. It scatters light evenly, eliminates harsh shadows, and—critically—produces the most color-neutral illumination available without professional equipment. The light temperature sits around 5500-6500K, which is close to what's called "daylight balanced." This means your camera's auto white balance has the easiest job possible, and the colors it records will be closest to what your eyes actually perceive.
The Room Setup (5 Minutes, No Equipment Needed)
- Clear a space at least 8 feet long and 5 feet wide (Great Danes need room to stand naturally without feeling cornered)
- Position your dog parallel to the window, about 3-4 feet away from it—not facing it, not facing away
- Put a white or light gray sheet on the floor if your floring is dark wood or patterned tile (dark floors bounce dark light upward onto the belly)
- Turn off all artificial lights in the room—mixing window light with overhead LEDs creates competing color temperatures
- Close blinds on any other windows so you have one consistent light source
That's it. No reflectors, no diffusers, no ring lights. One window. One dog. One phone
Marcus ended up using his kitchen for exactly this reason. The north-facing window over the sink gave him consistent, even light. The light-colored tile floor bounced soft fill light up under Odin's chest. And the ten-foot stretch between the island and the back door gave Odin enough room to stand without his tail hitting anything (well, mostly).
Camera Settings That Actually Matter for Large Breed Color Accuracy
Let's talk about what happening inside your phone when you tap that shutter button, because understanding this will save you from the three most common mistakes.
Turn Off HDR (Yes, Really)
HDR (High Dynamic Range) is designed to compress the difference between the brightest and darkest parts of a scene into a single image. Sounds helpful, right? It's not. Not for this purpose.
HDR works by taking multiple exposures and blending them. In the process, it smooths out tonal transitions. For a landscape, that's fine. For a brindle Great Dane, it literally erases the stripe boundaries. The algorithm sees those stripes as "noise" in the tonal range and averages them out.
On iPhone: Settings → Camera → turn off Smart HDR
On Android: Open camera → Settings → turn off Auto HDR or Scene Optimizer
Lock Your Exposure on the Dog, Not the Room
Here's what happens when you point your phone at a Great Dane standing in a bright room: the camera sees the bright walls, the bright window, the bright floor and one large dark-ish shape in the middle. It exposes for the room. Your dog goes dark.
The fix takes two seconds. Tap and hold on your dog's body (specifically on a mid-tone area of their coat—not the darkest patch, not the lightest). Your phone will lock exposure and focus on that point. On most phones, you'll see a yellow box with a sun icon. Slide that sun icon up slightly—maybe 10-15%—to open up the shadows without blowing out highlights.
This single adjustment is responsible for more color-accuracy improvement than any other tip in this entire guide.
White Balance: Lock It or Lose It
Auto white balance is smart, but it's not smart enough for this job. It will shift from frame to frame as your dog moves, as clouds pass over the sun, as you change your angle slightly. That means photo #1 might show a warm-toned fawn and photo #12 might show a cool-toned fawn—same dog, same minute, different white balance decisions.
If your phone allows manual white balance (most Android phones do natively; iPhone users can use apps like Halide or ProCamera):
- Set white balance to "Daylight" or approximately 5500K
- Leave it locked for the entire session
- This ensures consistent color across all your reference photos
"A figurine is only as accurate as the reference photos it's built from. Consistent lighting is consistent truth."
The Angles That Matter: Photographing a Dog Who's Taller Than Your Kitchen Table
This is where Great Dane photography diverges completely from small-breed photography. With a Yorkie, you're shooting down. With a Dane, you need to be shooting across or even slightly up.
The Critical Rule: Shoot at Chest Height
Get low. Seriously. Kneel, sit on the floor, or use a low stool. Your camera lens should be level with your Dane's chest—roughly 20-28 inches off the ground for most adults.
Why? Two reasons:
Proportion accuracy. Shooting from standing height (5-6 feet) looking down at a dog creates foreshortening. The head looks enormous. The body looks compressed. The legs look stuby. When our digital sculptors work from these photos, they have to guess at the true proportions—and guessing means potential inaccuracy.
Color accuracy. When you shoot downward, you're photographing the top of the coat, which catches the most direct light and appears lighter than the dog's true overall color. The sides, chest, and legs—which show the richest, most saturated color—are angled away from your lens and appear darker or are hidden entirely.
The Eight Essential Angles
For a full-color 3D print figurine, our digital artists need to see your dog from every direction. Think of it like building a map. Here's the minimum shot list:
- Left profile (perfectly perpendicular, full body, all four legs visible)
- Right profile (same as above—dogs aren't perfectly symmetrical)
- Front-on (face, chest, front legs, showing ear set and head width)
- Rear (tail set, hindquarter shape, rear leg angulation)
- Three-quarter left (45 degrees, showing depth and dimension)
- Three-quarter right (same from the other side)
- Top-down (for back markings, spine line, and overall color pattern)
- Face close-up (eyes, muzzle color, ear color inside and out)
For brindle, harlequin, or merle Danes, add:
- Close-up of the pattern on the left flank
- Close-up of the pattern on the right flank
- Chest pattern detail
- Any unique markings (spots, patches, color transitions)
The "Stand" Problem and How to Solve It
Great Danes are not naturally inclined to stand still in a perfect show stack while you crawl around them on the kitchen floor. We get it. Here's what actually works:
The treat-on-the-counter method. Place a high-value treat (something smelly—liver, cheese, whatever makes your Dane's nose twitch) on the counter at their nose height. They'll stand alert, ears forward, focused. You have about 8-12 seconds before they either grab it or lose interest. That's enough for3-4 shots if you're ready.
The two-person approach. One person holds the treat or toy at the correct height and position to keep the dog oriented correctly. The other person shoots Swap positions for different angles.
The "just let them stand" method. Honestly? Sometimes the best photos come when your Dane is just... standing there. Relaxed. Weight even. Not performing. These natural poses often show the truest body proportions because the dog isn't straining or leaning.
Understanding How Photos Become a Full-Color 3D Print
This is where things get interesting from a technical standpoint, and understanding this process will help you take better photos. Because once you know what the digital sculptor is looking for in your images, you'll know exactly what to provide.
From Photo to Digital Sculpture
When you submit reference photos to a company like PawSculpt, here's what happens on the production side:
Step 1: Reference Analysis. A digital artist studies your photos—not just glancing, but measuring. They're looking at proportional relationships. How long is the muzzle relative to the skull? What's the ear-to-shoulder ratio? Where does the elbow fall relative to the chest depth? For Great Danes specifically, they're checking the characteristic rectangular head shape, the long elegant neck, and the tuck-up of the loin.
Step 2: Digital Sculpting. Using software like ZBrush or Blender, the artist builds your dog's likeness polygon by polygon. They're working in three dimensions, rotating the model constantly, checking it against your reference photos from every angle. Coat texture gets sculpted in—the direction of fur flow, the lay of the ears, the wrinkles on the forehead.
Step 3: Color Mapping. This is where your photo quality matters most. The artist maps color information directly onto the 3D model's surface. Every color variation, every marking, every subtle gradient from one tone to another—it all comes from your photos. If your photos show washed-out brindle stripes, the color map will have washed-out brindle stripes. Garbage in, garbage out.
Step 4: Full-Color 3D Printing. Here's what makes modern figurine technology remarkable: the model is printed in full color directly. The printer deposits UV-cured photopolymer resin layer by layer—typically in the25-50 micron range (that's thinner than a human hair)—and the color pigments are embedded into the resin material itself during printing. There's no separate painting step. The color is literally part of the physical structure.
Step 5: Post-Processing. After printing, the figurine goes through cleaning (removing uncured resin), final UV curing for structural integrity, support removal (careful sanding of any contact points), and finally a clear coat application for UV protection and a finished sheen.
| Production Stage | What Happens | How Your Photos Affect It |
|---|---|---|
| Reference Analysis | Proportions measured, anatomy studied | Poor angles = proportion guesswork |
| Digital Sculpting | 3D model built in software | Missing angles = incomplete likeness |
| Color Mapping | Colors applied to 3D surface from photos | Washed-out photos = inaccurate colors |
| Full-Color Printing | Resin printed with embedded pigments | Color data is permanent once printed |
| Post-Processing | Cleaning, curing, clear coat | N/A—this stage is process-dependent |
Why This Means Your Photos Are the Single Most Important Variable
The printing technology itself is remarkably accurate at reproducing color. Modern full-color resin printers can reproduce thousands of distinct colors with high fidelity. The bottleneck isn't the machine—it's the input data.
Think of it this way: if you hand a master portrait painter a blurry, overexposed reference photo, even their skill can't recover information that isn't there. Same principle applies here. The digital sculptor can enhance and interpret to some degree, but they can't invent color information that your photos don't contain.
This is why we're spending5,500 words on photography rather than on the printing process itself. The printing works. Your photos are the variable you control.
The Smell of the Process: Why Familiar Scents Help You Get Better Photos
This might sound strange in a photography guide, but bear with me.
One of the biggest challenges in photographing Great Danes—or any large dog—is getting them to relax and stand naturally. A tense dog holds their body differently. Ears pin back. The tailucks. Muscles along the topline tighten and change the silhouette. And a dog who's been asked to "stay" in an unfamiliar setup is almost always a tense dog.
Here's what works: make the photo session smell like a normal day.
Don't clean the kitchen floor with lemon cleaner right before shooting. Don't light a candle. Don't spray air freshener. Dogs orient themselves by scent first, and an environment that smells "wrong" puts them on alert. You want your Dane to walk into the shooting space and think, "Oh, this is just the kitchen. Where's my breakfast?"
Marcus told us that the session where he finally got usable photos of Odin happened on a morning when he hadn't done anything special. Same coffee brewing. Same toast smell. Same kitchen Odin wandered in expecting his morning routine, stood by his food bowl looking expectant, and Marcus—already positioned on the floor with his phone—captured twelve perfect reference shots in under two minutes.
The dog didn't know it was a photo session. That's the goal.
Common Mistakes That Ruin Color Accuracy (And How to Fix Each One)
Mistake #1: Using Flash
Flash is the single fastest way to destroy color accuracy on a large dog. Here's why it's worse for Danes than for small breeds: the flash illuminates whatever is closest to the camera most intensely. On a Great Dane, that's usually the shoulder or chest—the part of the dog nearest to you. The result is a hot spot of overexposed, color-blown-out coat in the center of the frame, with the head and hindquarters falling into relative shadow.
The fix: Never use flash. Period. If you don't have enough natural light, wait for a brighter day or move to a room with a bigger window. A slightly underexposed photo (too dark) is recoverable. An overexposed flash photo is not.
Mistake #2: Photographing Against a Bright Background
Standing your Dane in front of a window, a white wall in direct sun, or a bright doorway creates a silhouette effect. Your camera exposes for the bright background, and your dog becomes a dark shape with no color detail.
The fix: The light source should be beside your dog (lighting them from the side) or slightly behind you (lighting them from the front). Never behind the dog.
Mistake #3: Shooting Only From Your Favorite Angle
We all have a "good side" photo of our dogs. The cute head tilt. The noble profile. But a single flatering angle doesn't give a3D sculptor enough information to build a complete figurine. You need the unflattering angles too—the rear view, the top-down, the straight-on face that shows asymetries.
The fix: Follow the eight-angle shot list above. Treat it like a checklist. Get the "boring" documentation shots first, then take your artistic favorites as bonus material.
Mistake #4: Editing Photos Before Submitting Them
This one surprises people. You'd think that brightening, color-correcting, or filtering your photos would help. It doesn't. It actively hurts.
When you apply a filter or adjust saturation in your phone's editor, you're adding a layer of interpretation between reality and the sculptor's reference. That "vivid" filter might make your fawn Dane look more golden on screen, but now the sculptor doesn't know: is the dog actually that golden, or is that the filter talking?
The fix: Submit completely unedited photos. Straight from the camera. RAW format if your phone supports it. Let the professional artists interpret the true colors—that's literally their job.
Mistake #5: Only Shooting in One Lighting Condition
Here's an insider tip that most guides miss entirely: send photos from at least two different lighting conditions. One set in your controlled indoor setup (overcast window light). One set outdoors in open shade.
Why? Because no single lighting condition reveals all the information in a complex coat. Indoor light might show the brindle stripe pattern beautifully but miss the subtle warm undertone that only shows in natural outdoor light. Outdoor shade might reveal the blue sheen on a blue Dane's coat that indoor photos flatten out.
Two lighting conditions give the sculptor a more complete color story. It's like triangulating—each set confirms and adds to what the other shows.
Specific Guidance by Great Dane Color
Fawn Danes
The challenge: fawn coats have a gradient from deeper golden on the back to lighter cream on the belly and legs. Auto-exposure tends to average this out into one flat beige.
What to do: Expose for the mid-tone (the shoulder area, usually). Take separate close-ups of the darkest area (typically along the spine) and the lightest area (inner thighs, chest) so the sculptor can see the full range. Photograph the black mask separately with the face filling the frame—masks often get lost when the camera exposes for the lighter body.
Brindle Danes
The challenge: stripes. Your camera's compression algorithm literally doesn't know what to do with fine, irregular stripes. It wants to smooth them out.
What to do: Get close. Really close. Take detail shots where individual stripes are clearly visible—you should be able to count them in photo. Shoot from 2-3 feet away for these detail shots. Also note: brindle stripes have direction. They flow in specific patterns across the body. A close-up of the left shoulder and close-up of the right hip will show different stripe directions. Capture both.
Blue Danes
The challenge: "blue" in dog terms is actually a diluted black that reads as steel-gray with warm undertones. Cameras almost universally render this as plain gray, losing the warmth entirely.
What to do: Shoot in slightly warm light (late morning, not miday). If you can, include something in the frame that you know is true neutral gray—a gray card, a concrete step, anything—so the sculptor can calibrate the difference between "actual gray" and "your dog's blue." The comparison is incredibly helpful.
Harlequin Danes
The challenge: extreme contrast. Pure white areas and pure black patches in the same frame. Your camera can't expose for both simultaneously.
What to do: Take three exposure sets. One exposed for the white areas (so they show texture and aren't blown out). One exposed for the black patches (so they show detail and aren't just black holes). One "middle" exposure. Between these three, the sculptor can reconstruct the full tonal range. Also: photograph the edges of patches closely. Are they sharp-edged or do they feather? This detail matters enormously in the final figurine.
Merle Danes
The challenge: merle is essentially a pattern of diluted and full-color patches with irregular borders, sometimes with tiny spots within larger patches. It's the most complex color pattern to photograph accurately.
What to do: Everything above, plus: take a full-body photo in even light where the entire pattern is visible at once. Then take quadrant close-ups (front-left, front-right, rear-left, rear-right). Merle patterns are unique like fingerprints—the sculptor needs to see the whole map and the details simultaneously.
What to Expect After You Submit Your Photos
Once you've captured your reference photos and submitted them to a service like PawSculpt, the process moves into digital craftsmanship territory. For specifics on timelines, revision processes, and guarantees, visit the PawSculpt FAQ page—those details are best checked directly since they can vary.
What we can tell you about the general process: your photos get reviewed by a digital sculptor who specializes in animal anatomy. They'll assess whether the reference set is complete enough to work from. If something's missing—say, you didn't get a clear rear view, or the ear color is ambiguous—they'll ask for additional photos before starting.
The sculpting phase is where artistry meets technology. The sculptor works in 3D software, building your dog's likeness with the same attention to anatomical accuracy that a traditional sculptor would bring, but with the precision that digital tools allow. They can rotate, zoom, measure, and compare against your references continuously.
Then comes the moment that still amazes us every time: the full-color print emerges from the machine with your dog's colors already embedded in the resin. No painting. No color matching by eye. The pigments are placed voxel by voxel (a voxel is essentially a 3D pixel) during the printing process itself. The color accuracy is limited only by the quality of the color data that went in—which circles back to why your photography matters so much.
According to the American Kennel Club's Great Dane breed standard, the breed comes in six recognized colors, each with specific pattern requirements. Understanding your Dane's official color classification can help you communicate more precisely with any artist working on their likeness.
A Final Word on Patience (And Why It Pays Off)
Marcus ended up taking photos of Odin over three separate mornings. Not because the first session was a disaster—it wasn't. But because after reviewing his initial shots, he noticed that Odin's brindle pattern was clearer on some days than others depending on whether Odin had been lying on one side (compressing the coat) or had just been brushed.
The third morning, after Odin's coat had been brushed the night before and he'd slept normally, the stripes were at their most defined. The colors were richest. And Marcus, now practiced at the low-angle, locked-exposure, window-light technique, captured a set of reference photos that made our sculptors say, "These are perfect."
"The best reference photos aren't lucky shots. They're the result of understanding what you're trying to capture and setting up the conditions to capture it."
His finished figurine—a 6-inch full-color resin print of Odin mid-stride, ears forward, brindle coat rendered stripe by stripe in embedded pigment—sits on the kitchen counter now. Right next to the treat jar. Every morning when Marcus makes his coffee, there's Odin. Permanent. Accurate. Every stripe accounted for.
That's what good photography makes possible. Not just a figurine, but a recognition. The moment you look at it and your brain says, "That's him." That response doesn't come from generic dog-shaped objects. It comes from color accuracy. From correct proportions. From the specific way your dog's ears sit and your dog's coat flows.
And it all starts with how you hold your phone in the kitchen on a cloudy Tuesday morning.
Frequently Asked Questions
How many photos do I need for a custom Great Dane figurine?
Plan on 8-12 photos minimum. You need both profiles, front, rear, three-quarter views from each side, a top-down shot, and a face close-up. For brindle, harlequin, or merle Danes, add 3-4 close-up detail shots of the coat pattern from different body areas. More reference material always helps—our sculptors would rather have too many photos than too few.
Why do my Great Dane photos always look washed out?
It's a surface-area problem. Your phone's auto-exposure sees all that coat reflecting light and compensates by underexposing. The fix is simple: tap and hold on your dog's mid-tone coat area to lock exposure, then nudge the exposure slider up slightly. This single adjustment makes the biggest difference in color accuracy.
Should I edit my pet photos before submitting them for a figurine?
No—and this is a common mistake. Submit completely unedited, straight-from-camera images. Any filter, saturation boost, or color correction you apply adds false information. The digital sculptor needs to see true colors, even if the photos look "boring" to you. RAW format is ideal if your phone supports it.
What lighting works best for photographing a large dog's true colors?
Overcast natural light from one window, with all artificial lights turned off. Position your dog parallel to the window, about 3-4 feet away. This gives you color-neutral illumination that won't add warm or cool bias to your dog's coat. Avoid flash entirely—it creates hot spots that destroy color detail on large-surface-area dogs.
How does full-color 3D printing actually capture my dog's coat pattern?
The printer deposits UV-cured photopolymer resin in layers typically 25-50 microns thin, with color pigments embedded directly into the material during printing. Each voxel (3D pixel) gets its specific color assigned from the digital model's color map. The result is color that's physically part of the figurine's structure—not a coating that could chip or fade.
Can a 3D printed figurine accurately capture brindle or merle patterns?
Absolutely. The technology reproduces complex multi-color patterns with high fidelity. The real challenge is getting reference photos detailed enough for the sculptor to map those patterns accurately onto the 3D model. Close-up shots where you can count individual stripes or see individual spots are essential for these complexats.
Ready to Capture Your Great Dane's True Colors?
You've done the hard part—learning how to photograph your large dog for a figurine that actually looks like them. The right photos make the difference between a generic dog-shaped object and a figurine that stops you mid-step because it captures something true. Whether your Dane is still stealing treats off the counter or lives now only in your memory, those colors and patterns deserve to be preserved with accuracy.
Create Your Custom Pet Figurine →
Visit pawsculpt.com to explore the full process, see examples, and learn about current turnaround times and guarantees.
