How to Photograph a Hyper Boxer and Pick the Resin Finish That Flatters Its Face
Roughly a third of a second. That's all the time a phone's autofocus needs, and all the time a boxer needs to ruin the shot—mid-spin, ears flying, in a dusty shaft of attic light. If you've ever tried to photograph an energetic dog like this, you already know the feeling.
Quick Takeaways
- Shoot after exercise, not before — a pleasantly tired boxer holds a pose your shutter can actually catch.
- Light reveals a boxer's face — sidelight pools in the wrinkles and defines the dark mask far better than flat overhead light.
- Finish is not cosmetic — the right resin finish controls how light reads your dog's expression, so explore the finish options at pawsculpt.com before deciding.
- Eye-level, fast shutter, multiple angles — three habits that turn chaotic photos into a usable sculpt reference.
- High gloss can flatten a brachycephalic face — counterintuitively, a softer finish often preserves more character.
Why a Boxer Is the Hardest Easy Dog to Capture
There's a particular cruelty in trying to hold still something that was built to move.
A boxer is muscle wearing a thin coat. The breed matures slowly—the American Kennel Club describes them as staying playful and "puppyish" well into adulthood, sometimes for three years or more, which is part of why they earned the nickname the Peter Pan of dogs. That energy isn't a phase you wait out. It's the dog. And it's exactly what you're trying to keep.
So here's the thing most photography guides miss when they talk about how to photograph an energetic dog: the goal isn't a perfect action shot. The goal is a usable one. Those are not the same thing.
A blurry mid-leap photo might thrill you for an afternoon. But if you ever want that moment turned into something permanent—a print, a portrait, or a boxer figurine—a frozen blur gives an artist almost nothing to work with. The leap is the feeling. The face is the dog.
"Energy lives in the photo. Identity lives in the face. The best reference captures both, but never sacrifices the second for the first."
We've worked with thousands of pet families, and the single most common regret we hear isn't "I wish I'd caught him jumping." It's "I have a thousand photos and not one good one of his actual face." Boxers are so expressive, so constantly doing something, that owners rarely stop to take the quiet, head-on portrait. The dog is always a verb.
That gap is where this whole guide lives.
The mortality nobody mentions while the dog is bouncing
Let's be honest about why this matters more than camera settings.
You photograph the energy now because energy is the thing that fades first. The bounce softens. The gray creeps into the muzzle—and on a fawn boxer, that gray arrives early and visible, around the lips and chin. The dog who couldn't sit still becomes the dog who sleeps in the warm square of floor by the window.
There's a word the Japanese use, mono no aware, for the tender ache of knowing a beautiful thing is passing even while you're inside it. Every boxer owner feels this without a name for it. You're laughing at the zoomies and grieving them in the same breath.
A good photo is how you argue with time. A good sculpt is how you win, a little.
How to Photograph an Energetic Dog (Without Losing Your Mind)
Forget the idea that you need professional gear. You don't. What you need is a plan that respects how a boxer's brain works.
Tire the dog out first—this is the whole secret
The mistake most people make is photographing a fresh, wired boxer and then fighting for control.
Do the opposite. Take your dog on a real walk or a hard game of fetch first. A pleasantly tired boxer will still look bright-eyed and alert (you want that spark in the eyes), but they'll hold a sit-stay for the two seconds you need. We're not talking about an exhausted dog with droopy eyes. We mean the sweet spot maybe 20 minutes after exercise, when the edge is off but the personality's still on.
So what? Because sharpness is everything for a reference photo. A camera freezes a calm dog cleanly. It smears a vibrating one into mush, and mush can't be sculpted.
One quick caution, and we'll be real about it: boxers are brachycephalic, meaning that flat, adorable face comes with a shortened airway. Don't exercise them hard in heat. PetMD's guidance on brachycephalic breeds is worth a read—overheating is a genuine risk, not a maybe. Photograph in the cool of morning or evening.
Get down to their level—always
Stand up, point your phone down at your dog, and you'll get a distorted, big-nosed, small-bodied cartoon. Every time.
Kneel. Lie on the floor. Put the lens at the height of your boxer's eyes or just slightly below. Suddenly the chest looks powerful, the head reads in correct proportion, and that noble brachycephalic profile finally looks like your dog instead of a fisheye joke.
This single change improves more reference photos than any other tip we give. It costs nothing. It just costs your dignity on the kitchen floor.
Chase the light, not just the dog
Here's where the craftsman in us gets excited, because light is the entire game.
Flat, overhead light—midday sun, a ceiling fixture—erases a boxer's best features. The forehead wrinkles, the muzzle break, the depth of the chest: all of it goes invisible when light hits from straight above. The dog looks pasted onto the photo.
Soft sidelight does the opposite. Light coming from a window to the side rakes across the face and pools shadow into every wrinkle and fold. It carves the muzzle out of the flatness. On a brindle coat, sidelight makes the tiger-stripe pattern shimmer; on a fawn, it warms the coat to honey.
"You're not photographing a dog. You're photographing the way light falls on a dog. Learn that, and everything changes."
We call this raking light, and it's the same technique we use later in the studio to inspect a finished sculpt for flaws. Light low and from the side reveals topography. Remember that phrase. It comes back.
The settings that actually matter
If you're using a phone, you have more control than you think.
- Burst mode is your best friend. Hold the shutter and fire 20 frames. With a moving boxer, you're not taking a photo—you're harvesting one good one from a flurry.
- Tap to lock focus on the eyes. Sharp eyes forgive a lot. Blurry eyes ruin everything.
- Use a fast shutter if your phone allows it. In Pro or manual mode, 1/500 of a second or faster freezes most boxer chaos. The trade-off is you need more light to do it, which loops back to shooting near a bright window.
- Skip the digital zoom. It throws away detail. Move your feet instead.
Below is the cheat sheet we wish every customer had before their first photo session.
| Element | What to Aim For | Why It Matters for a Sculpt |
|---|---|---|
| Angle | Eye-level or slightly below | Correct proportions; no distorted muzzle |
| Lighting | Soft sidelight from a window | Reveals wrinkles, mask, and muscle depth |
| Focus | Locked on the eyes | Eyes anchor the whole likeness |
| Shutter | 1/500s or faster | Freezes motion into usable sharpness |
| Coverage | 8–12 photos, multiple angles | Gives the artist a true 3D understanding |
| Background | Plain, contrasting | Separates the dog from clutter |
Why one perfect photo is a trap
Here's the counterintuitive part. Even a flawless single photo is a weak reference.
A 3D artist isn't copying a picture. They're rebuilding a three-dimensional animal from two-dimensional clues. One photo, no matter how gorgeous, hides half the dog—the far ear, the depth of the chest, the way the tail sets, the slope of the back. The artist ends up guessing, and guesses are where likenesses go to die.
Give us the dog from several sides instead. A front face. A clean profile. A three-quarter view (this one's gold—it shows depth and width at once). A shot from above to read the back and shoulders. Throw in a couple of casual full-body shots so the proportions stay honest.
The math is simple: more angles, fewer guesses, better likeness. A handful of decent photos beats one stunning one, every single time.
From Photo to Sculpt: What Our 3D Artists Actually See
When your photos land on a digital sculptor's screen, something interesting happens. They stop seeing a cute dog and start seeing a problem to solve in space.
This is the part of the process almost nobody explains, so let's pull back the curtain.
The photo-to-sculpt workflow, plainly
Our process begins with digital sculpting—master 3D artists hand-model your pet inside professional software like ZBrush or Blender. Think of it as building your dog out of digital clay, pushing and pulling a virtual surface with thousands of tiny adjustments. Nothing is cast or scanned from your photos. It's modeled, fresh, from the ground up.
The artist starts with proportion. They block in the big masses—skull, chest, hindquarters—and constantly cross-check them against your reference photos. Is the head one-third of the body length or one-quarter? Where exactly does the chest reach its widest? A boxer's silhouette is distinctive, and getting these ratios wrong reads as "not my dog" instantly, even when every detail is technically present.
Then comes coat flow. A boxer's coat is short and smooth, which sounds easy and absolutely is not. Short coats hide nothing. There's no fluffy fur to forgive a lumpy underlying form. Every muscle, every tendon, the line of the jaw—it all shows. The artist has to sculpt the anatomy correctly, because the coat is basically transparent to it.
"A long-haired dog forgives you. A boxer audits you. Every muscle has to be right because the coat hides nothing."
The details that make it your boxer
We've learned that recognition lives in tiny, specific places.
- The mask. That dark fawn or near-black face marking has a specific shape and edge on every individual. Get the mask's borders right and the whole face clicks into place.
- The wrinkle map. Boxers have a personal arrangement of forehead and muzzle wrinkles. They're as unique as a fingerprint.
- The white flashing. The blaze, the chest, the socks—their exact pattern is a signature. We model these precisely from your photos.
- The expression. The set of the brow, the slight underbite of the jaw, the tilt that says worried or delighted. This is the soul of the thing, and it's why we ask for photos that show the real face, not just the action.
This is also why we said tire the dog out. A panting, tongue-flapping boxer mid-run gives us a distorted mouth and squinted eyes. A calm, alert head study gives us the truth.
The Boxer's Face Problem—and the Finish That Flatters It
Now we get to the heart of it, and the part that genuinely surprises people.
Most folks assume a glossier figurine is a better figurine. Shinier equals more premium, right? For a boxer, that assumption can quietly sabotage the very face you paid to preserve.
Let's slow down and explain why, because this is the resin finish choice that matters most and the one almost no guide discusses.
Light is how a face becomes legible
Remember raking light from earlier? It applies here, in reverse and at full force.
A boxer's character lives in topography—the folds, the muzzle break, the dark mask, the deep-set eyes. You read that face by reading the shadows that gather in its valleys. Shadow is information.
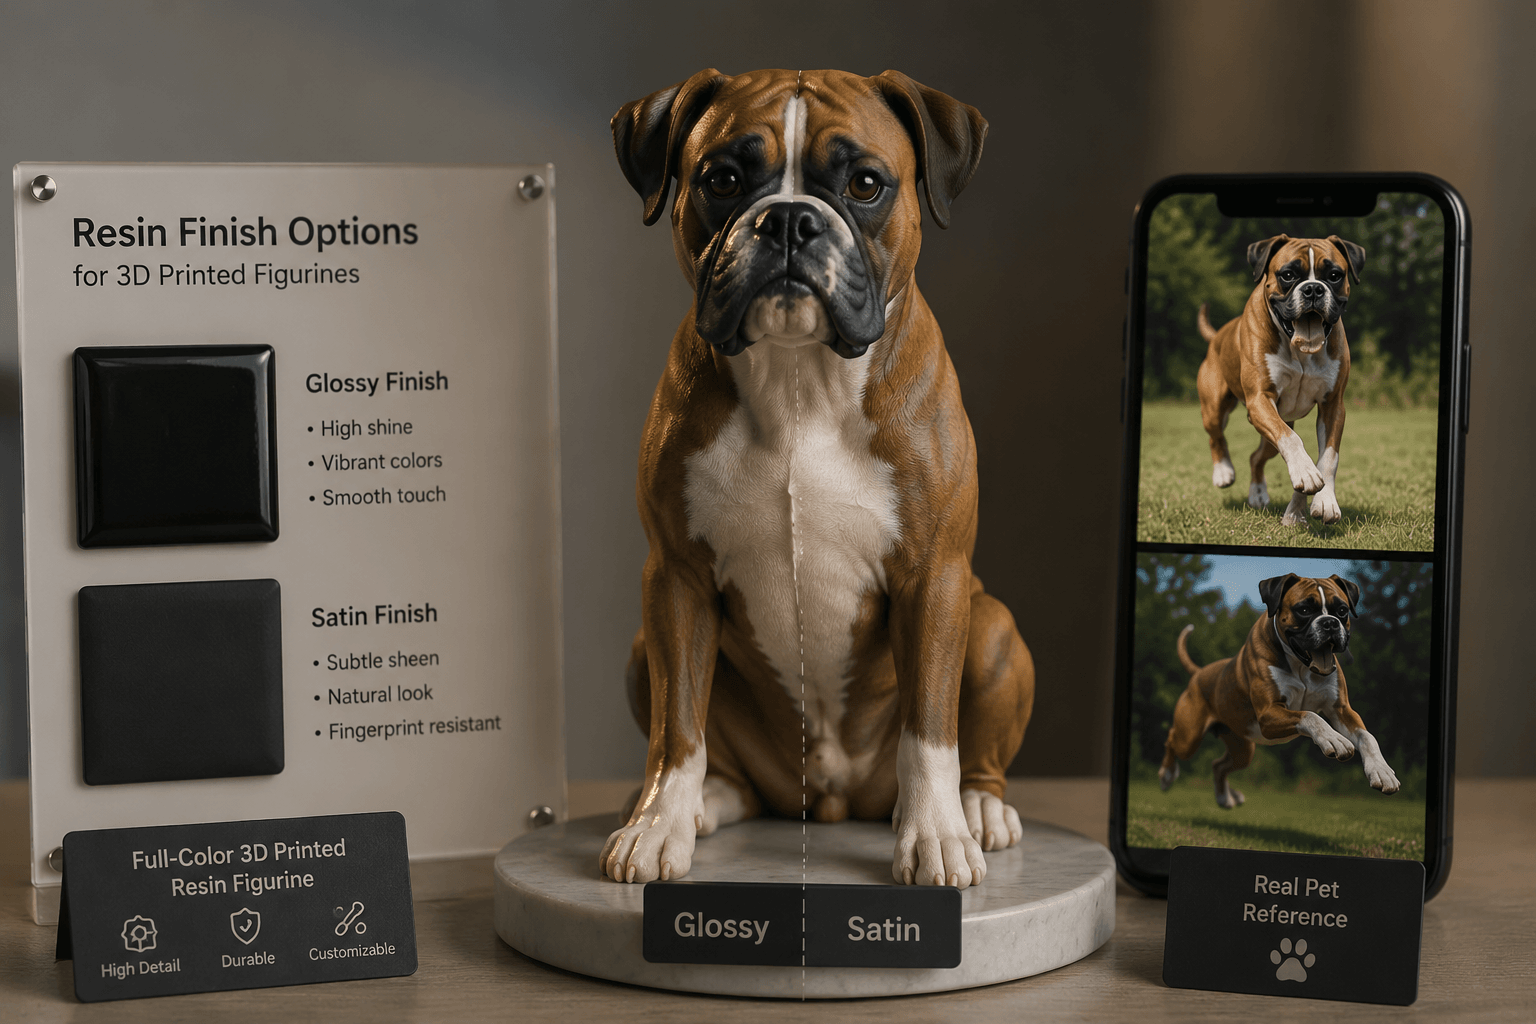
A high-gloss finish acts like a mirror. It throws specular highlights—those bright hot spots—across the surface, and on a small sculpt those highlights can blow out the wrinkles, flatten the mask into a shiny smear, and bounce light into the very shadow pockets that defined the expression. You end up with a beautiful, gleaming object that somehow reads less like your dog.
A satin or matte finish scatters light softly. It lets shadow stay in the folds where it belongs. The face keeps its depth. The mask stays readable. The dog stays the dog.
"Gloss makes plastic look expensive. The right finish makes a dog look alive. Those are different jobs."
This is the counterintuitive insight we wish every customer knew going in: for a dark-masked, wrinkled, brachycephalic breed, more shine often means less likeness. The flatter, more characterful the face, the more a softer finish tends to flatter it.
When gloss actually wins
We're not anti-gloss. There's a time for it.
A satin or light-gloss finish can make a brindle coat sing. Those tiger stripes have depth, and a touch of sheen gives them a wet-coat vibrancy that looks fantastic, especially across the broad muscle of the shoulders and back. The trick is contrast: a slightly glossier body with a more restrained face. That separation reads as natural, because a real dog's nose and eyes catch light differently than its dry coat does.
A fully fawn boxer, by contrast, usually looks richest with an even satin across the whole piece—enough to warm the color without throwing harsh highlights.
Here's how we think about it on the shop floor.
| Finish | How Light Behaves | Best For | Watch Out For |
|---|---|---|---|
| Matte | Scatters fully, no hot spots | Maximum wrinkle and mask detail | Can mute coat color slightly |
| Satin | Soft, controlled sheen | Most boxers; balanced realism | The reliable all-rounder |
| Light gloss | Gentle highlights | Brindle coats, muscle depth | Use sparingly on the face |
| High gloss | Mirror-like, strong highlights | Display drama, dark coats | Can flatten facial detail |
A quick honest note: finish names and exact options vary, and the best call often depends on your specific dog's coat and color. When in doubt, ask. You can walk through the finish choices with our team at pawsculpt.com rather than guessing.
"Every wrinkle on a boxer's face is a sentence. Our job is to make sure the light lets you read all of them."
— The PawSculpt Team
The Craft Behind the Resin: How a Full-Color 3D Print Actually Happens
People hear "3D printed" and picture a flimsy gray plastic trinket from a hardware-store machine. What we do shares a name with that and almost nothing else. Let's walk through it like the manufacturing process it actually is, because understanding the craft helps you appreciate the object on your shelf.
Myth vs. Reality
Before the technical part, let's clear out three misconceptions we hear constantly.
Myth: "It's hand-painted, so the colors must be applied by an artist with a brush."
Reality: There are no brushes. The color is printed directly into the resin, voxel by voxel—a voxel being a 3D pixel, a tiny cube of material with its own color baked in. Your dog's fawn, its dark mask, its white blaze: all of it is part of the material itself, not a coating sitting on top.
Myth: "A shinier figurine is always a higher-quality one."
Reality: As we just covered, finish is a tool, not a grade. The right finish for the face beats the shiniest finish every time.
Myth: "3D printing means it's mass-produced and identical."
Reality: Every sculpt is hand-modeled digitally from your specific photos. The printer is the press; the artistry is in the model. No two orders are the same because no two dogs are.
Step one: digital sculpting
We covered this above, but it bears repeating in context. Before anything physical exists, your boxer lives as a digital model—hand-modeled by master 3D artists, then prepared for full-color printing. This is where likeness is won or lost. The machine can only print what the artist built.
Step two: full-color resin printing
Once the model is approved, it goes to a full-color 3D printer that builds the figurine up in extraordinarily thin layers of UV-cured photopolymer resin—a liquid plastic that hardens when hit with ultraviolet light. Layer heights in this kind of work typically land somewhere in the 25–50 micron range (a micron is a thousandth of a millimeter), which is finer than a human hair. That's how we get smooth muscle transitions and crisp wrinkle edges.
What makes our process special is that the color goes in during printing. The pigment is embedded in the resin as each layer forms. The result is vibrant, continuous color that's part of the material's body, not a skin that can chip off the surface.
A few things a practitioner watches for at this stage:
- Orientation. How the model sits on the build platform matters enormously. Tilt it well, and the most visible surfaces—the face, the chest—come out cleanest. Tilt it poorly, and support marks land right on the muzzle. Choosing orientation is half art, half hard-won habit.
- Supports. Overhangs (an outstretched paw, a lifted tail) need temporary scaffolding so they don't sag mid-print. The skill is placing supports where their removal scars won't show.
- Hollowing and drain holes. Larger pieces are often partly hollow to save material and reduce internal stress, with small drain holes so uncured liquid resin can escape. Trapped resin causes problems down the line—it can leak, or cure unevenly and warp the piece.
Step three: post-processing (and the one manual touch)
Fresh off the printer, a piece isn't done. It goes through a careful sequence.
- Washing removes uncured resin from the surface.
- Curing under controlled UV finishes hardening the material. Here's a real trade-off: under-cure and the resin stays slightly soft and can warp; over-cure and it gets brittle and can grow fragile at thin points like ears or tails. Good curing is a Goldilocks problem.
- Support removal and gentle sanding cleans up the contact points. We inspect for support pitting—tiny surface marks where scaffolding met the model—and smooth them.
- Clear coat application. This is the only manual finishing step, and it's where your boxer figurine finish is decided. A protective clear coat—matte, satin, or gloss—is applied to seal the surface, guard the color against UV fading over the years, and set the final sheen. This is the lever that controls how light reads your dog's face.
That clear coat does double duty: protection and presentation. It's why your figurine keeps its color on a sunny windowsill, and it's why the finish conversation we had earlier isn't decoration—it's the final, deciding brushless touch.
Step four: quality control under raking light
Here's where that phrase returns one last time.
Before a piece ships, we inspect it under raking light—a light placed low and to the side, skimming across the surface. The same trick that reveals a boxer's wrinkles in a photo reveals any flaw in a print: a stray support mark, an uneven layer, a soft spot from curing. Topography hides nothing under a raking light. We check dimensional accuracy, symmetry of the face and limbs, and surface smoothness.
The natural resin surface keeps a faint, fine grain—a whisper of layer texture under the clear coat. We consider that a feature, not a flaw. It's honest. A figurine that's too perfect looks like a factory toy. A little real texture is what makes it feel like an object that someone made, on purpose, of your dog.
What to Expect When You Order
We won't pretend to give you exact timelines or prices here, because those shift and we'd rather you get current details straight from the source. But we can walk you through the shape of the journey so nothing feels like a black box.
| Stage | What's Happening | Your Role |
|---|---|---|
| Photo submission | You send reference images | Use the angle and lighting tips above |
| Digital sculpting | Artists hand-model your pet in 3D | Review and request adjustments |
| Preview & revisions | You see the model before printing | Speak up—this is the moment to refine |
| Full-color printing | The approved model is printed in resin | Sit tight |
| Post-processing & finish | Curing, support removal, clear coat | Confirm your finish preference |
| Quality check & ship | Raking-light inspection, packing | Wait by the door |
The preview stage is the one we'd underline. You see and approve the digital model before a single drop of resin is printed. That's your safety net—the time to say "the mask should be darker" or "her ears sit a little higher." For current turnaround, revision details, and the guarantee, check the FAQ at pawsculpt.com. We'd rather you have accurate, up-to-date answers than numbers we made up in a blog post.
Caring for your figurine
These pieces are durable, but they're not indestructible. A little care keeps them looking right for decades.
- Dust with a soft, dry brush or microfiber cloth. No harsh chemicals—they can dull or cloud the clear coat.
- Keep it out of direct, blazing sun. The materials are UV-resistant, but no pigment is immortal under years of full sun. A shelf with indirect light is ideal.
- Avoid extreme heat. Don't leave it in a hot car or on a radiator; cured resin can soften at high temperatures.
- Handle thin parts gently. Ears and tails are the most fragile points on any sculpt, boxer or otherwise.
The Quiet Reason This Matters
Step back from the technical for a moment.
You started reading this because you wanted to photograph a dog who won't sit still. But underneath that practical itch is something older and heavier. You're trying to keep a creature who is, by nature, temporary. The boxer who fills your whole house with motion right now will one day be a still photograph and a memory and an ache in the chest when you reach for a leash out of habit.
That's not morbid. That's love, doing its honest accounting.
A photograph holds the light of a single instant. A sculpt holds the shape of the whole animal—something you can pick up, turn in your hands, set where the afternoon sun touches it. Some families plant a tree. Some keep a collar in a drawer. And some choose a tangible keepsake, a custom pet figurine that keeps the muscle and the mask and the mischief in three dimensions, long after the zoomies are only a story you tell.
Frequently Asked Questions
How do you photograph an energetic dog like a boxer?
Tire them out with a light walk or fetch first, then shoot during that calm-but-alert window about 20 minutes later. Get down to eye level, use burst mode with a fast shutter (1/500s or quicker), and lock focus on the eyes. Soft sidelight from a window does the heavy lifting on the face.
What photos work best for a custom pet sculpt?
Coverage beats perfection. Send a front face, a clean side profile, a three-quarter angle, and a shot or two from above, plus a couple of full-body images for proportion. The best photos for a pet sculpt are sharp, eye-level, and lit from the side so the artist can read the dog in three dimensions.
Which resin finish flatters a boxer's face?
For most boxers, a satin finish wins. It controls those bright highlights and keeps shadow in the wrinkles and the dark mask, which is where the breed's character lives. High gloss looks dramatic but can flatten the very facial detail that makes your dog recognizable. A light gloss can work beautifully on a brindle body.
Are the figurines hand-painted?
No—and this is the part that surprises people. The color is printed directly into the resin, voxel by voxel, during the 3D printing itself. There's no brushwork. The only manual finishing touch is a protective clear coat, which also sets your chosen sheen.
How long does a custom figurine take, and what does it cost?
These details change, so we'd rather point you to the current source than guess. Visit pawsculpt.com for up-to-date turnaround times, pricing, revision details, and the quality guarantee.
Will the colors fade over time?
Because the color is embedded in the material rather than coated on top, it holds up far better than surface paint would. A UV-resistant clear coat adds protection. Keep your figurine out of direct, blazing sunlight and it should keep its color for many years.
Ready to Celebrate Your Pet?
Every pet has a story worth preserving. Whether you're honoring a beloved companion who's crossed the rainbow bridge or celebrating your boxer's unstoppable, floor-shaking energy, a custom PawSculpt figurine captures the details that make your dog one-of-a-kind—the mask, the wrinkles, the mischief in the eyes. Once you've learned to photograph an energetic dog the right way, you're already holding the blueprint for something permanent.
Create Your Custom Pet Figurine →
Visit pawsculpt.com to learn more about our full-color 3D printing process, preview and revision options, and our quality guarantee.
