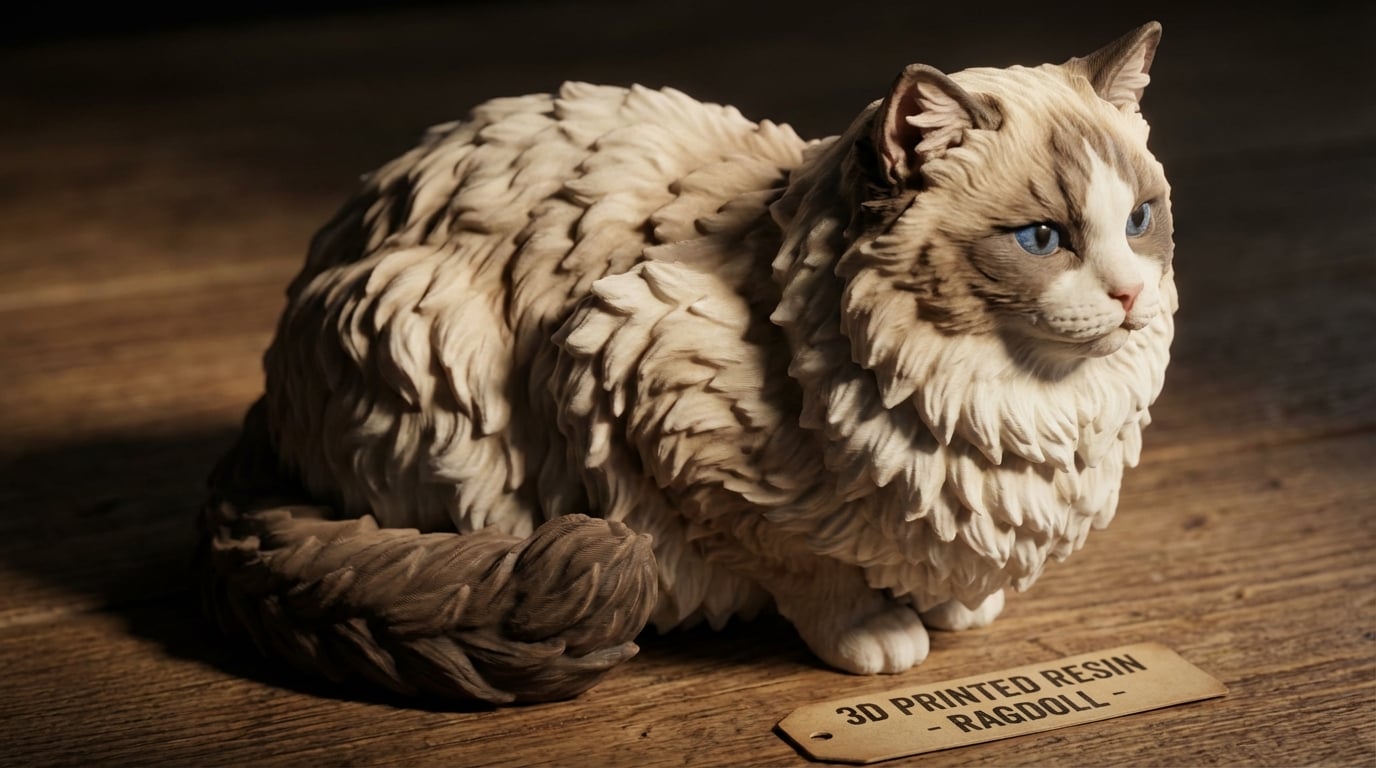
The Ragdoll Owner's Dilemma: 4 Ways to capture 'Fluff' in Solid Resin (And Why It Works Better Than You Think)
The heavy, sweet scent of sun-warmed jasmine always drew Oliver to the corner of the garden where the light hit the flagstones just right. There, his cream-and-slate fur would expand into a magnificent, gravity-defying cloud, a living portrait of ragdoll cat art in motion.
Quick Takeaways
- Texture over literalism — Capturing "fluff" in resin requires strategic digital sculpting of fur clumps rather than individual hairs.
- Light and shadow — High-contrast reference photos help our 3D artists define the depth of a Ragdoll’s dense undercoat.
- Material integrity — Full-color resin provides the weight and permanence that traditional "soft" memorials often lack.
- Preserving the "floof" — Learn how our custom pet figurines use voxel-level detail to replicate complex Ragdoll coat patterns.
The Physics of "Floof": Why Ragdolls Defy Standard Sculpting
In our years working with pet families, we’ve learned that Ragdoll owners face a unique aesthetic challenge. When your cat is essentially 15% feline and 85% airborne silk, how do you translate that ethereal quality into a solid, static object? Most traditional sculptures end up looking like a smooth, painted rock or a jagged, prickly mess.
The mistake most people make is trying to sculpt every single hair. In the world of high-end additive manufacturing, we know that "micro-detail" can actually lead to "visual noise." If a 3D model has millions of tiny, needle-like hairs, the 3D printer’s resolution—typically in the 25–50 micron range—might struggle to resolve them, resulting in a surface that feels like sandpaper rather than fur.
Instead, our digital artists focus on "clumping." Think of it like how a Disney animator draws hair; they look for the large shapes, the way the fur parts at the shoulders, and the heavy "bib" of the Ragdoll’s ruff. By sculpting these organic volumes, we create shadows. And in 3D printing, shadow is what creates the illusion of softness in a hard material.
The Challenge of the "Point" Coloration
Ragdolls are famous for their pointed coats—darker ears, faces, and tails that fade into snowy bodies. In a standard manufacturing setup, achieving this gradient is a nightmare. Hand-painting often leaves a "hard line" where the color changes.However, because we use full-color resin 3D printing, we don't use brushes. Our technology works at the voxel level (a 3D pixel). We can program the printer to transition from a deep seal-point brown to a creamy white over the course of several hundred layers, embedding the pigment directly into the UV-cured photopolymer. This creates a soft, photographic transition that mimics the natural "bloom" of a Ragdoll’s coat.
"A Ragdoll isn't just a cat; it's a cloud with a heartbeat. Capturing that weightlessness in resin is the ultimate test of digital craft."
— The PawSculpt Team
1. Digital Anatomy: Beyond the Surface Fur
One of our customers recently sent us photos of her cat, Mochi, a Blue Lynx Point with a tail like a feather duster. She was worried a figurine would look "too stiff." We explained that the secret isn't just the fur—it's the underlying anatomy.
When our artists begin the photo-to-sculpt workflow, they aren't just looking at the hair. They are looking for the skeletal structure beneath. Ragdolls have a specific, heavy-set "rectangular" body type. If you get the proportions wrong, the fur just looks like it’s draped over a box.
Proportional Checks and Coat Flow
We perform what we call "raking light" inspections on the digital model before it ever touches the printer. We simulate a light source moving around the 3D sculpt to see how the "fur" catches shadows.- The "Ruff" Logic: The fur around the neck must flow downward and outward.
- The Belly Shag: Ragdolls have longer fur on their underbelly. We sculpt this with a slight "heaviness" to suggest the weight of the cat's coat.
- The Hocks: The tufts on the back legs (the "britches") need to show volume without looking like the cat is wearing oversized pants.
| Feature | Sculpting Approach | Why It Matters |
|---|---|---|
| The Bib/Ruff | Layered, overlapping "S" curves | Creates the iconic "lion's mane" look |
| Tail Volume | Tapered cylinders with "flicked" ends | Prevents the tail from looking like a solid log |
| Ear Tufts | Subtle, integrated protrusions | Adds personality without being too fragile to ship |
| Paws | "Toe fluff" integration | Captures the messy, endearing look of Ragdoll feet |
2. The Science of Full-Color Resin Printing
Let's talk shop for a moment. As engineers who have spent over a decade in multi-color additive manufacturing, we’ve seen the evolution from brittle, chalky prints to the high-end photopolymers we use today.
We use a process similar to PolyJet technology. Imagine a high-end inkjet printer, but instead of paper, it’s a tray. Instead of ink, it’s a liquid resin that hardens instantly under UV light. The printer head moves back and forth, depositing microscopic droplets of colored resin.
Why No Hand-Painting?
The "counterintuitive insight" here is that hand-painting actually obscures detail. When you apply a layer of acrylic paint to a tiny sculpture, the thickness of the paint fills in the microscopic crevices of the fur texture. By printing the color into the material, we keep every digital detail sharp.The colors are embedded pigments, meaning they won't flake, peel, or chip off over time. If you were to (heaven forbid) snap the figurine in half, you would see the color goes all the way through the material. This provides a depth of tone that a surface-level paint job simply cannot match.
Tradeoffs: Detail vs. Durability
In the shop, we often discuss the "brittleness vs. toughness" tradeoff. High-detail resins are historically brittle. To counter this, our post-processing includes a specific UV-curing cycle that optimizes the cross-linking of the polymers. This makes your 3d printed cat sturdy enough to handle, though it should still be treated like the fine collectible it is. It’s not a toy; it’s a museum-grade recreation.3. Post-Processing: The "Glow" Factor
Once the printer finishes its 8-to-12-hour journey, the figurine emerges encased in a "support material"—a waxy substance that holds up overhanging parts (like the chin or tail) during the build.
The Cleaning Ritual
We don't just rip the supports off. That would leave "pitting" or "scars" on the surface. We use a combination of pressurized water and manual refining to dissolve the supports. 1. Initial Wash: Removing the bulk of the support wax. 2. Fine Sanding: We use high-grit pads to smooth out any "stair-stepping" (the tiny lines visible from the 3D printing layers). 3. Secondary Cure: The model goes back into a UV chamber to ensure the core is fully stabilized.The Clear Coat: Our Only Manual Step
While we don't paint, we do apply a professional-grade clear coat. This is where the "Artistic Perspective" really shines. We use a matte finish for the body to keep the fur looking soft and natural, but we often apply a subtle gloss to the nose and eyes. This "captures the light" and gives the figurine that "spark of life" that makes you feel like your cat is looking back at you."Grief isn't a problem to be solved. It's a love story that continues after the last chapter."
4. The Ragdoll Owner's Dilemma: Accuracy in Marking
Every Ragdoll has a "thumbprint"—a specific smudge of grey on the nose, or a white "mitten" that's slightly higher on the left paw than the right.
In our experience, the hardest part for owners isn't the shape; it's the markings. This is why we offer unlimited revisions. Our digital workflow allows us to tweak the "texture map" (the digital skin of the model) based on your feedback. If the "blaze" on your cat's face is too wide, we don't have to start over. We simply adjust the digital files and re-align the color voxels.
What Photos Work Best?
To get that perfect ragdoll cat art result, we usually ask for:- Eye Level: Photos taken at the cat's level, not looking down.
- Indirect Sunlight: This shows the true color of the "points" without washing them out.
- The "Under-Fluff": A shot of the chest and belly so we can see how the fur layers.
| Photo Quality | Impact on Figurine | Pro Tip |
|---|---|---|
| Low Res / Blurry | "Muddy" color transitions | Use "Portrait Mode" on your phone for better depth |
| Flash Photography | Red-eye and flat fur texture | Turn off the flash; use a window for natural light |
| Multiple Angles | Accurate 360-degree markings | Don't forget the tail and the back of the ears! |
Capturing the "Texture of Memory"
Look, we'll be real: a figurine isn't a replacement for the weight of a 15-pound cat "flopping" across your lap. But there is something profound about the tactile nature of a custom pet figurine.
We've worked with thousands of families who found that having a physical object to touch—something that reflects the light the same way their pet did—provides a unique kind of comfort. It's a "tangible anchor" for the memories that start to feel a bit too airy over time.
What actually helps more than just looking at photos is having a three-dimensional presence in the room. When you walk past the bookshelf and see the specific curve of your Ragdoll's tail, it triggers a different part of the brain than a flat image on a screen. It’s about preservation in the most literal sense.
"The best gifts don't just sit on a shelf—they start conversations and spark memories."
— The PawSculpt Team
Frequently Asked Questions
How do you make the fur look soft if it is made of resin?
We use a technique called "organic clumping" in our digital sculpting phase. By creating varied depths and "valleys" in the fur texture, we create natural shadows. When finished with a professional matte coat, the resin absorbs light rather than reflecting it harshly, which gives the visual illusion of soft, dense Ragdoll fur.Can you match my Ragdoll's specific eye color?
Absolutely. Because we use full-color resin 3D printing, we aren't limited by a palette of paint. We can replicate the specific "ice blue" or "violet-blue" characteristic of the breed by programming the exact CMYK values into the print file.How long does the 3D printing process take?
The physical print usually takes 8 to 12 hours, but the entire journey—from digital sculpting and your 7-day preview to the final UV-curing and clear-coating—typically takes 3 to 6 weeks. This ensures that every quality control check, from dimensional accuracy to surface finish, is met.Is the color going to fade over time?
Unlike hand-painted items where the pigment sits on the surface and can be scratched or bleached by the sun, our colors are part of the material itself. Combined with a UV-resistant clear coat, these figurines are designed to last a lifetime without losing their vibrancy.What if the 3D model doesn't look like my cat?
This is why we have a "Preview First" policy. You'll receive a 360-degree digital render of your 3d printed cat before we ever hit "start" on the printer. You can request unlimited changes to the shape, the markings, or the pose until it feels exactly like your pet.Ready to Celebrate Your Pet?
Every pet has a story worth preserving, and for the Ragdoll owner, that story is told through every silken tuft and sapphire glance. Whether you're honoring a beloved companion who's crossed the rainbow bridge or celebrating your furry friend's unique personality, a custom PawSculpt figurine captures those details that make your pet one-of-a-kind. Our advanced technology ensures that your ragdoll cat art is more than just a model—it's a lasting tribute.
Free instant AI preview • 3D artist preview within 7 days • 5 free revisions
